
ST EMLYN’S · MLA REVISION GUIDE
System examination
01 / CHAPTER 6
Prepare, examine and interpret
This chapter is for medical students learning to examine patients and preparing for the CPSA. Work towards a safe, structured examination: recognise important findings, explain a short differential diagnosis, suggest sensible next steps and know when to ask for help. These expectations sit within the GMC outcomes for newly qualified doctors.
Your medical school sets and runs its clinical and professional skills assessment. Follow its station instructions and timings. The sequences and paired cards here are practice aids, not an official mark scheme. Use a sequence to answer the clinical question, adapting it to the patient’s symptoms and condition.
Introduce yourself as a student when that is your actual role, confirm identity, explain the purpose and extent of the examination and obtain consent. Ask about pain and urgent symptoms, perform hand hygiene and use appropriate protective equipment. Provide communication support, privacy and suitable exposure, keeping the patient covered elsewhere. Position them comfortably and explain that they can ask you to stop. Offer a trained chaperone for an intimate examination and record the discussion; a friend or relative is not automatically an appropriate clinical chaperone. GMC guidance on intimate examinations and chaperones.
On placement, agree the examination and supervision with the responsible clinician. They should obtain the patient’s consent to your involvement; patients may decline without affecting their care. Check permission as you proceed and work within your experience. The GMC guidance on patient safety in student placements explains these responsibilities.
In a simulated station, check what may be performed and what should be described. Do not undertake an uncomfortable or intimate manoeuvre simply to lengthen the examination. On a patient, an unfamiliar or intimate examination needs an agreed indication, consent and appropriate supervision.
Practise with a partner
Choose a system below, read its clinical notes and open the MLA paired practice card beside it. One learner performs; the other checks the steps and gives feedback. Then swap roles. Use a consenting partner for comfortable, non-invasive techniques and a clinical skills model for intimate examination. Rehearse unfamiliar techniques with a supervisor.
After feedback, repeat the part that needs work. End by summarising the findings, explaining what they might mean and stating what you would discuss with the responsible clinician.
Finish with a reasoned conclusion
Restore comfort, offer help with dressing and thank the patient. Present the positive findings and relevant negatives, your interpretation and any limitations. Propose further examination or investigations because they answer a question, not because they appear on a memorised completion list. State an important uncertainty and the help needed to resolve it. If you recognise a serious finding, communicate it promptly rather than waiting for the end of a routine.
Infographics and videos
Nick Smith’s original St Emlyn’s examination infographics and demonstration videos remain available alongside the relevant systems. Use them to support supervised practice. The written notes explain important qualifications; older media need to be read in that context and do not establish clinical competence.
Examination illustrations and demonstrations by Nick Smith.
02 / CHAPTER 6
Cardiovascular
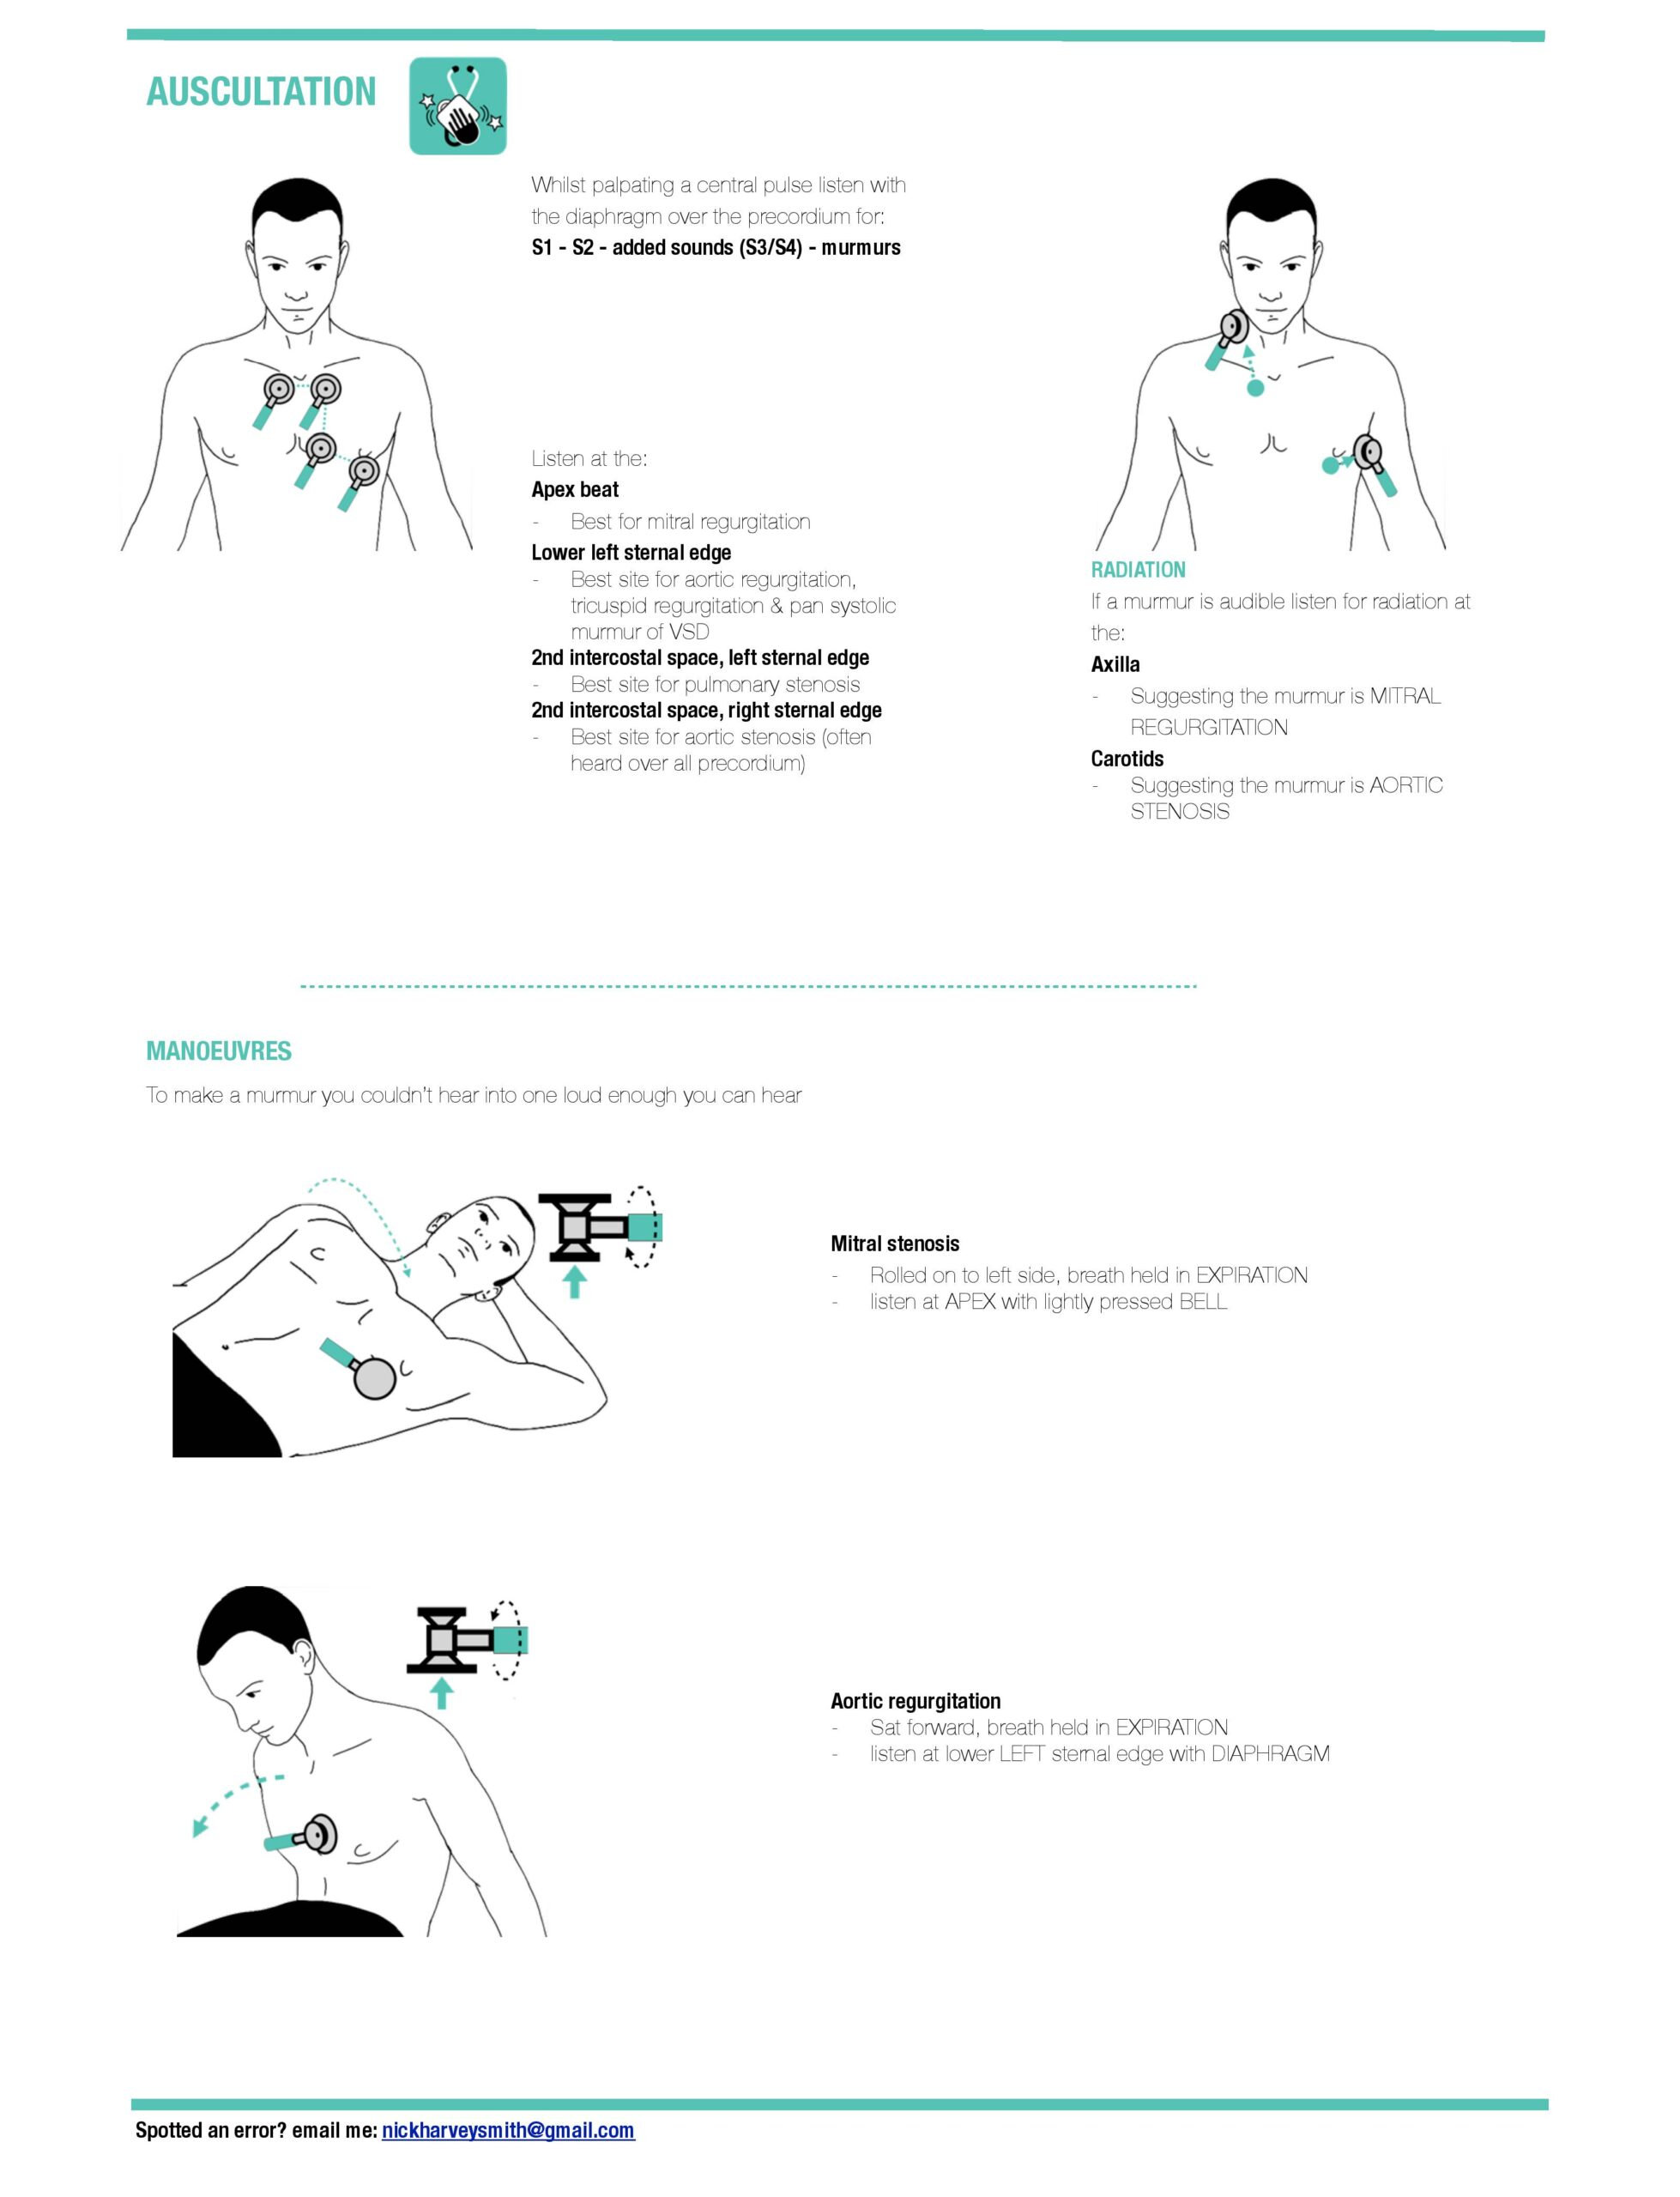
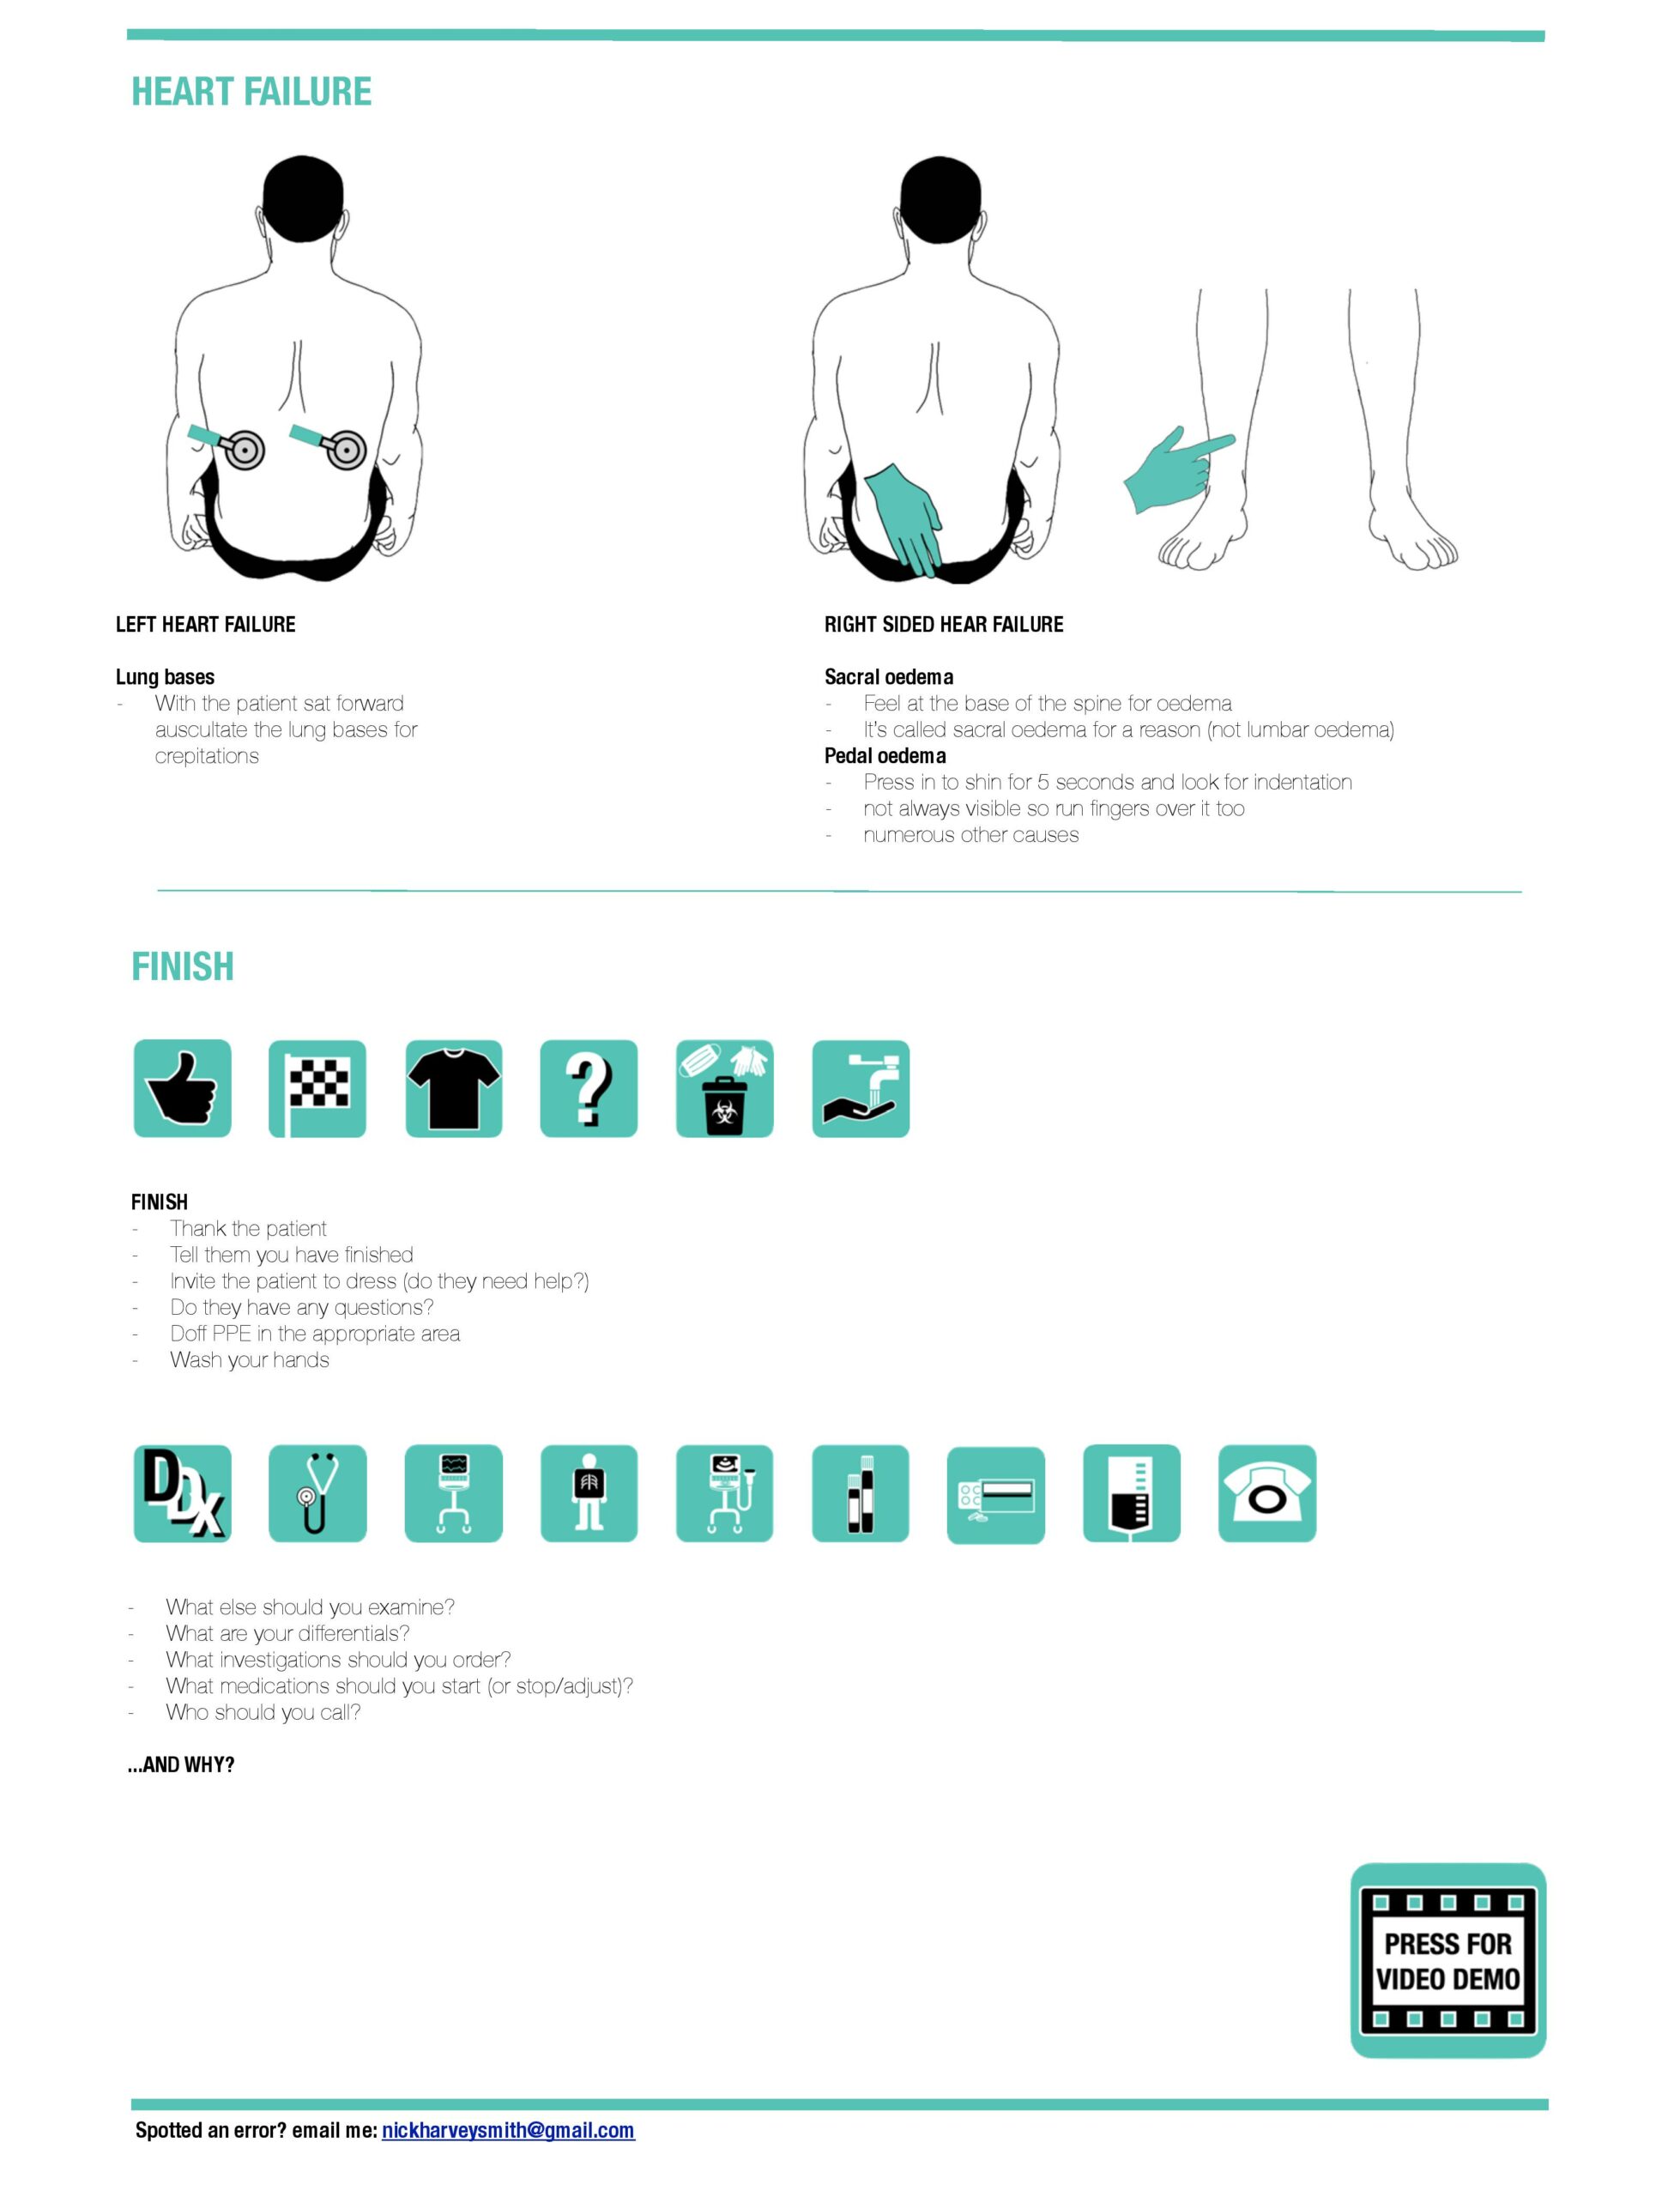
Begin with the patient’s symptoms and current observations. Breathlessness at rest, chest pain, syncope or poor perfusion may require immediate assessment before a full examination. Look at the person and their surroundings, then examine the pulse, peripheral signs, neck veins and precordium. Common findings such as oedema need interpretation in context; a single peripheral sign does not establish a diagnosis.
Inspect, palpate and auscultate; connect the findings to haemodynamics.
Cardiovascular: sequence and example phrases
Introduction
Use the preparation and consent approach above, adapted to this examination. Introduce yourself by your actual role and agree supervision. Explain what you need to examine, ask about pain and keep the patient involved as you proceed.
Brief history
“Can you briefly tell me why you have come to hospital?”
General inspection
“I am looking at the…”
Patient’s
- comfort level; respiratory distress
- body habitus
- dysmorphic features
- scars (sternotomy or pacemaker)
Environment
- oxygen
- GTN spray
- walking aids
Hands and other observations
“I am feeling for…”
- warmth
- clamminess
- the pulse (rate; rhythm; quality)
“I am looking for…”
- clubbing
- tar staining
- peripheral cyanosis
- features of endocarditis (e.g. Janeway lesions)
- signs of aortic regurgitation (e.g. head bobbing)
Other observations
- Blood Pressure
- Respiratory Rate
- Oxygen saturations
- Temperature
- Blood glucose when clinically indicated
Neck
“I am looking for…”
- Carotid pulse (one side at a time; never compress both carotids together): "I am going to feel the pulses in your neck in turn to assess their quality"
- Jugular venous pressure:
- "I will start with the bed at about 45 degrees and adjust it to see the venous pulsation clearly.
- Please turn your head to the left and relax head on the pillow.
- If helpful, and with your permission, I will apply gentle sustained abdominal pressure while watching the neck veins (abdominojugular reflux).
- I am measuring the vertical height of the venous pulsation above the sternal angle, in centimetres, and recording your position."
Face
“I am looking for evidence of…”
- Corneal arcus and xanthelasma
- Conjunctival pallor (“Please look up; I will gently lower your bottom eyelids.”)
- Central cyanosis
- Angular stomatitis of lips
Precordium
Inspection: “I have already commented on.”
"I am palpating…”
- the central capillary refill time
- the apex beat: identify its actual position; normally near the fifth intercostal space in the midclavicular line
- each valve area for heaves and thrills of palpable murmurs
No percussion
"I am auscultating the…”
- carotids for bruit or radiation of aortic stenosis
- all the heart valves with bell and diaphragm
- for murmurs (including manoeuvres to assess for murmurs as indicated by findings)
Additional
“Please can you…”
- lean forward so I can listen to your lungs and press on your lower back to assess for oedema
- lie flat so I can assess for hepatomegaly
- lift your trousers above your knees so I can look for peripheral oedema
Close
Restore the patient’s comfort and privacy, thank them and summarise your actual findings. Use the interpretation below to explain the next steps and discuss them with the responsible clinician.
Further reading
Interpret and present your findings
Describe pulse rate and rhythm, blood pressure, the position of the apex, heart sounds and any murmur by timing, location and radiation. Connect these with perfusion, venous pressure and signs of congestion. For example, breathlessness with a raised JVP, basal crackles and peripheral oedema supports a congestive picture, but you still need the history and appropriate investigations to establish its cause. Select ECG, chest imaging or blood tests for that question, and communicate an unstable patient’s needs immediately.
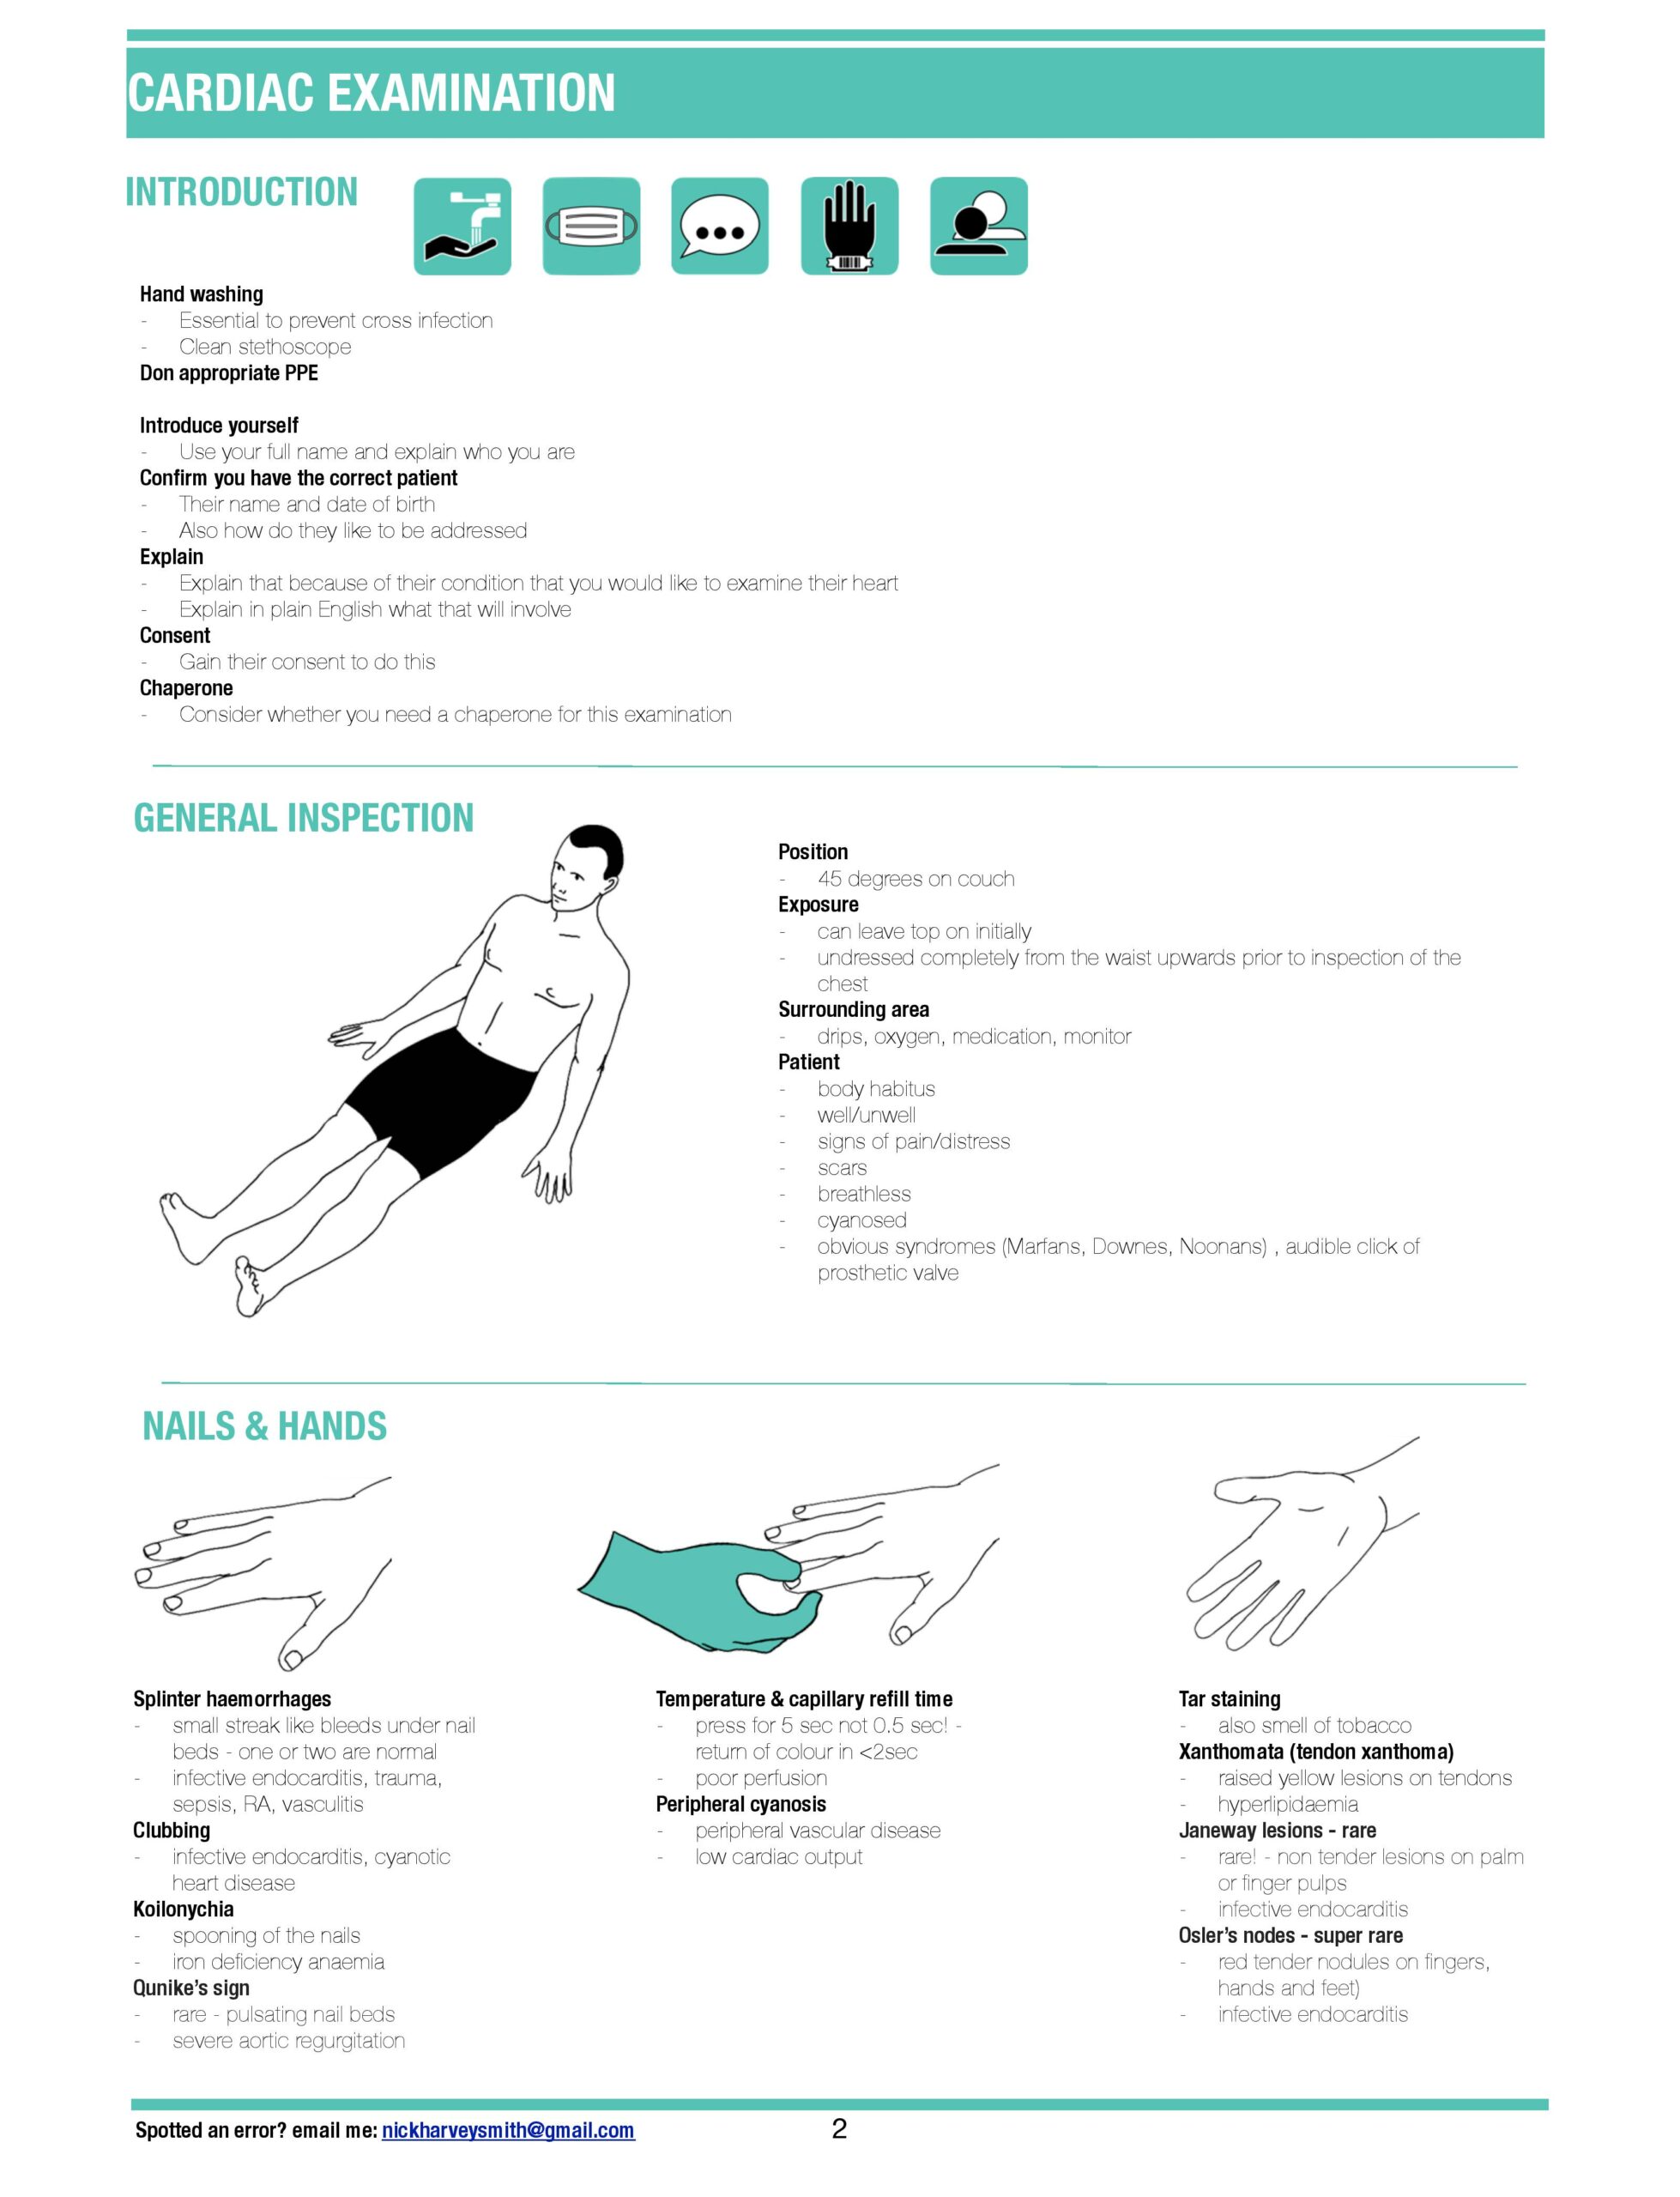
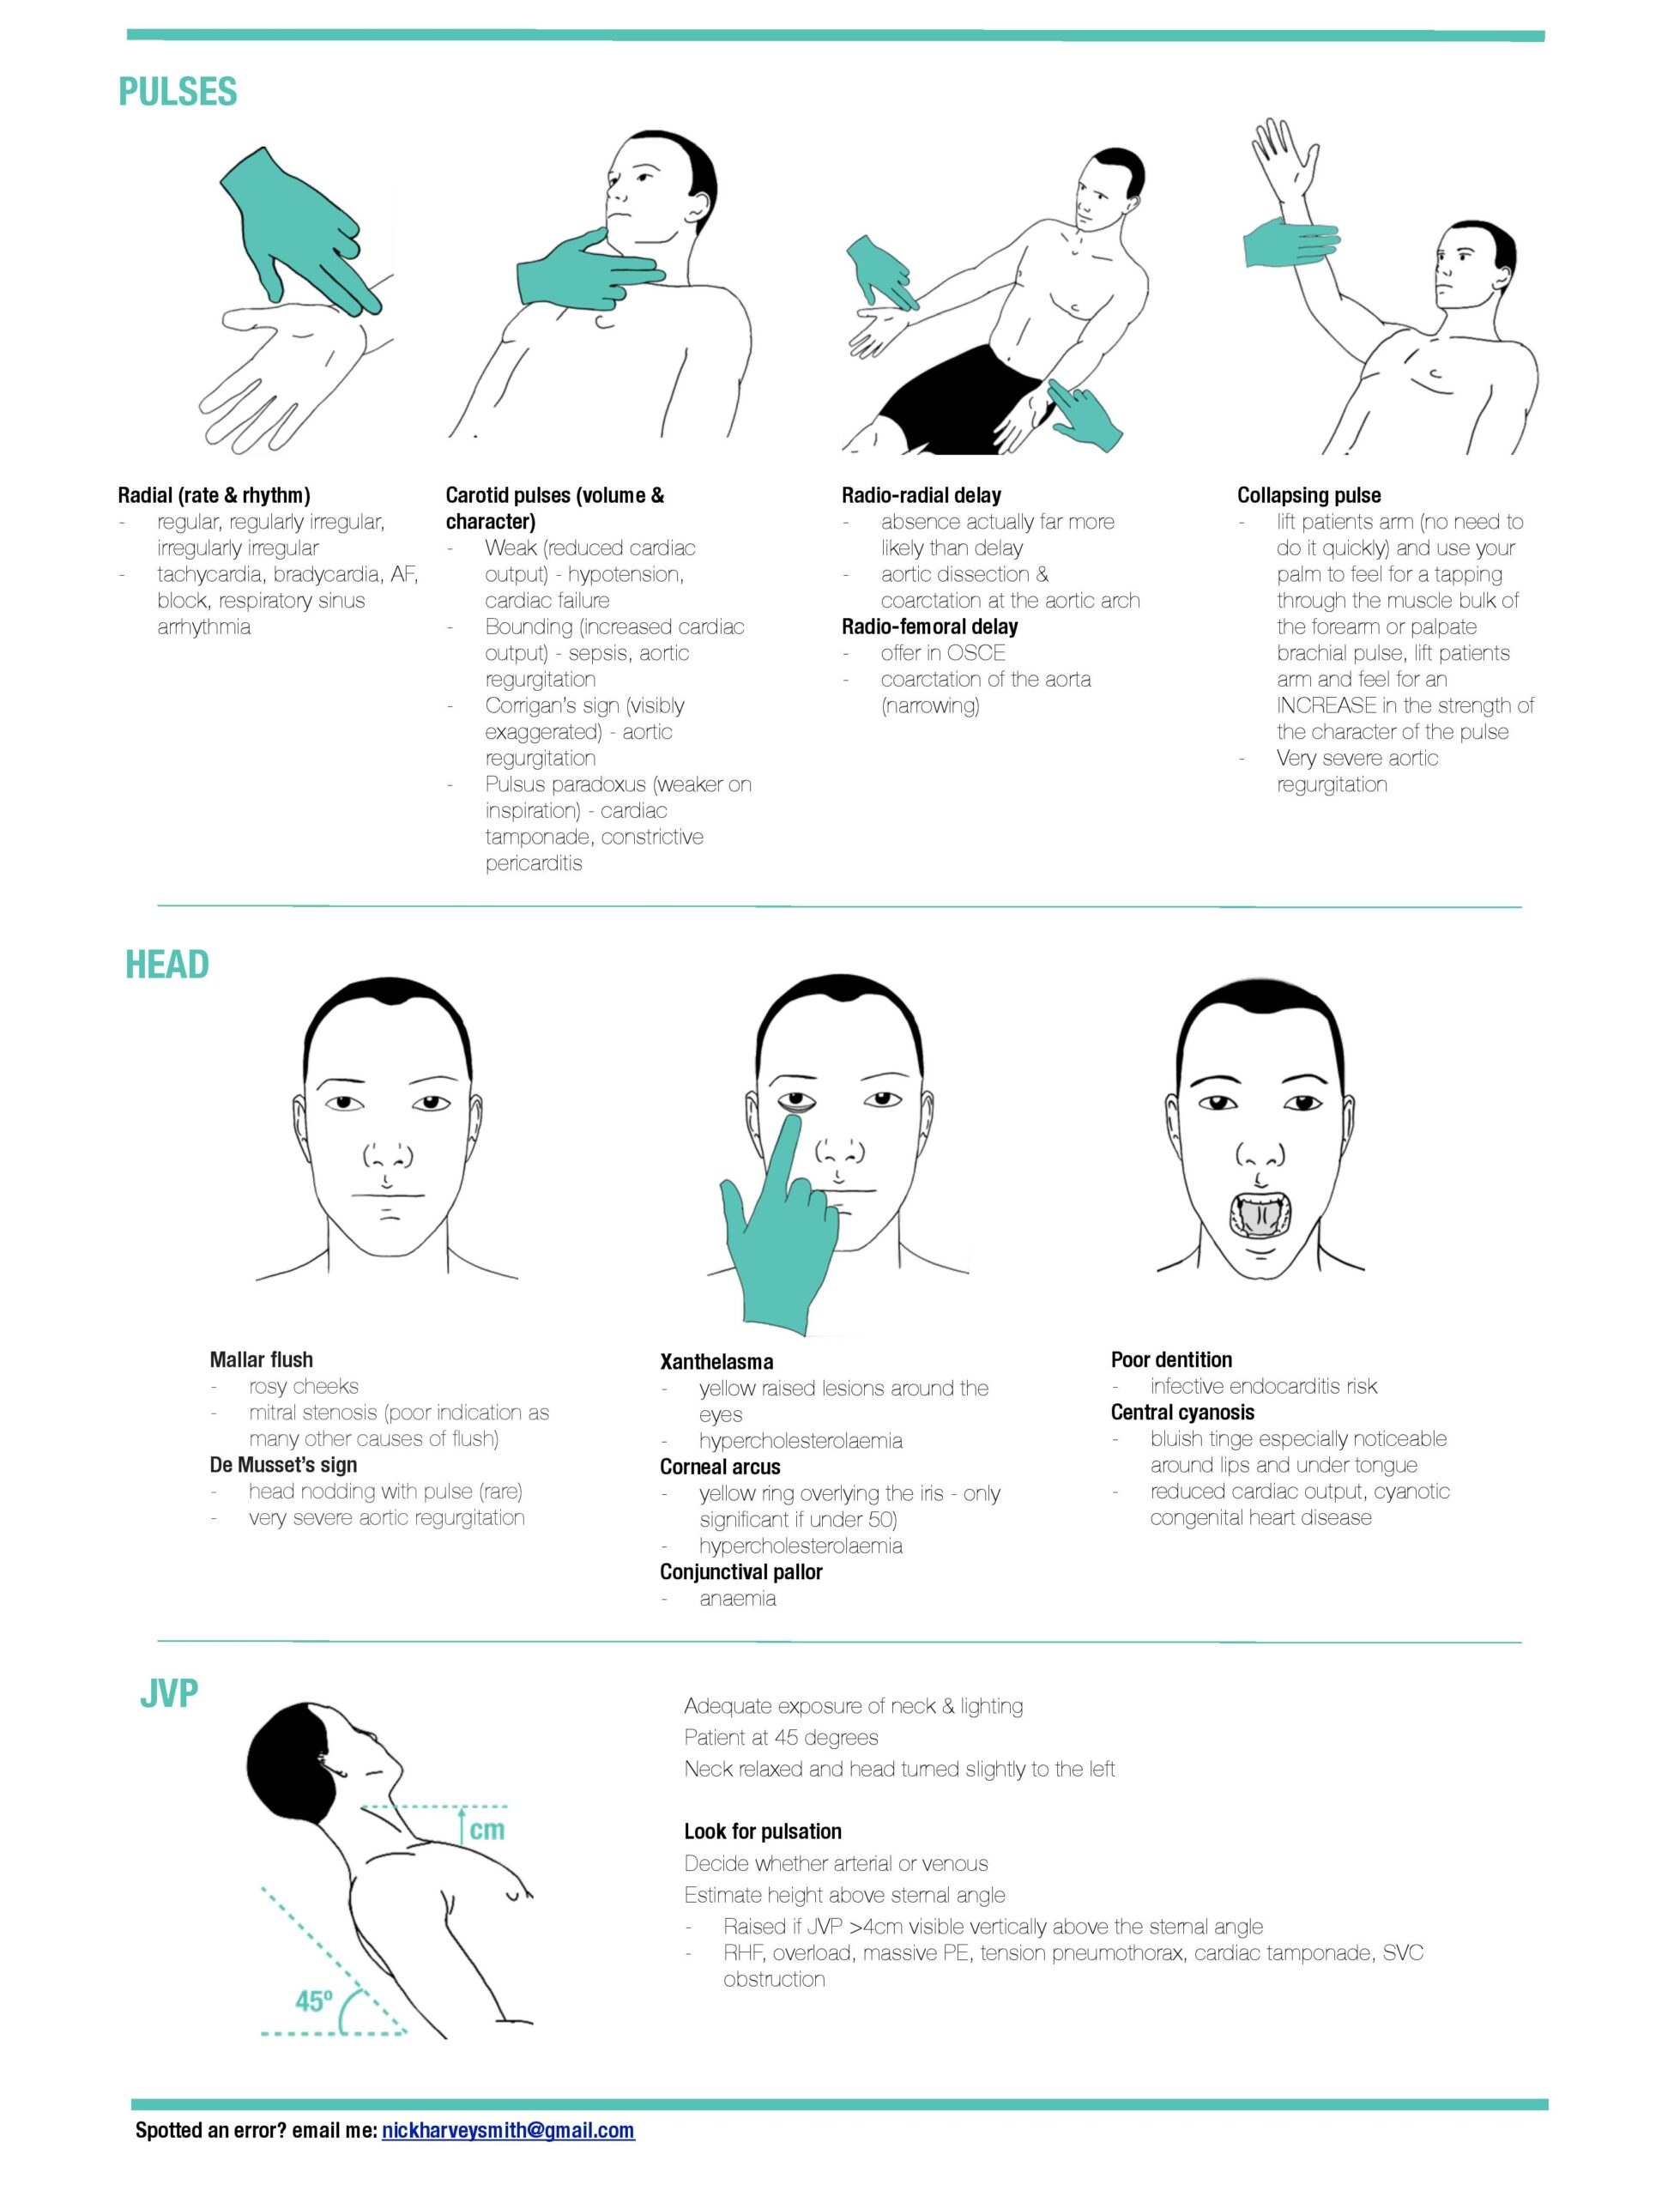
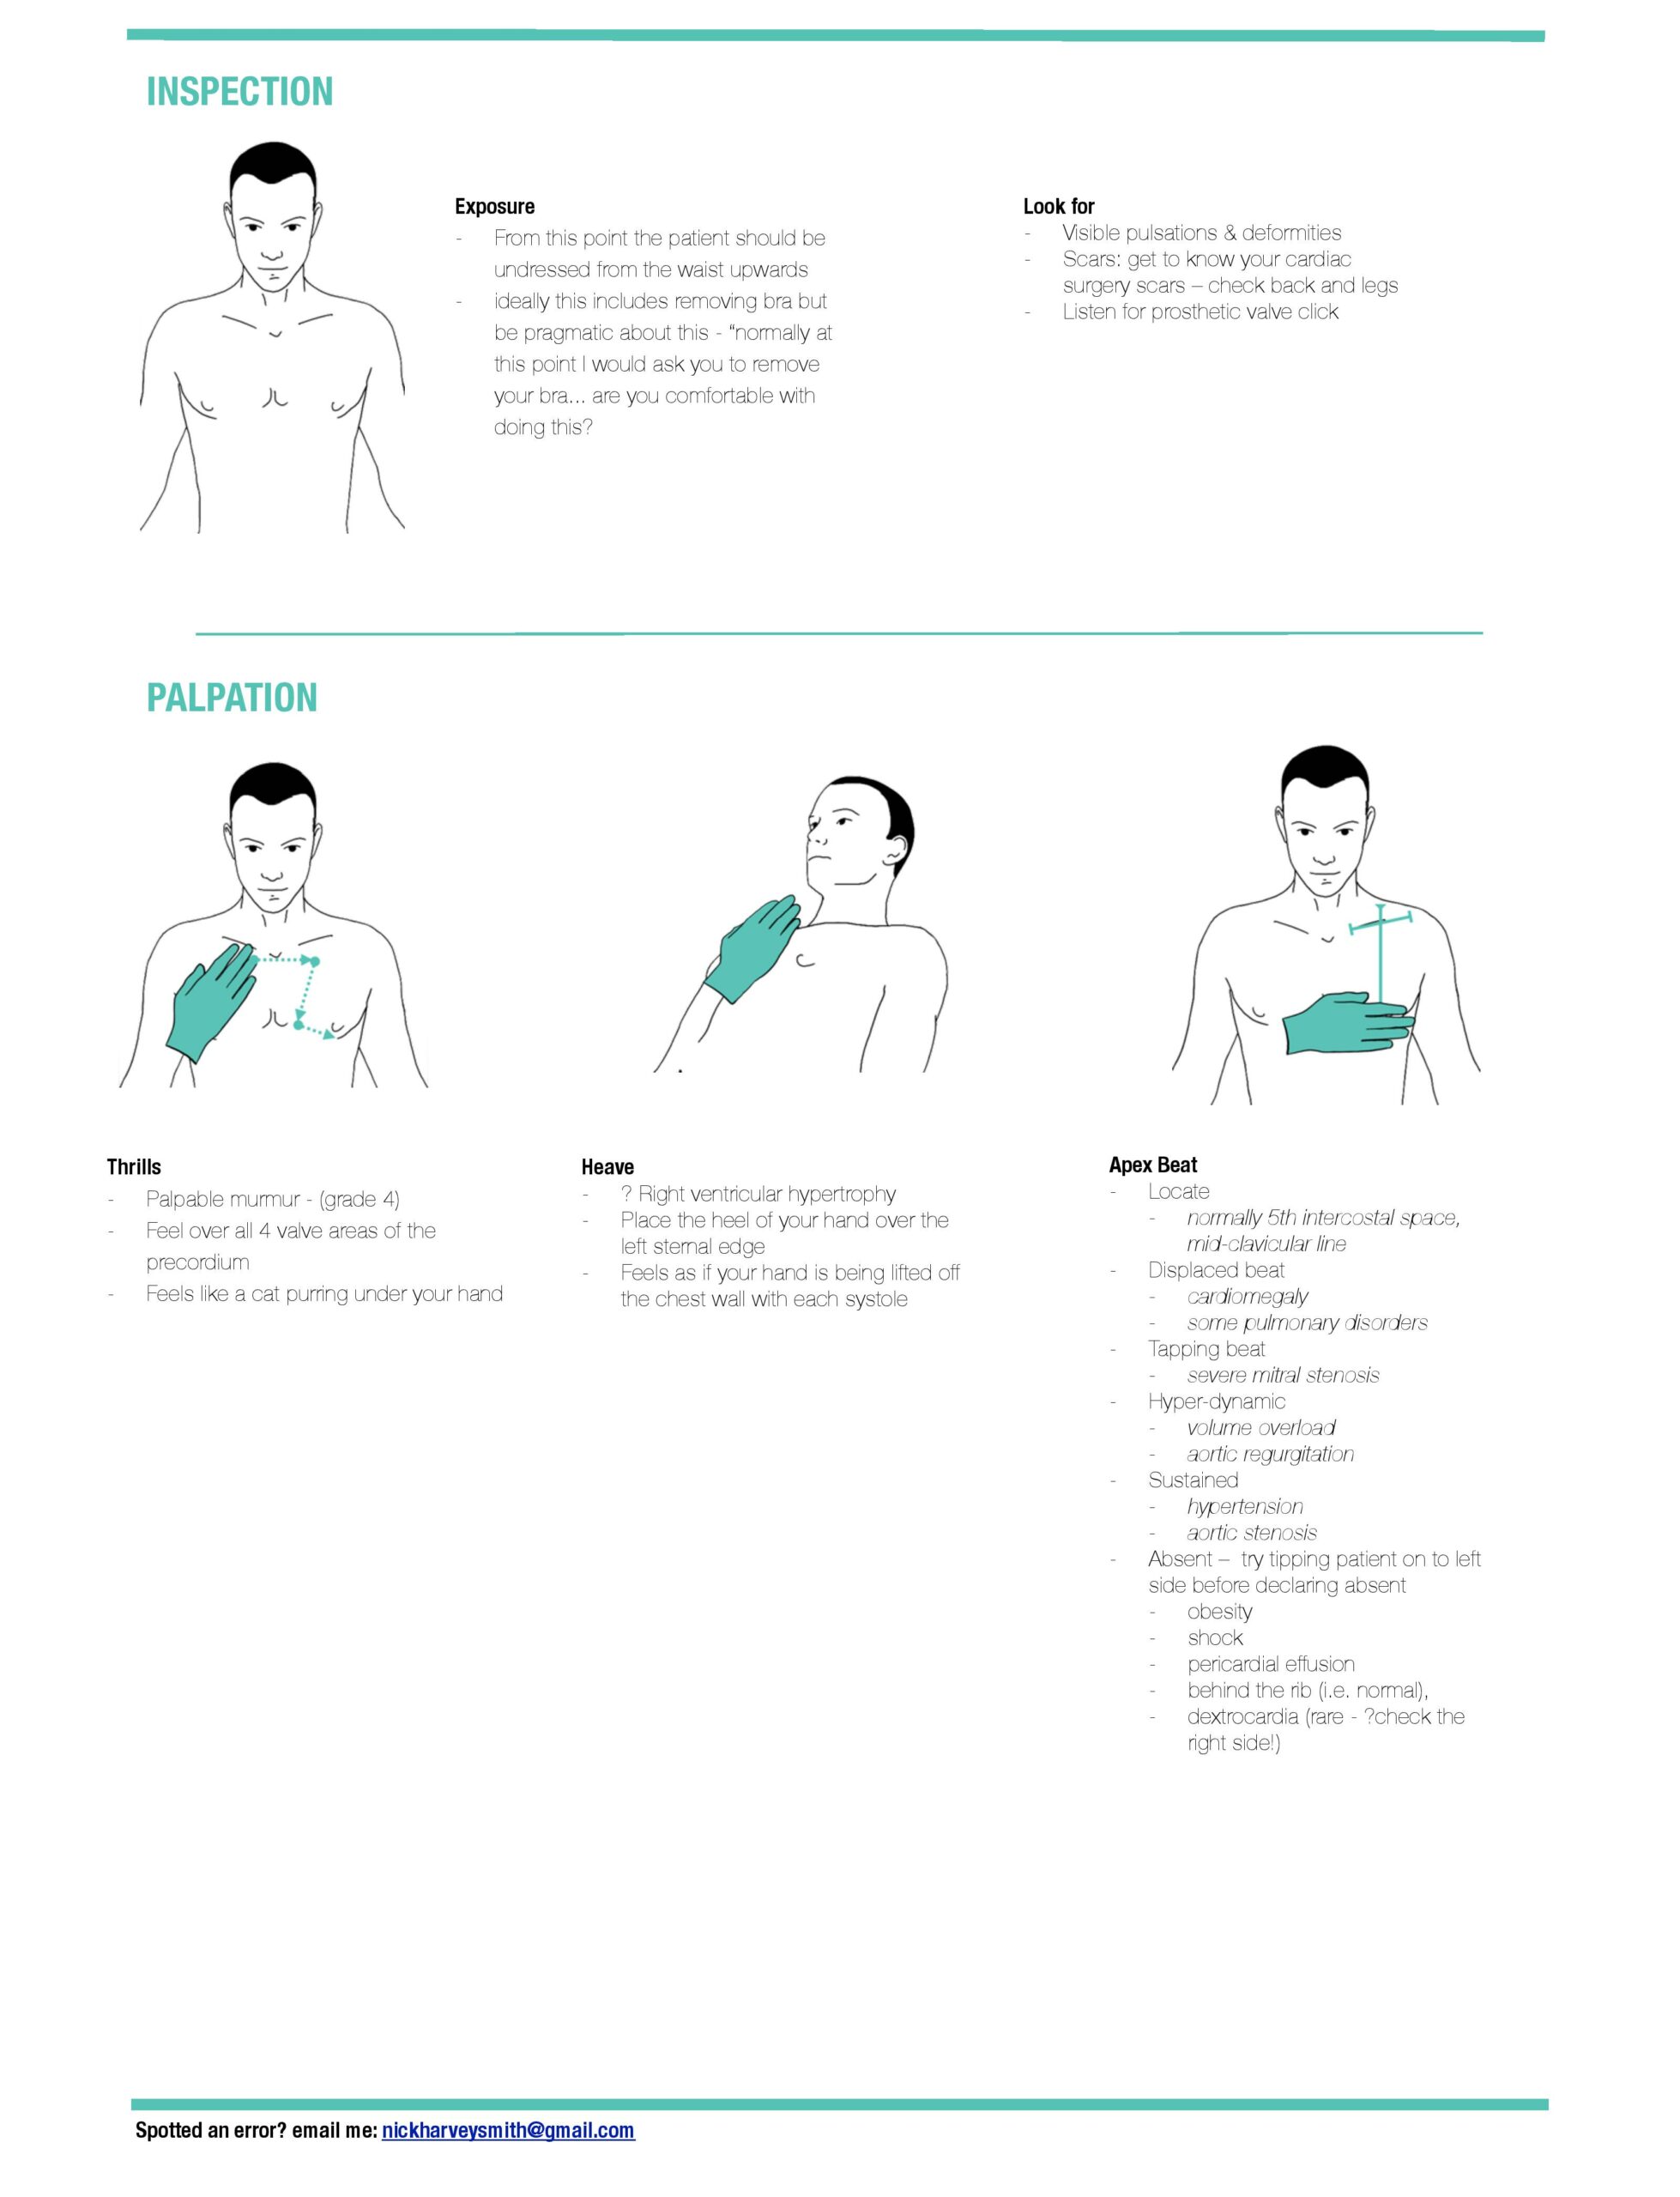
Reading the original illustration. The original artwork uses simplified associations between signs and diagnoses. Interpret them with the whole assessment; a peripheral sign alone does not establish the underlying disease. Agree the necessary exposure with the patient and protect dignity throughout.
Original cardiovascular infographics · Nick Smith
Original St Emlyn’s teaching artwork. Read with the updated written sequence and qualifications on this page.
03 / CHAPTER 6
Respiratory
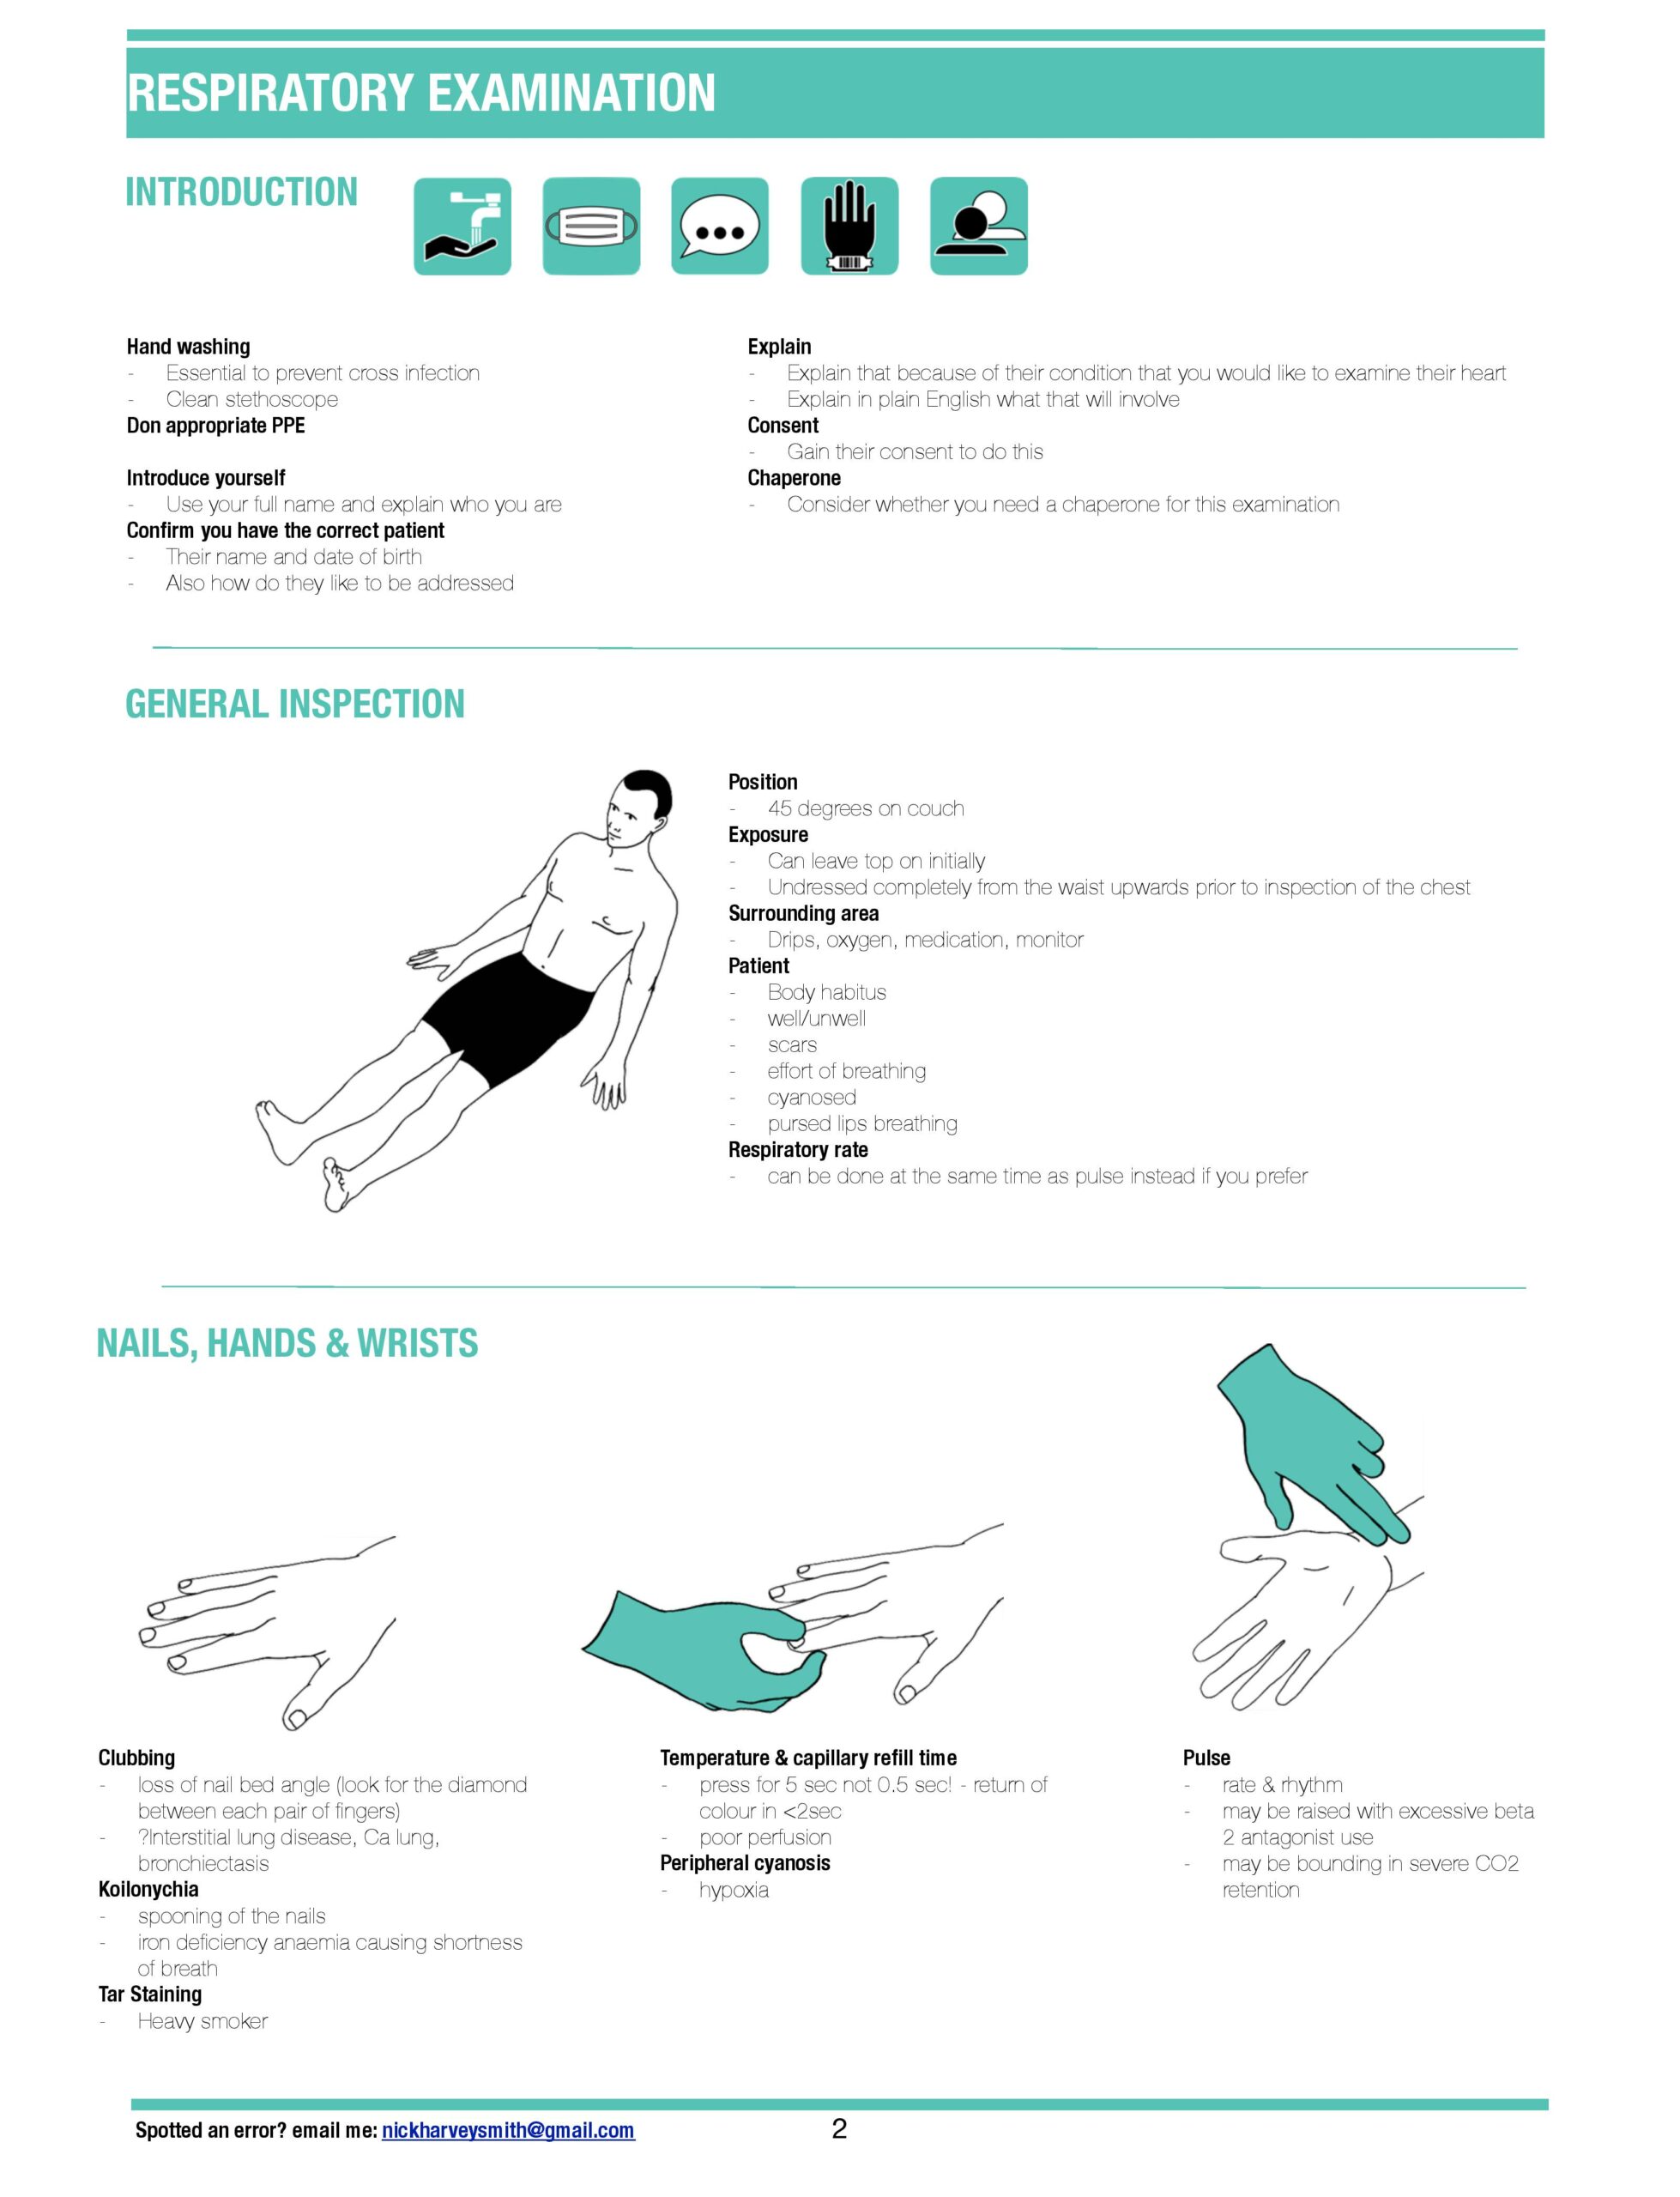
Observe the respiratory rate, effort and ability to speak before asking the patient to move or take repeated deep breaths. Review oxygen delivery and saturation together; a number without the oxygen device and flow is incomplete. Compare corresponding areas on both sides when palpating, percussing and listening, and allow a breathless person to rest.
Assess breathing, compare both sides and choose focused additional tests.
Respiratory: sequence and example phrases
Introduction
Use the preparation and consent approach above, adapted to this examination. Introduce yourself by your actual role and agree supervision. Explain what you need to examine, ask about pain and keep the patient involved as you proceed.
Brief history
"Can you briefly tell me why you have come to hospital?
General inspection
“I am looking at the…”
Patient’s
- comfort level
- body habitus
- scars from chest drains/aspiration
- chest wall deformity
- respiratory distress and shortness of breath
- cyanosis
Environment
- oxygen
- inhalers/nebulisers
- sputum pots
Hands and other observations
“I am feeling for…”
- warmth
- clamminess
- the pulse (rate; rhythm; quality)
“I am looking for…”
- clubbing
- tar staining
- peripheral cyanosis
- wasting (Pancoast's tumour)
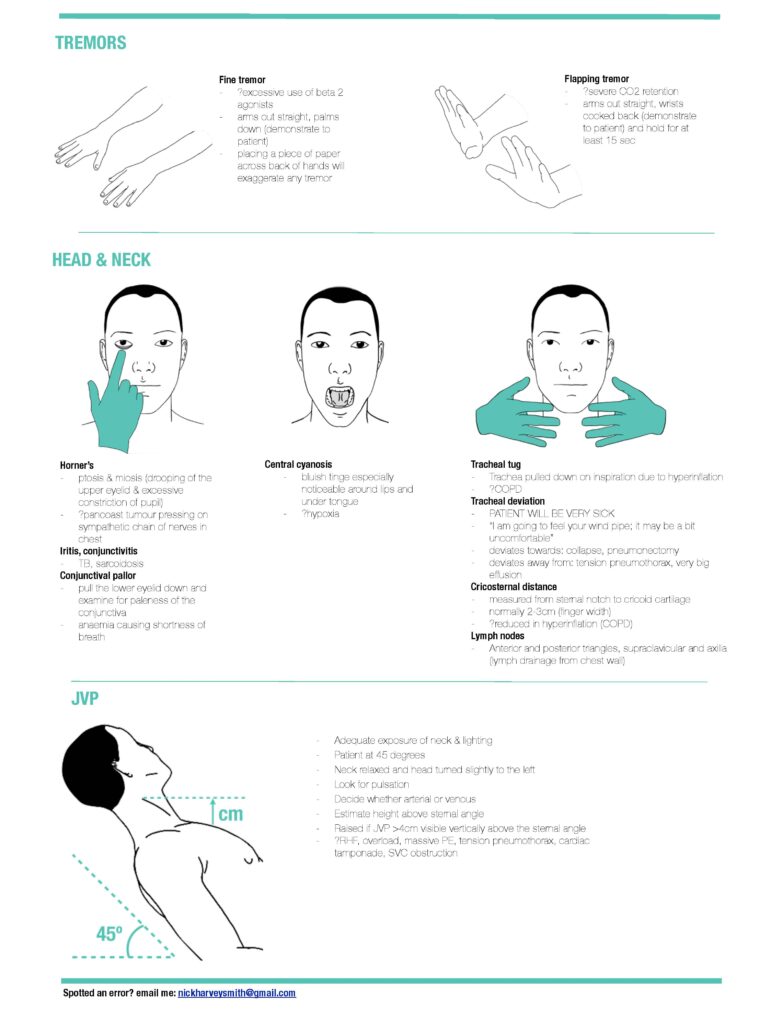
- CO2 retention tremor
Other observations
- Blood Pressure
- Respiratory Rate
- Oxygen saturations
- Temperature
- Blood glucose when clinically indicated
Neck
“I am looking for…”
- Jugular venous pressure:
- "I will start with the bed at about 45 degrees and adjust it to see the venous pulsation clearly.
- Please turn your head to the left and relax head on the pillow.
- If helpful, and with your permission, I will apply gentle sustained abdominal pressure while watching the neck veins (abdominojugular reflux).
- I am measuring the vertical height of the venous pulsation above the sternal angle, in centimetres, and recording your position."
- Lymph nodes: I need to feel for any glands in your neck. I will stand behind you and feel along your jaw; in front of then behind your ears; down your neck and along your collar bones.
- Trachea position: I need to feel in the space between your collar bones assessing that your windpipe is central.
Face
“I am looking…”
- at your eyes for Horner’s syndrome (ptosis; miosis; ask about anhidrosis)
- for central cyanosis
- for nasal patency (please occlude each nostril in turn and breathe in and out. Does it feel equal?)
Chest
“I will examine the front, sides and back of your chest, comparing the two sides.”
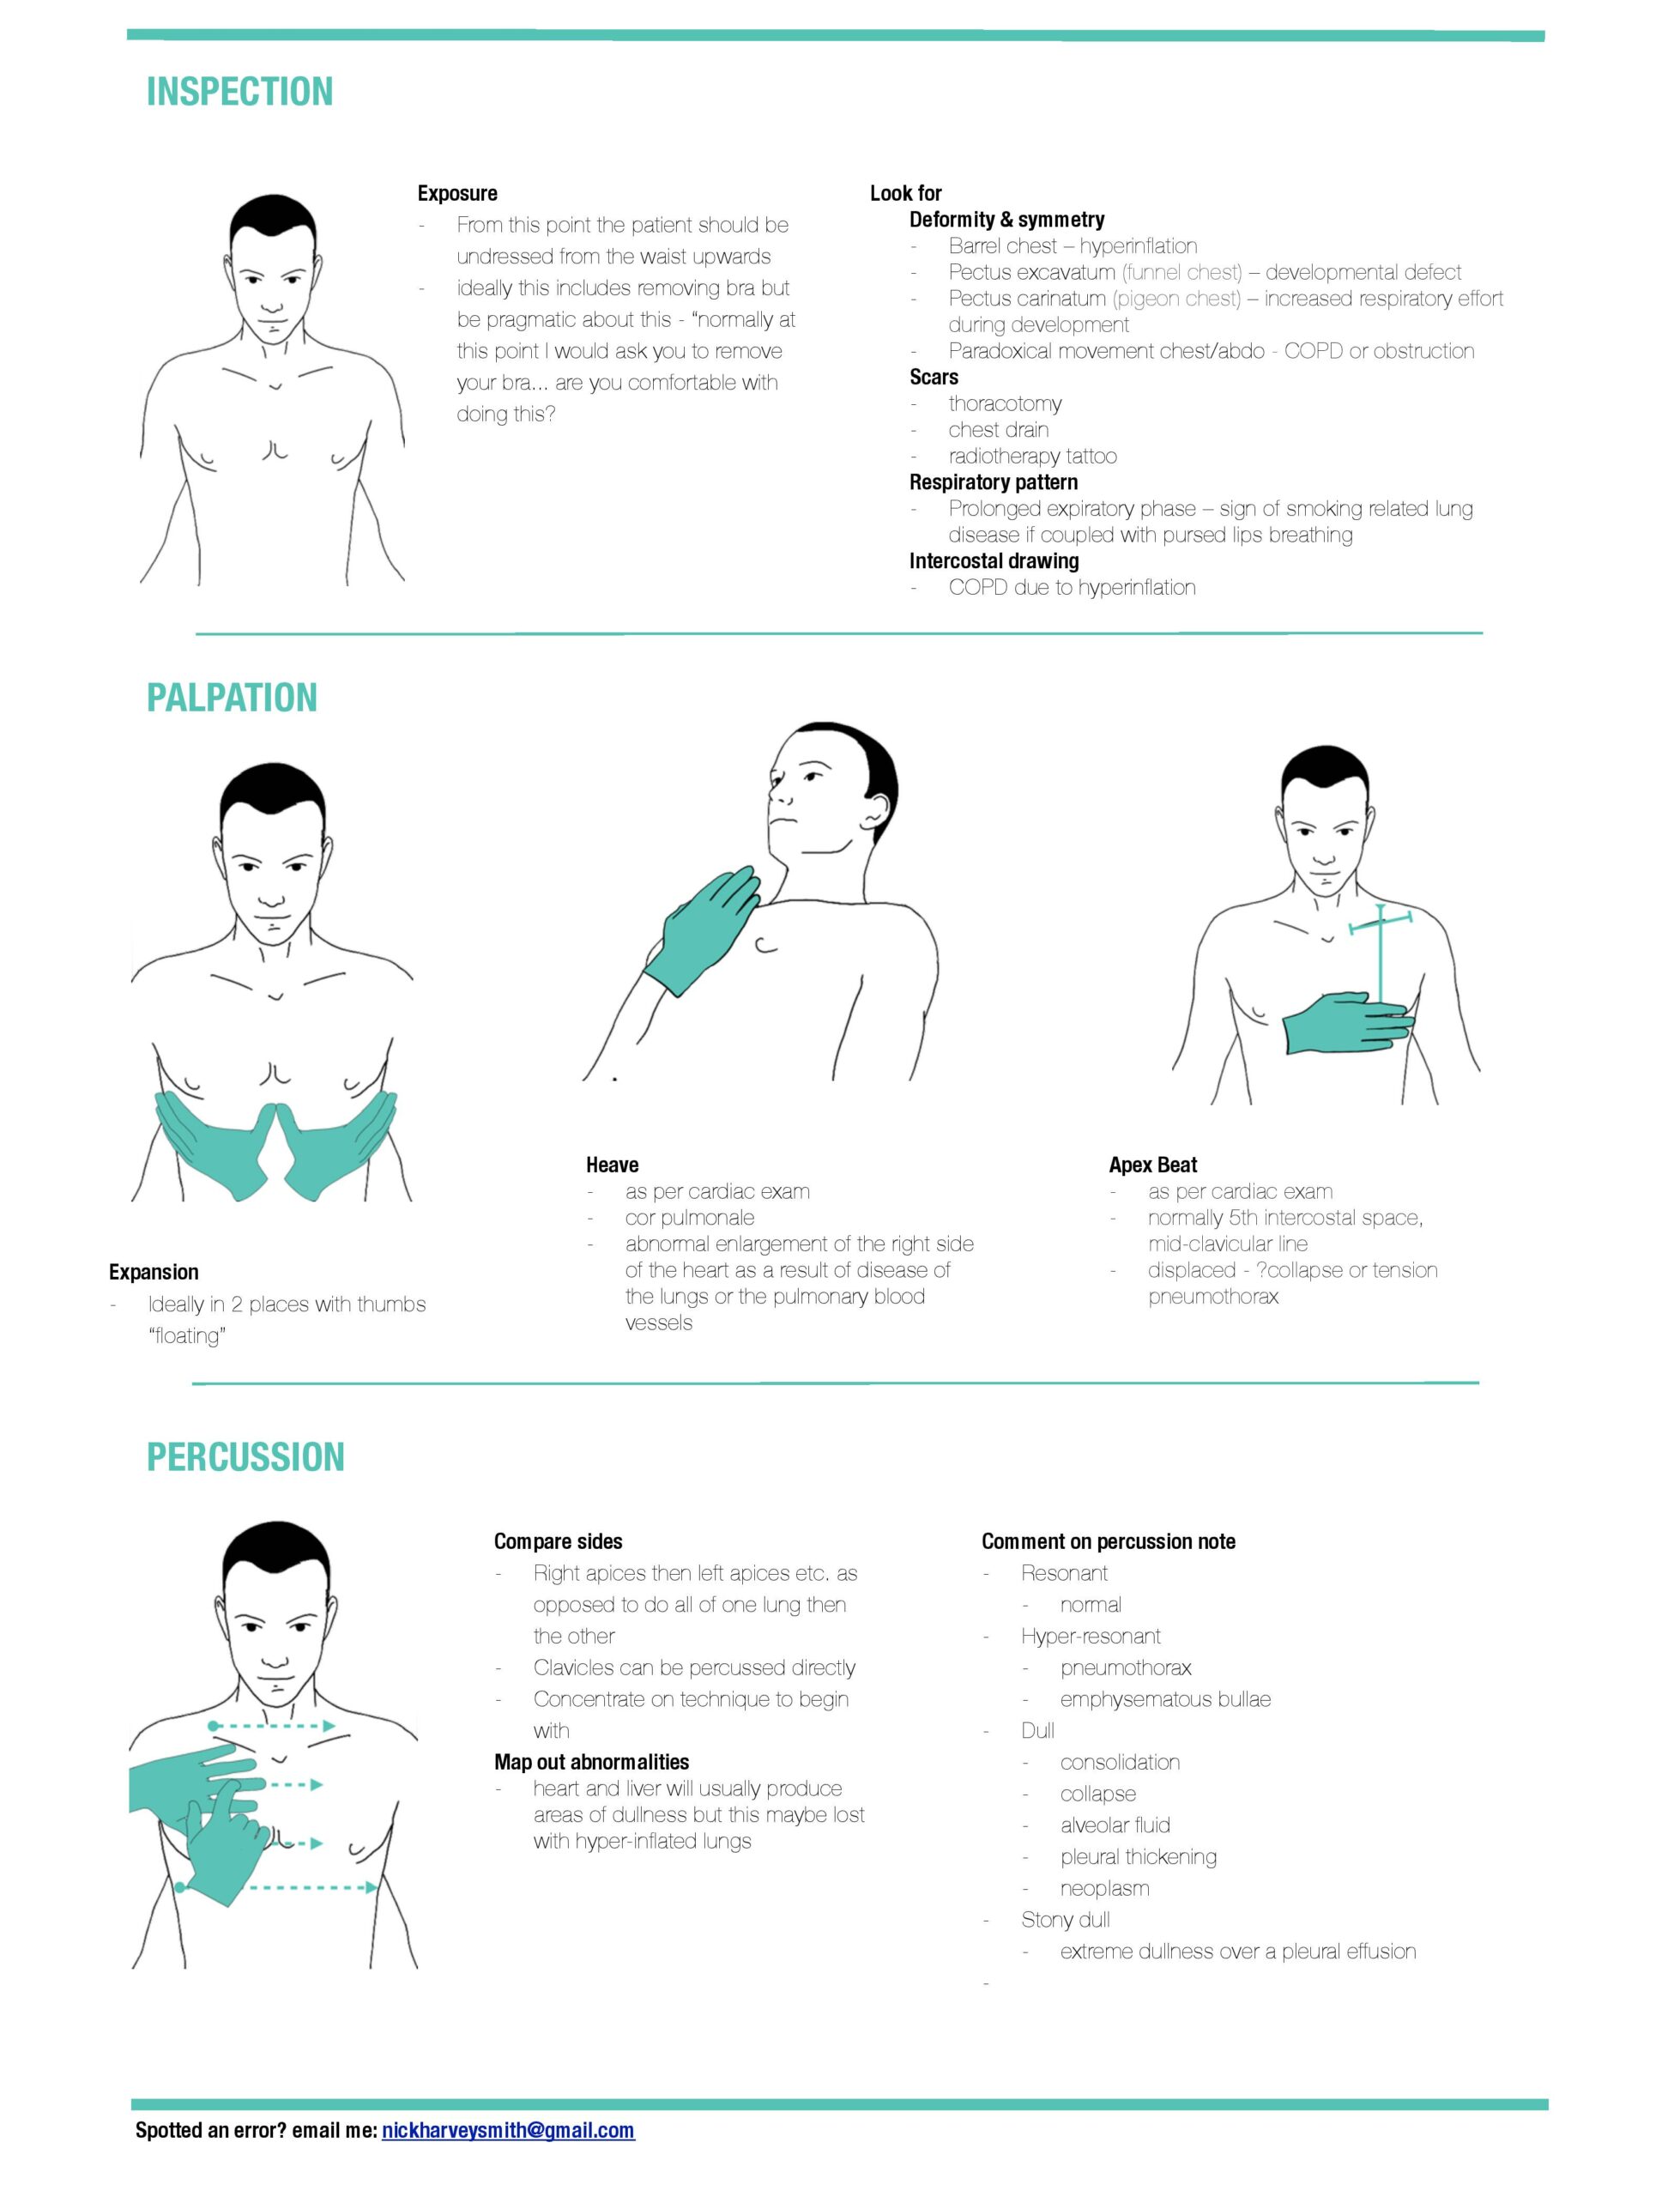
- Inspect: look for scars, bruising, deformity and the pattern of breathing.
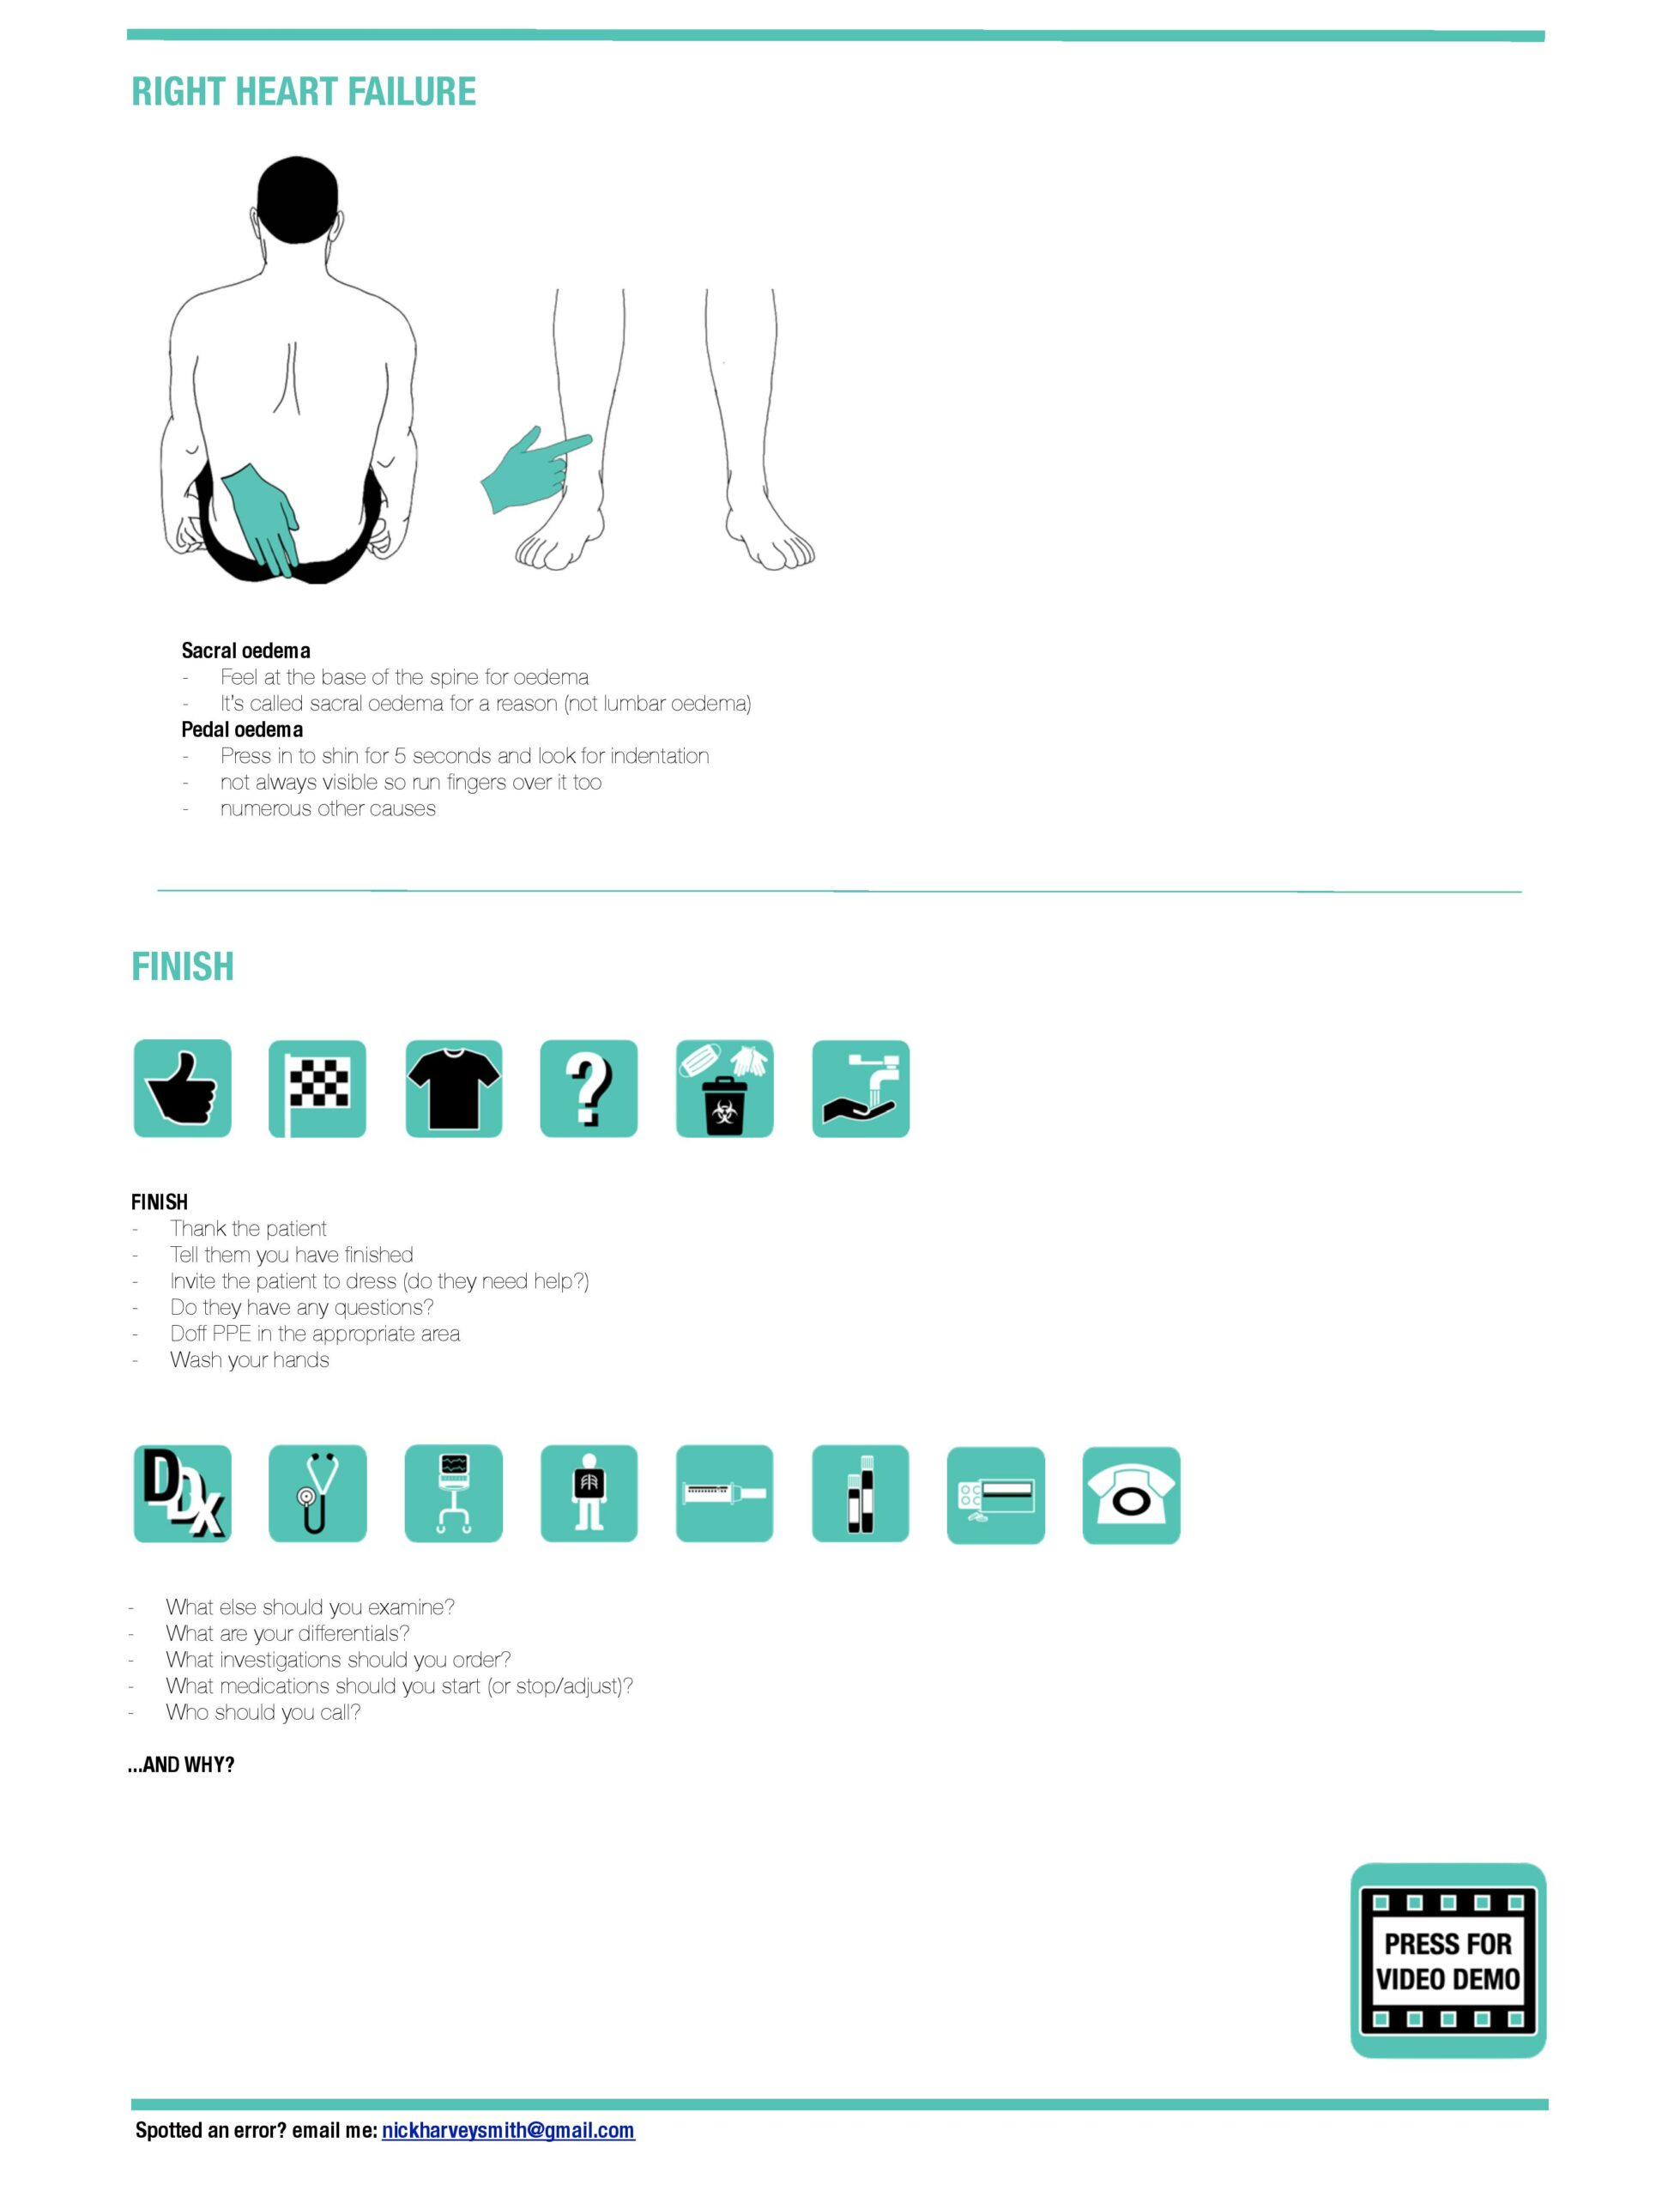
- Palpate: assess expansion, comparing sides. Check for relevant chest-wall tenderness and dependent oedema.
- Percuss: compare corresponding areas on the two sides.
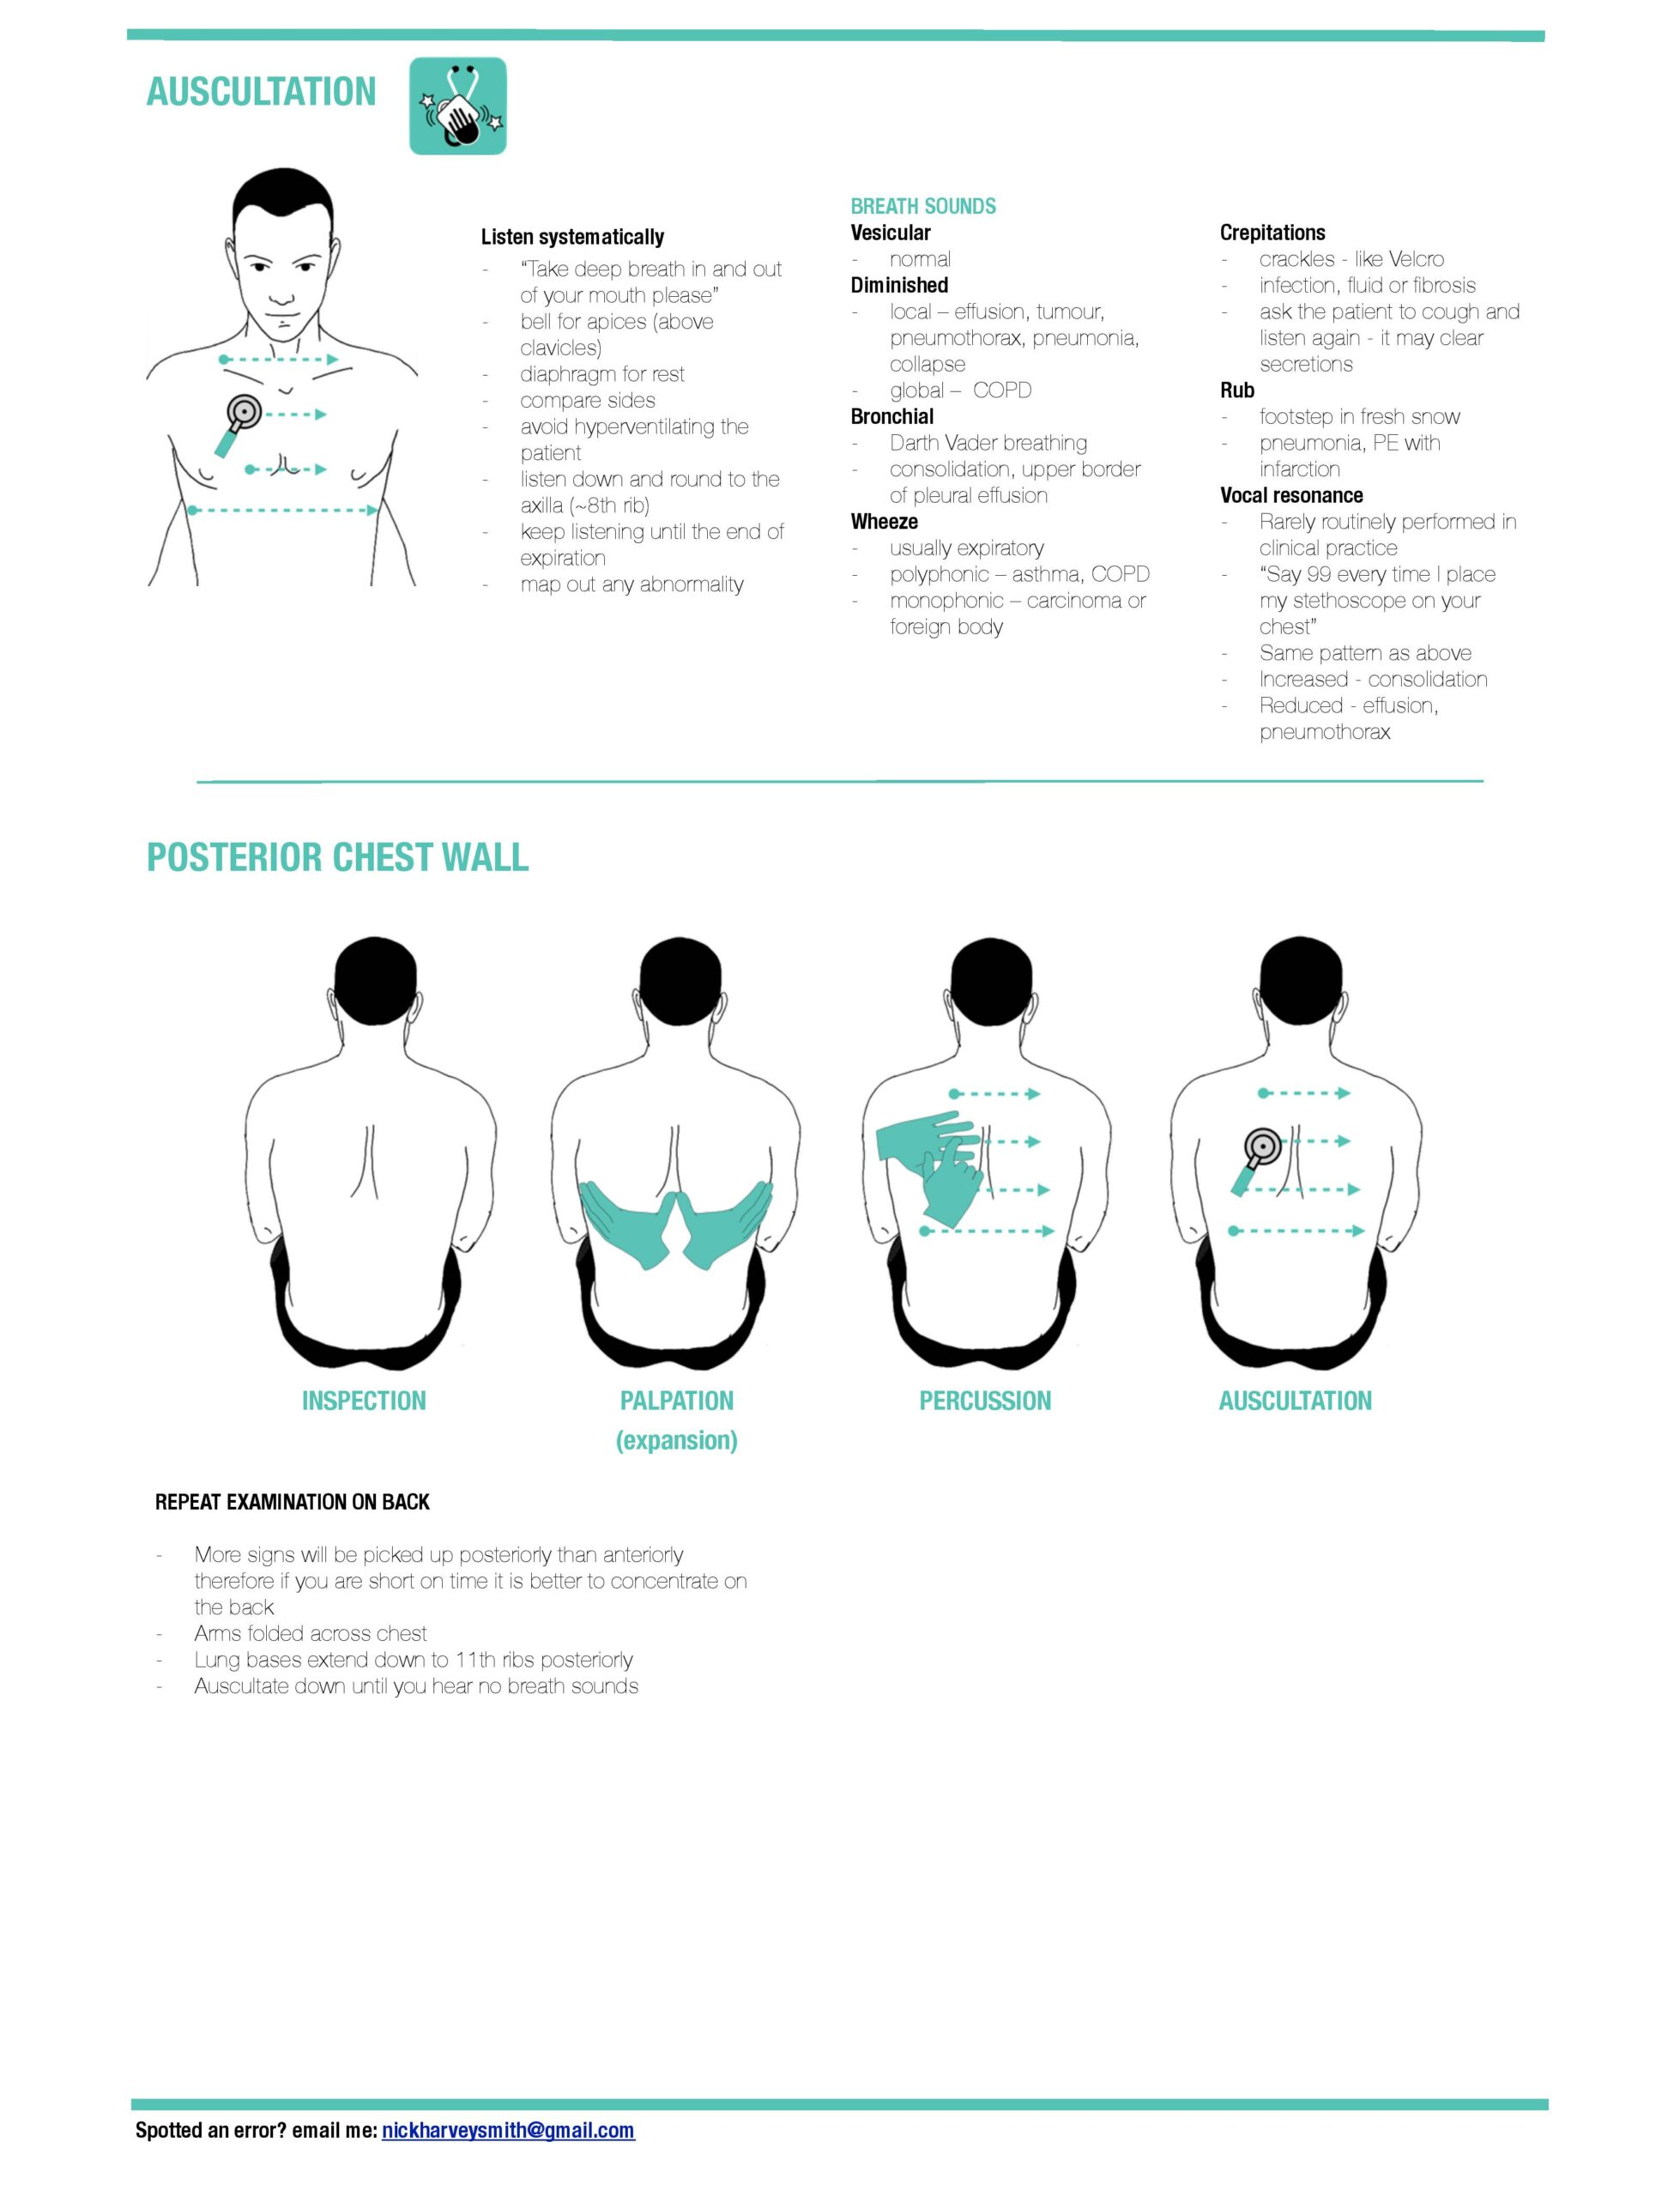
- Auscultate: compare breath sounds and listen for added sounds. For vocal resonance, ask the patient to say “ninety-nine” while listening through the stethoscope.
Tactile vocal fremitus is felt with the hands; vocal resonance is heard through the stethoscope. Choose tests that help answer the clinical question.
Stanford — pulmonary examination
Close
Restore the patient’s comfort and privacy, thank them and summarise your actual findings. Use the interpretation below to explain the next steps and discuss them with the responsible clinician.
Further reading
- Geeky Medics — respiratory examination
- Oxford Medical Education — respiratory examination
- Oxford Medical Education — respiratory examination video
- Geeky Medics — Peak expiratory flow rate
- Oxford Medical Education — Abg
- Geeky Medics — Abg interpretation
- Geeky Medics — Chest x ray interpretation a methodical approach
- Radiology Masterclass — Chest pathology end
- Stanford — pulmonary examination
Interpret and present your findings
Describe the distribution of abnormal sounds and percussion changes rather than naming a disease from one sign. Reduced breath sounds with dullness and reduced expansion suggest a different process from widespread wheeze. Relate findings to the severity and time course, and propose targeted tests such as chest imaging, peak flow or a blood gas when clinically indicated. A blood gas is not required solely because an examination station is respiratory.
Reading the original illustration. In the original artwork, “beta 2 antagonist” in the pulse section should read beta-2 agonist, and the introduction should describe examining the chest, not the heart. Tracheal deviation is not always an acute emergency; interpret it in context. It is also an unreliable late sign of tension pneumothorax, so urgent care must not wait for it.
Original respiratory infographics · Nick Smith
Original St Emlyn’s teaching artwork. Read with the updated written sequence and qualifications on this page.
04 / CHAPTER 6
Abdominal
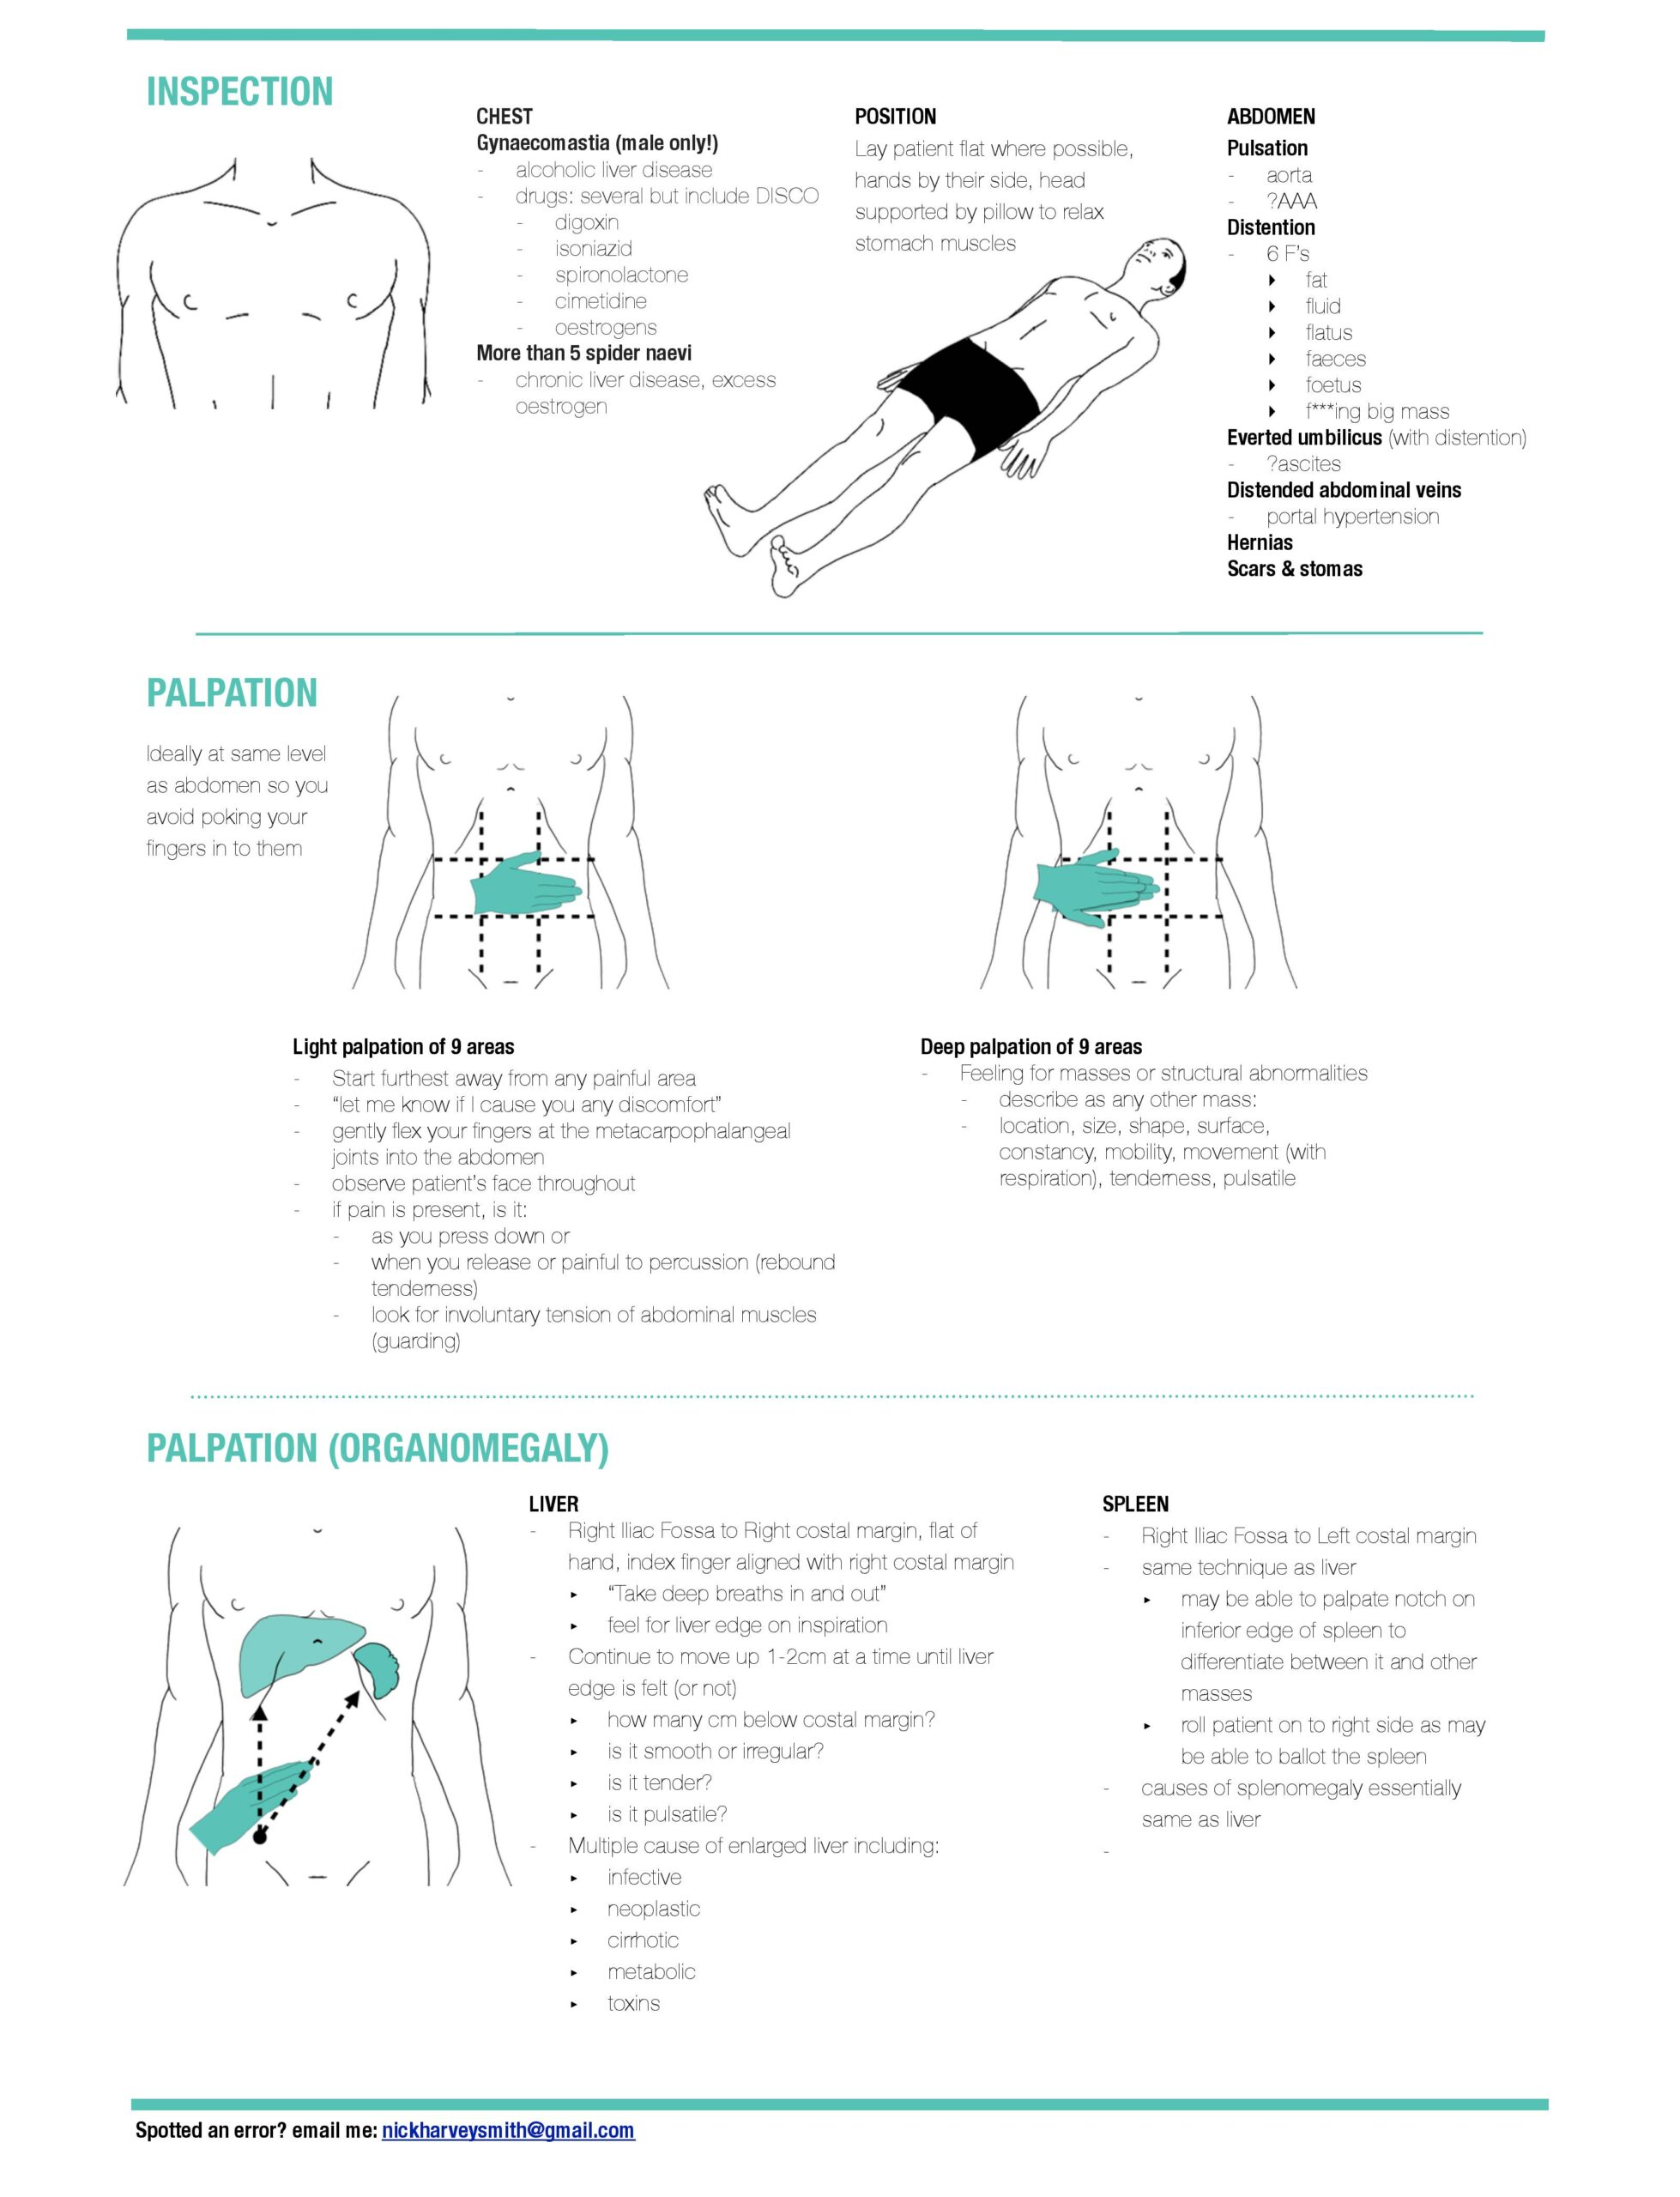
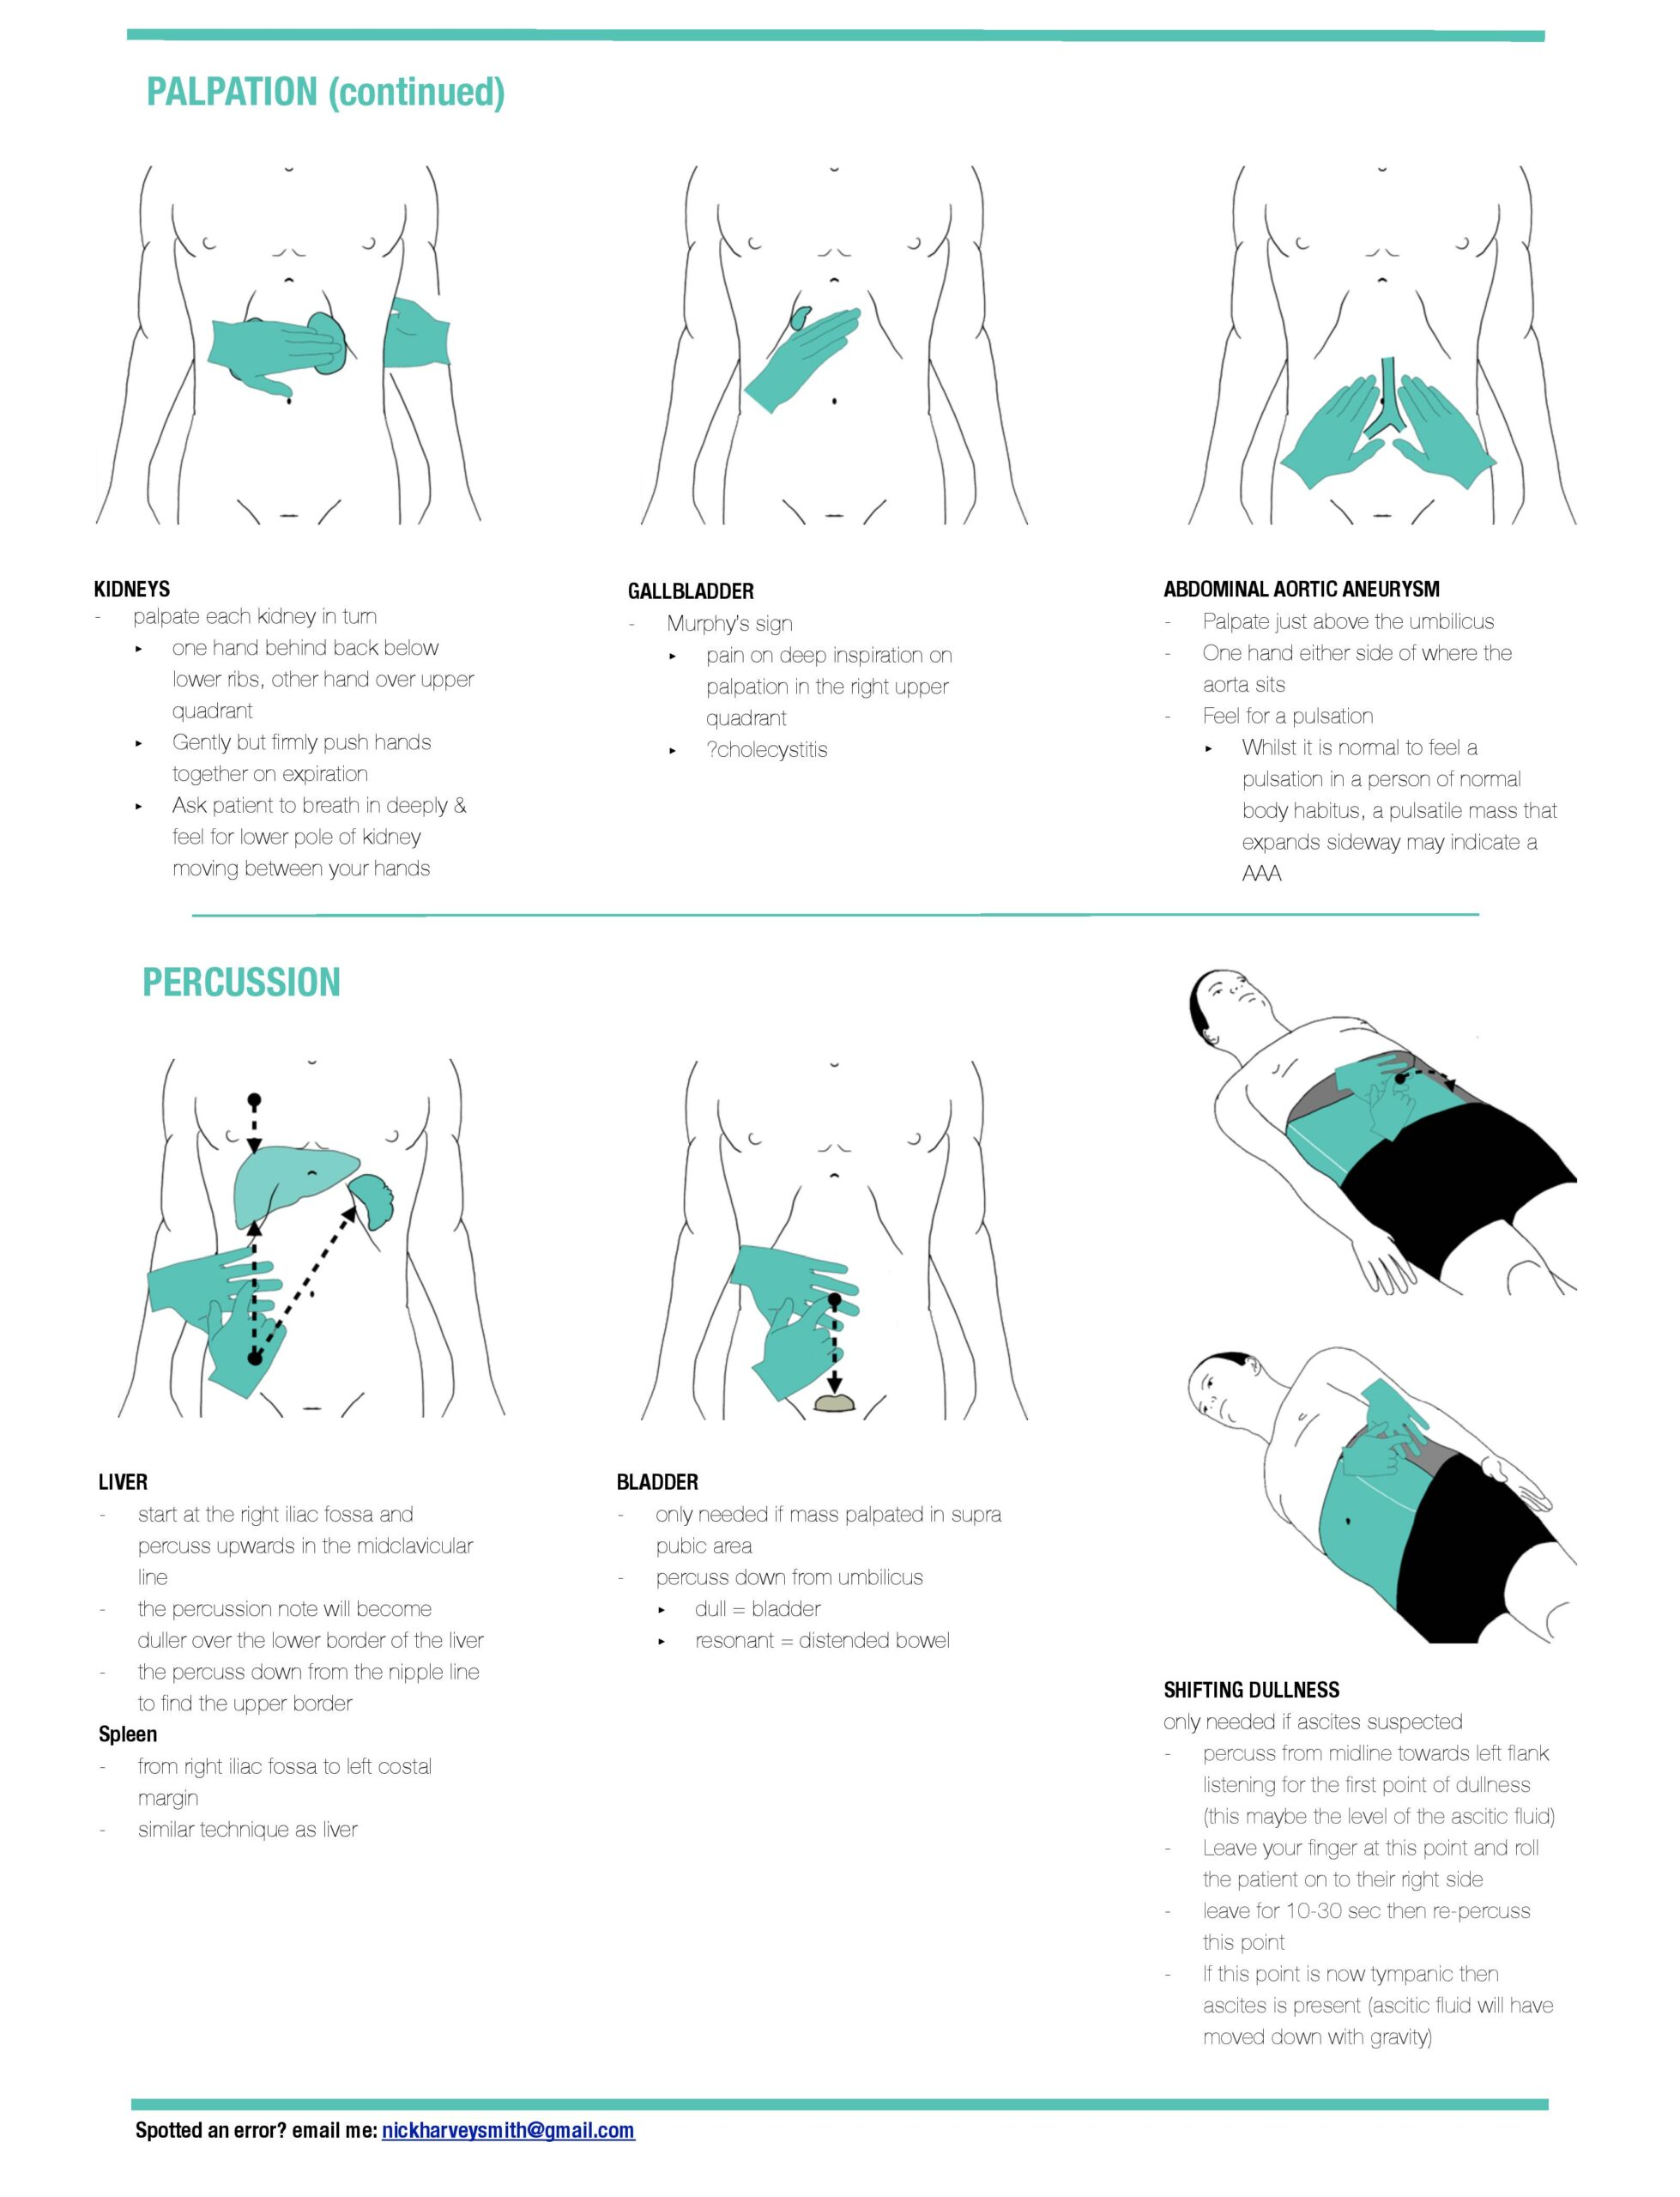
Ask where the pain is and begin away from it. Support a comfortable supine position where possible, expose the abdomen appropriately and watch the patient’s face during palpation. Inspect before touching, then examine gently; do not repeatedly provoke a painful sign. The sequence should reveal tenderness, peritonism, organ enlargement, masses or fluid while also assessing the patient’s overall condition.
Examine gently, follow the pain and identify the relevant next step.
Abdominal: sequence and example phrases
Introduction
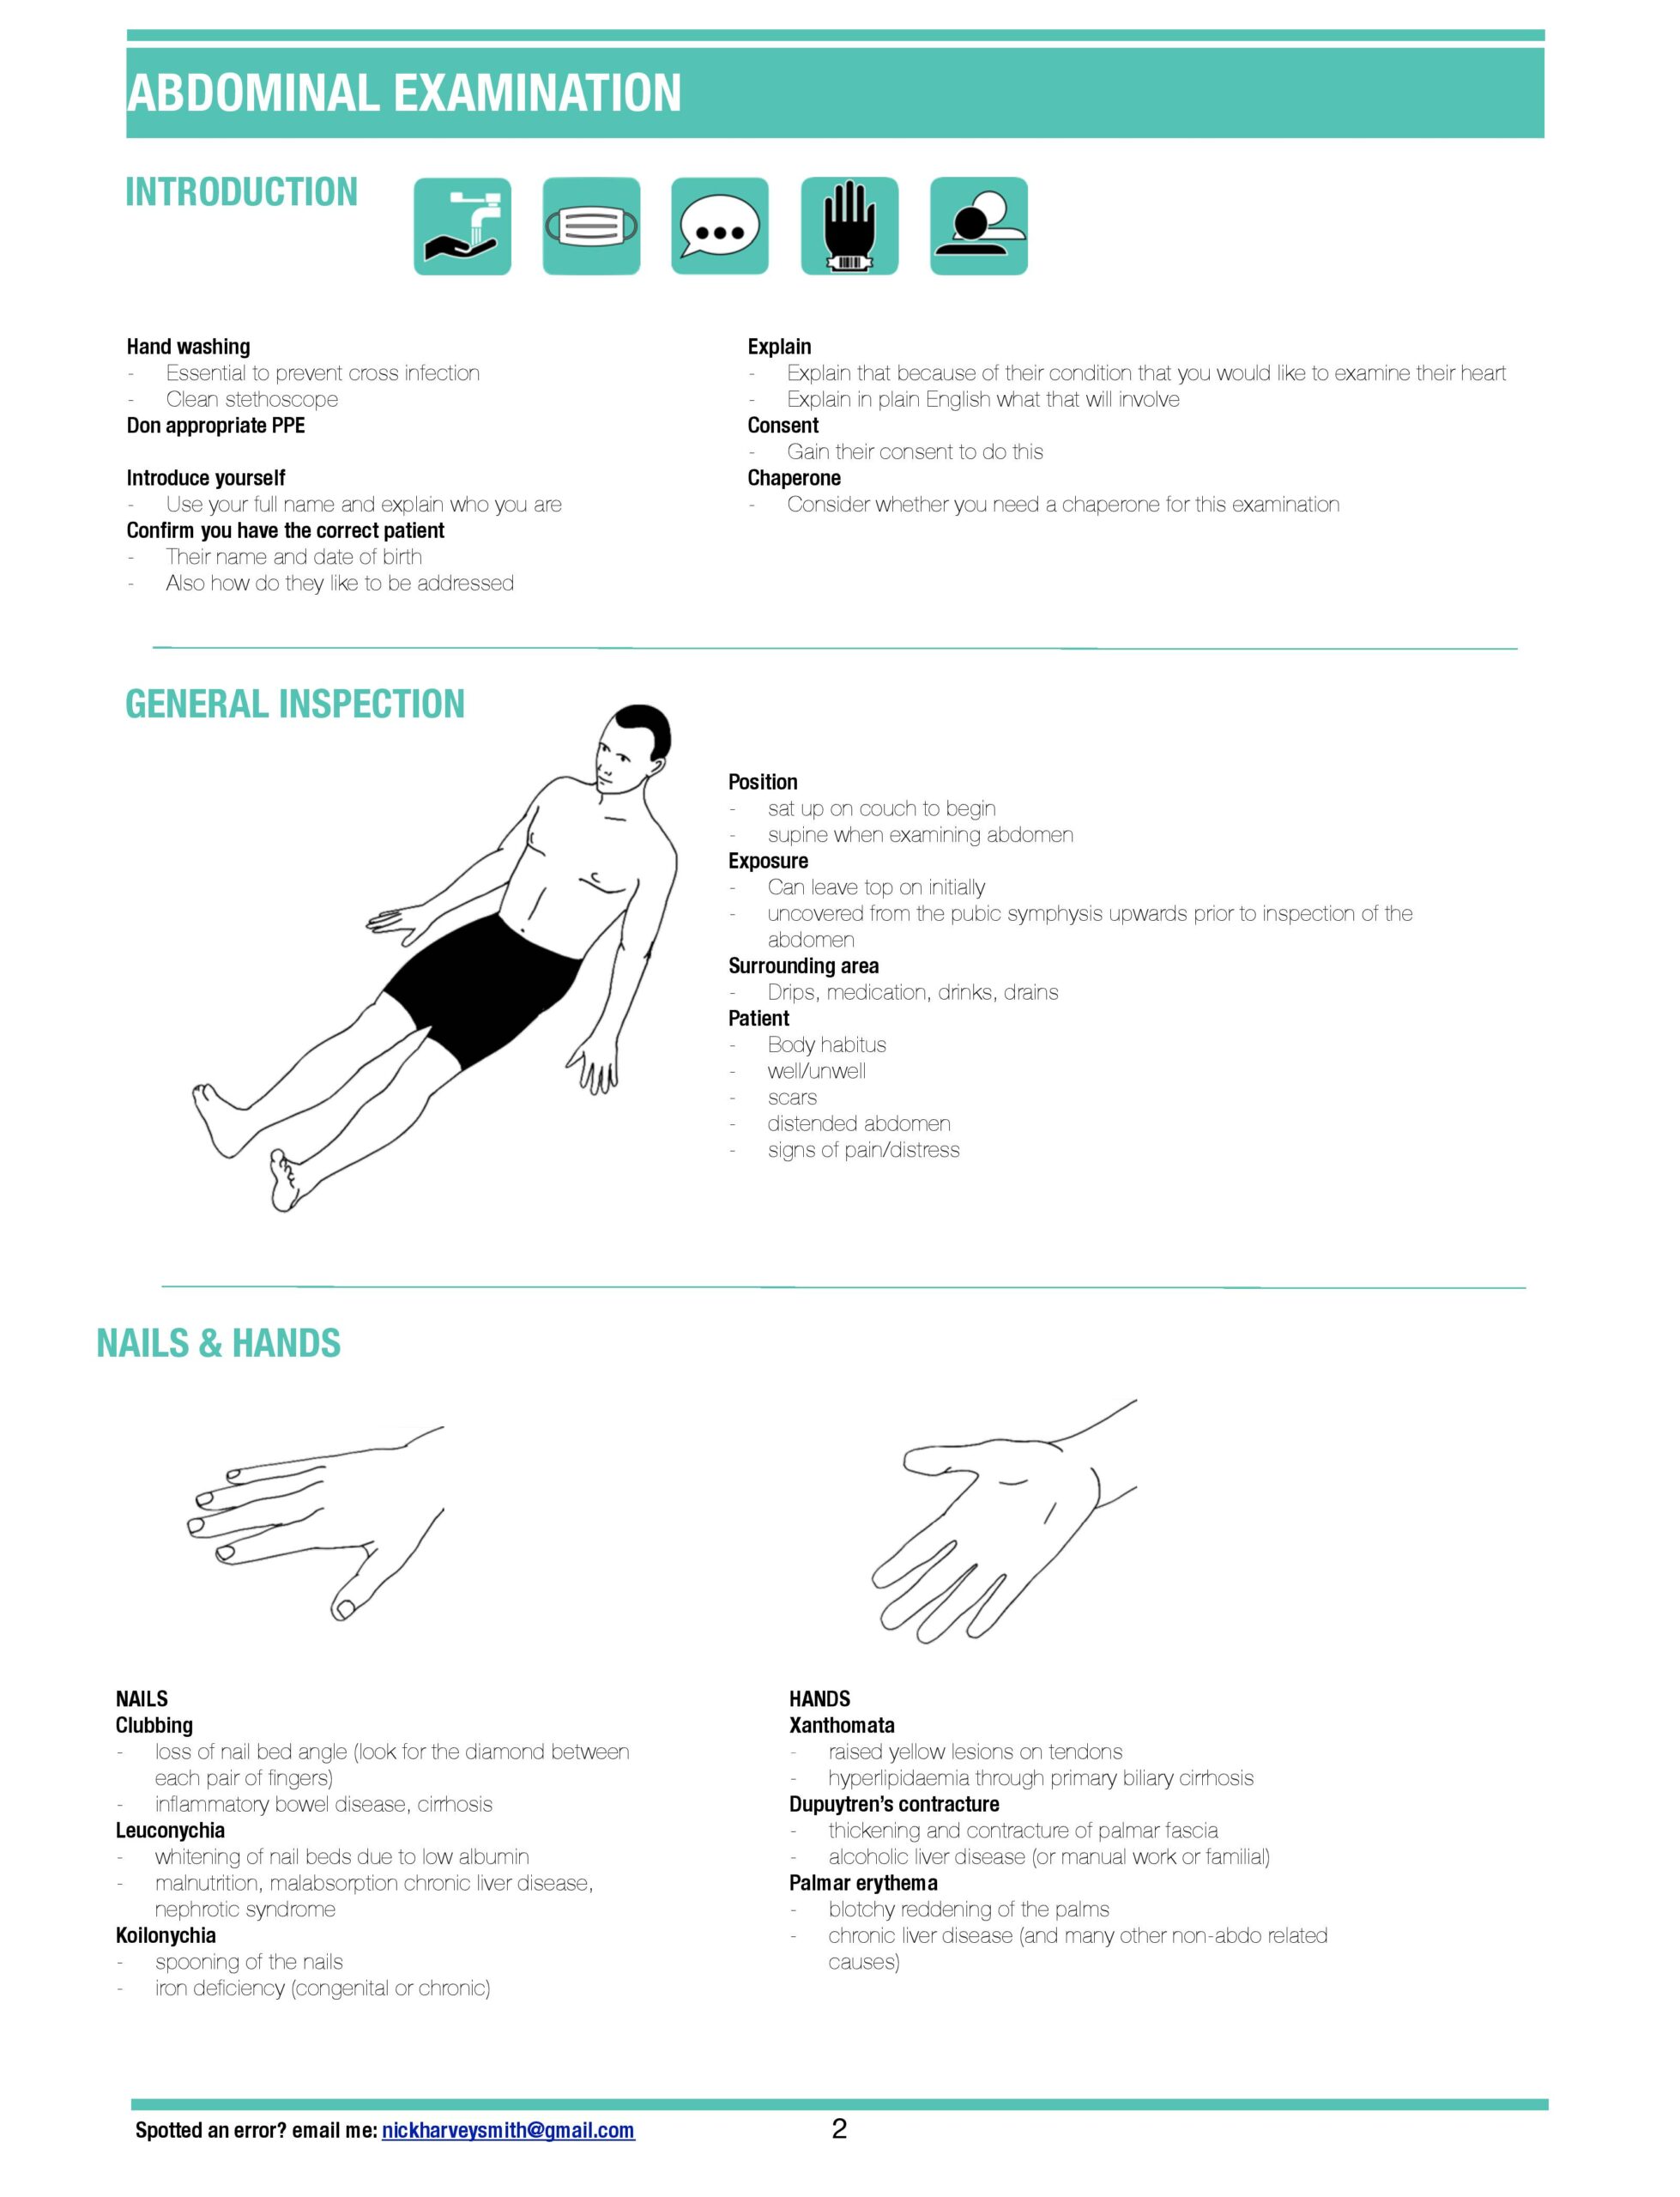
Use the preparation and consent approach above, adapted to this examination. Introduce yourself by your actual role and agree supervision. Explain what you need to examine, ask about pain and keep the patient involved as you proceed.
Brief history
“Can you briefly tell me why you have come to hospital?”
General inspection
“I am looking at the…”
Patient’s
- comfort level
- jaundice
- abdominal distension
- abdominal drains or scars
- spider naevi; caput medusa and gynaecomastia
- anasarca
Environment
- drains
Hands and other observations
“I am feeling for…”
- warmth
- clamminess
- the pulse (rate; rhythm; quality)
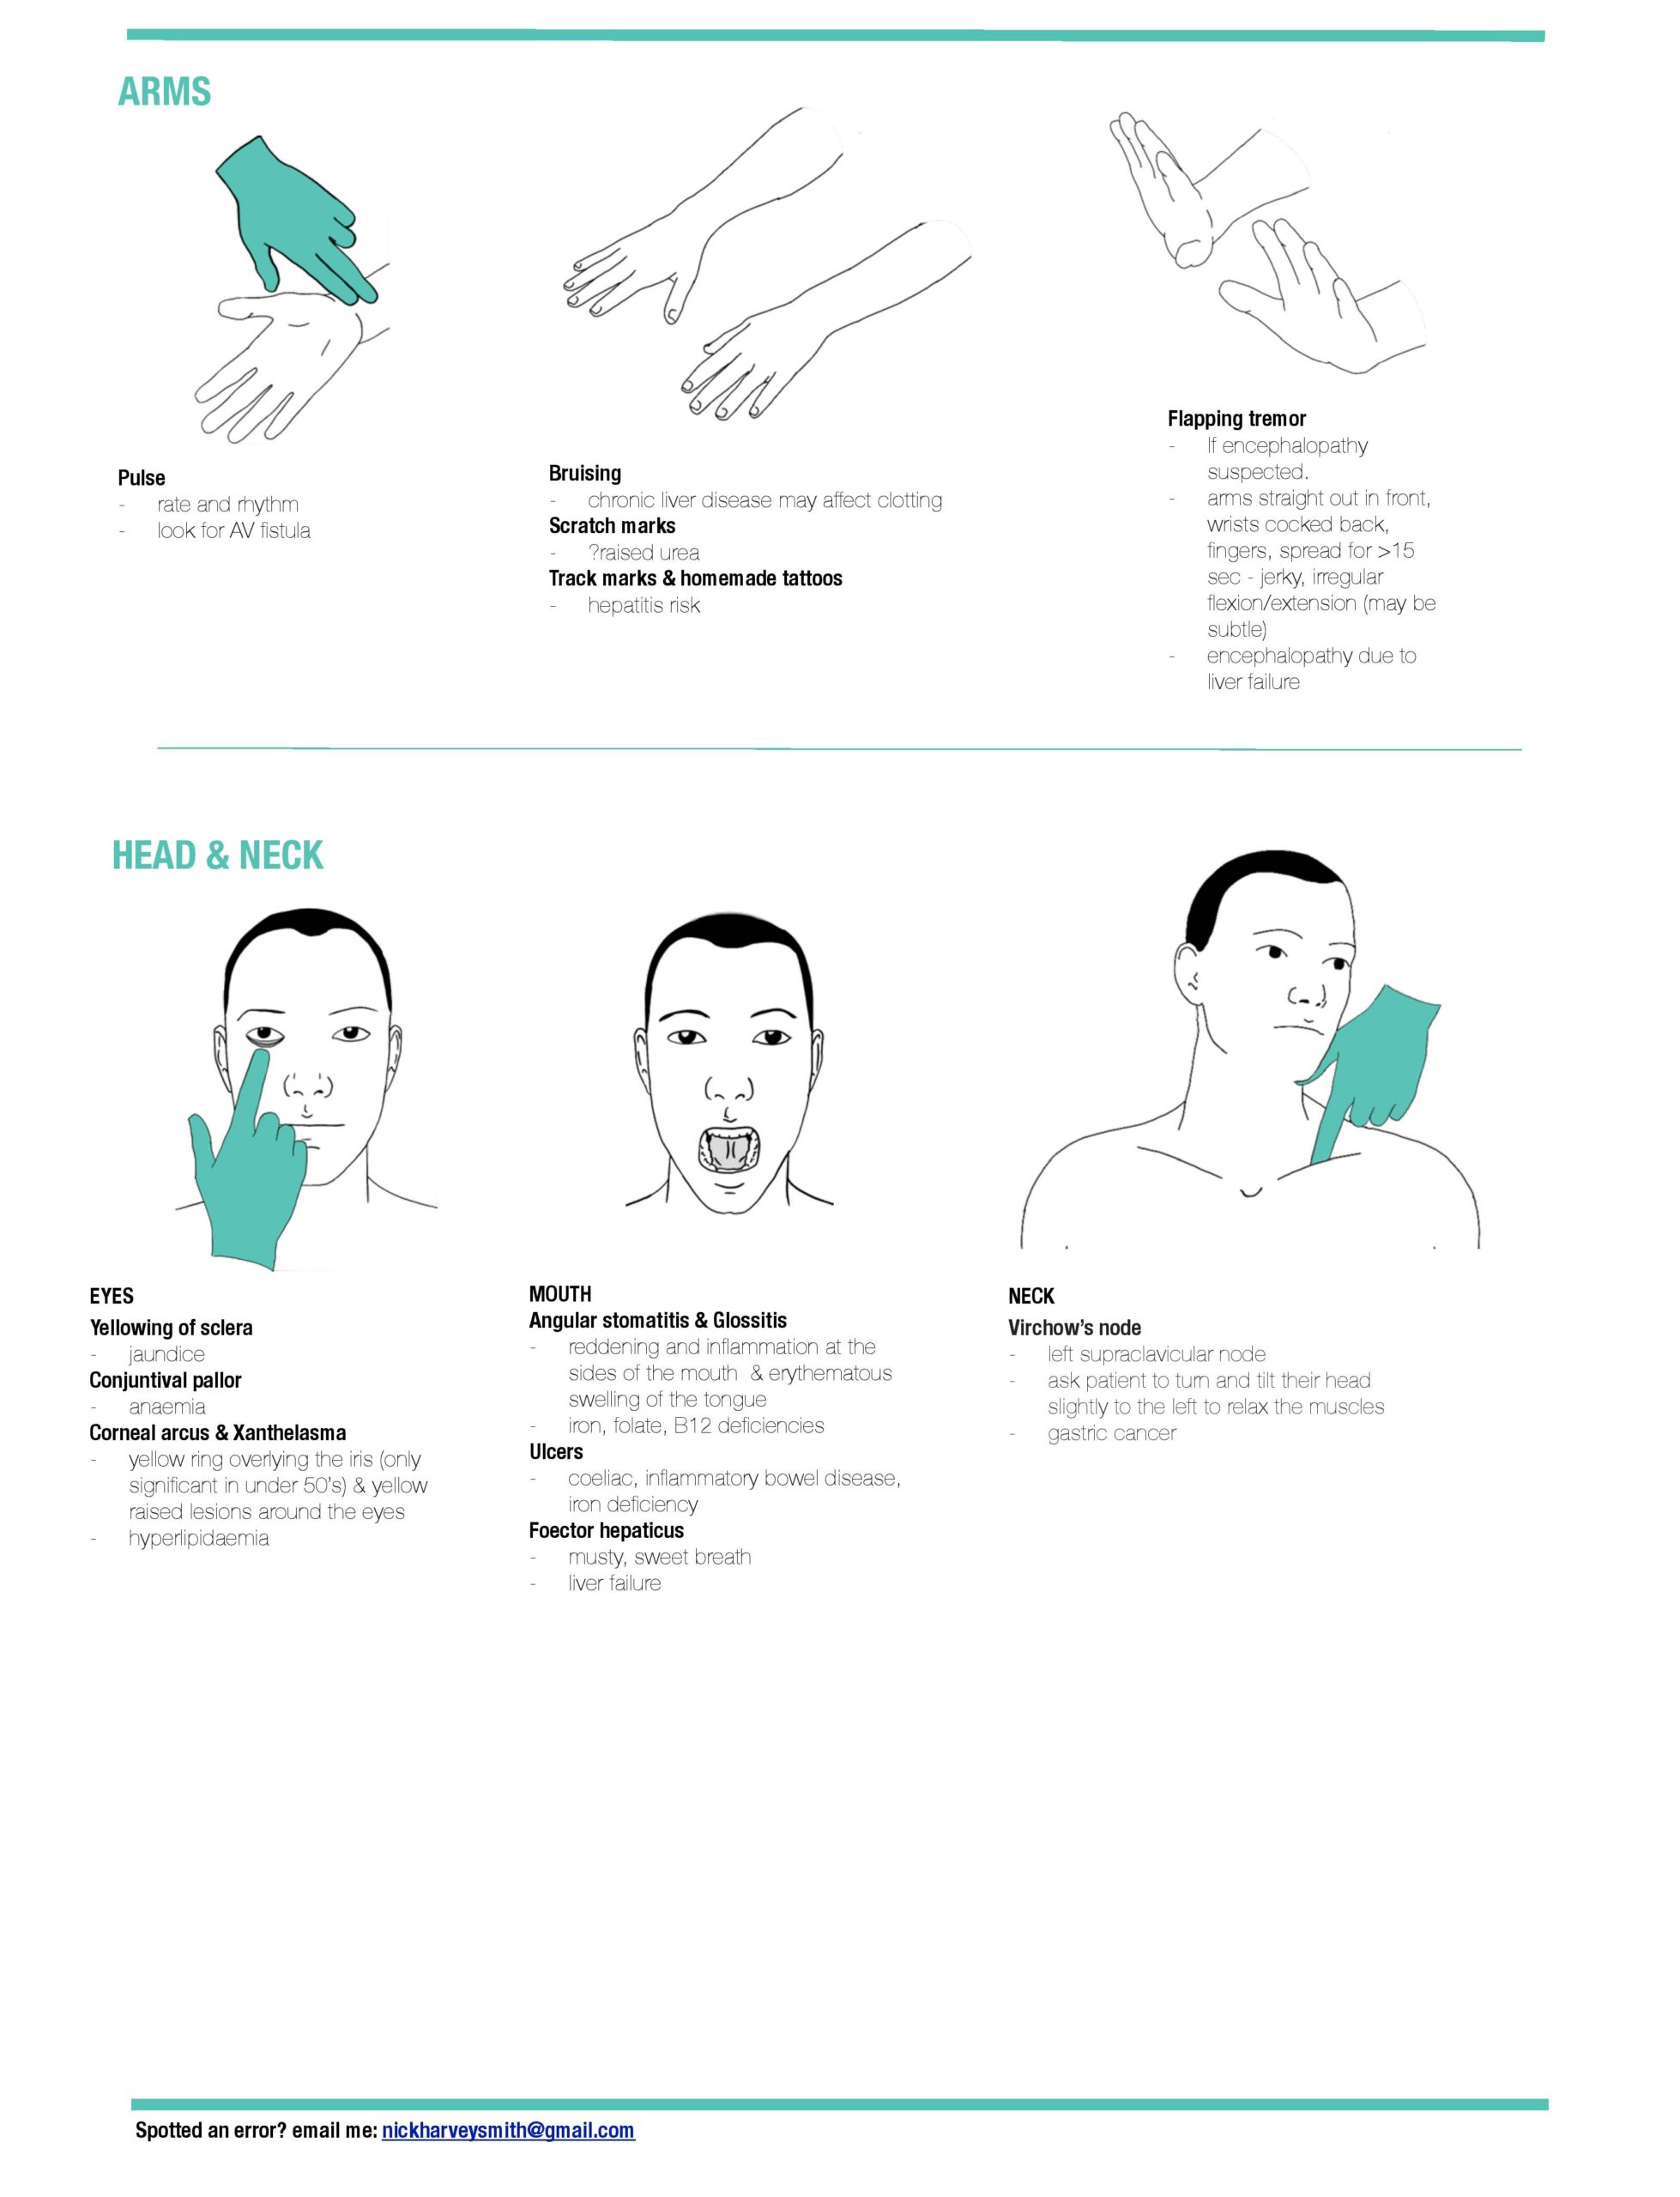
“I am looking for…”
- clubbing
- leukonychia
- palmar erythema
- Dupuytren’s contractures
- liver flap
Other observations
- Blood Pressure
- Respiratory Rate
- Oxygen saturations
- Temperature
- Blood glucose when clinically indicated
Face
“I am looking for evidence of…”
- conjunctival pallor (“Please look up; I will gently lower your bottom eyelids.”)
- angular stomatitis of lips
- oral ulcers (Please open your mouth and stick out your tongue.")
- lymph nodes (“I need to feel your neck for any swellings. I will stand behind you to do this.”)
- Virchow’s node can be found in the left supraclavicular fossa and may be a sign of intra-abdominal malignancy
Abdomen
“Now I need to examine your abdomen. Are you ok to lie flat? If at any time you are in pain or want me to stop let me know.”
“I will examine the patient from their right side; at their level; looking at the patient for any signs of discomfort.”
Inspection
- Closer inspection (don't forget the left flank)
Palpation
- Ask where it hurts, begin away from pain and palpate gently, then more deeply if appropriate, assessing tenderness, guarding, rigidity and masses
- Organs: liver; spleen; kidney; bladder
- Aorta
Percussion
- Organs: liver; spleen; bladder
- Ascites (shifting dullness)
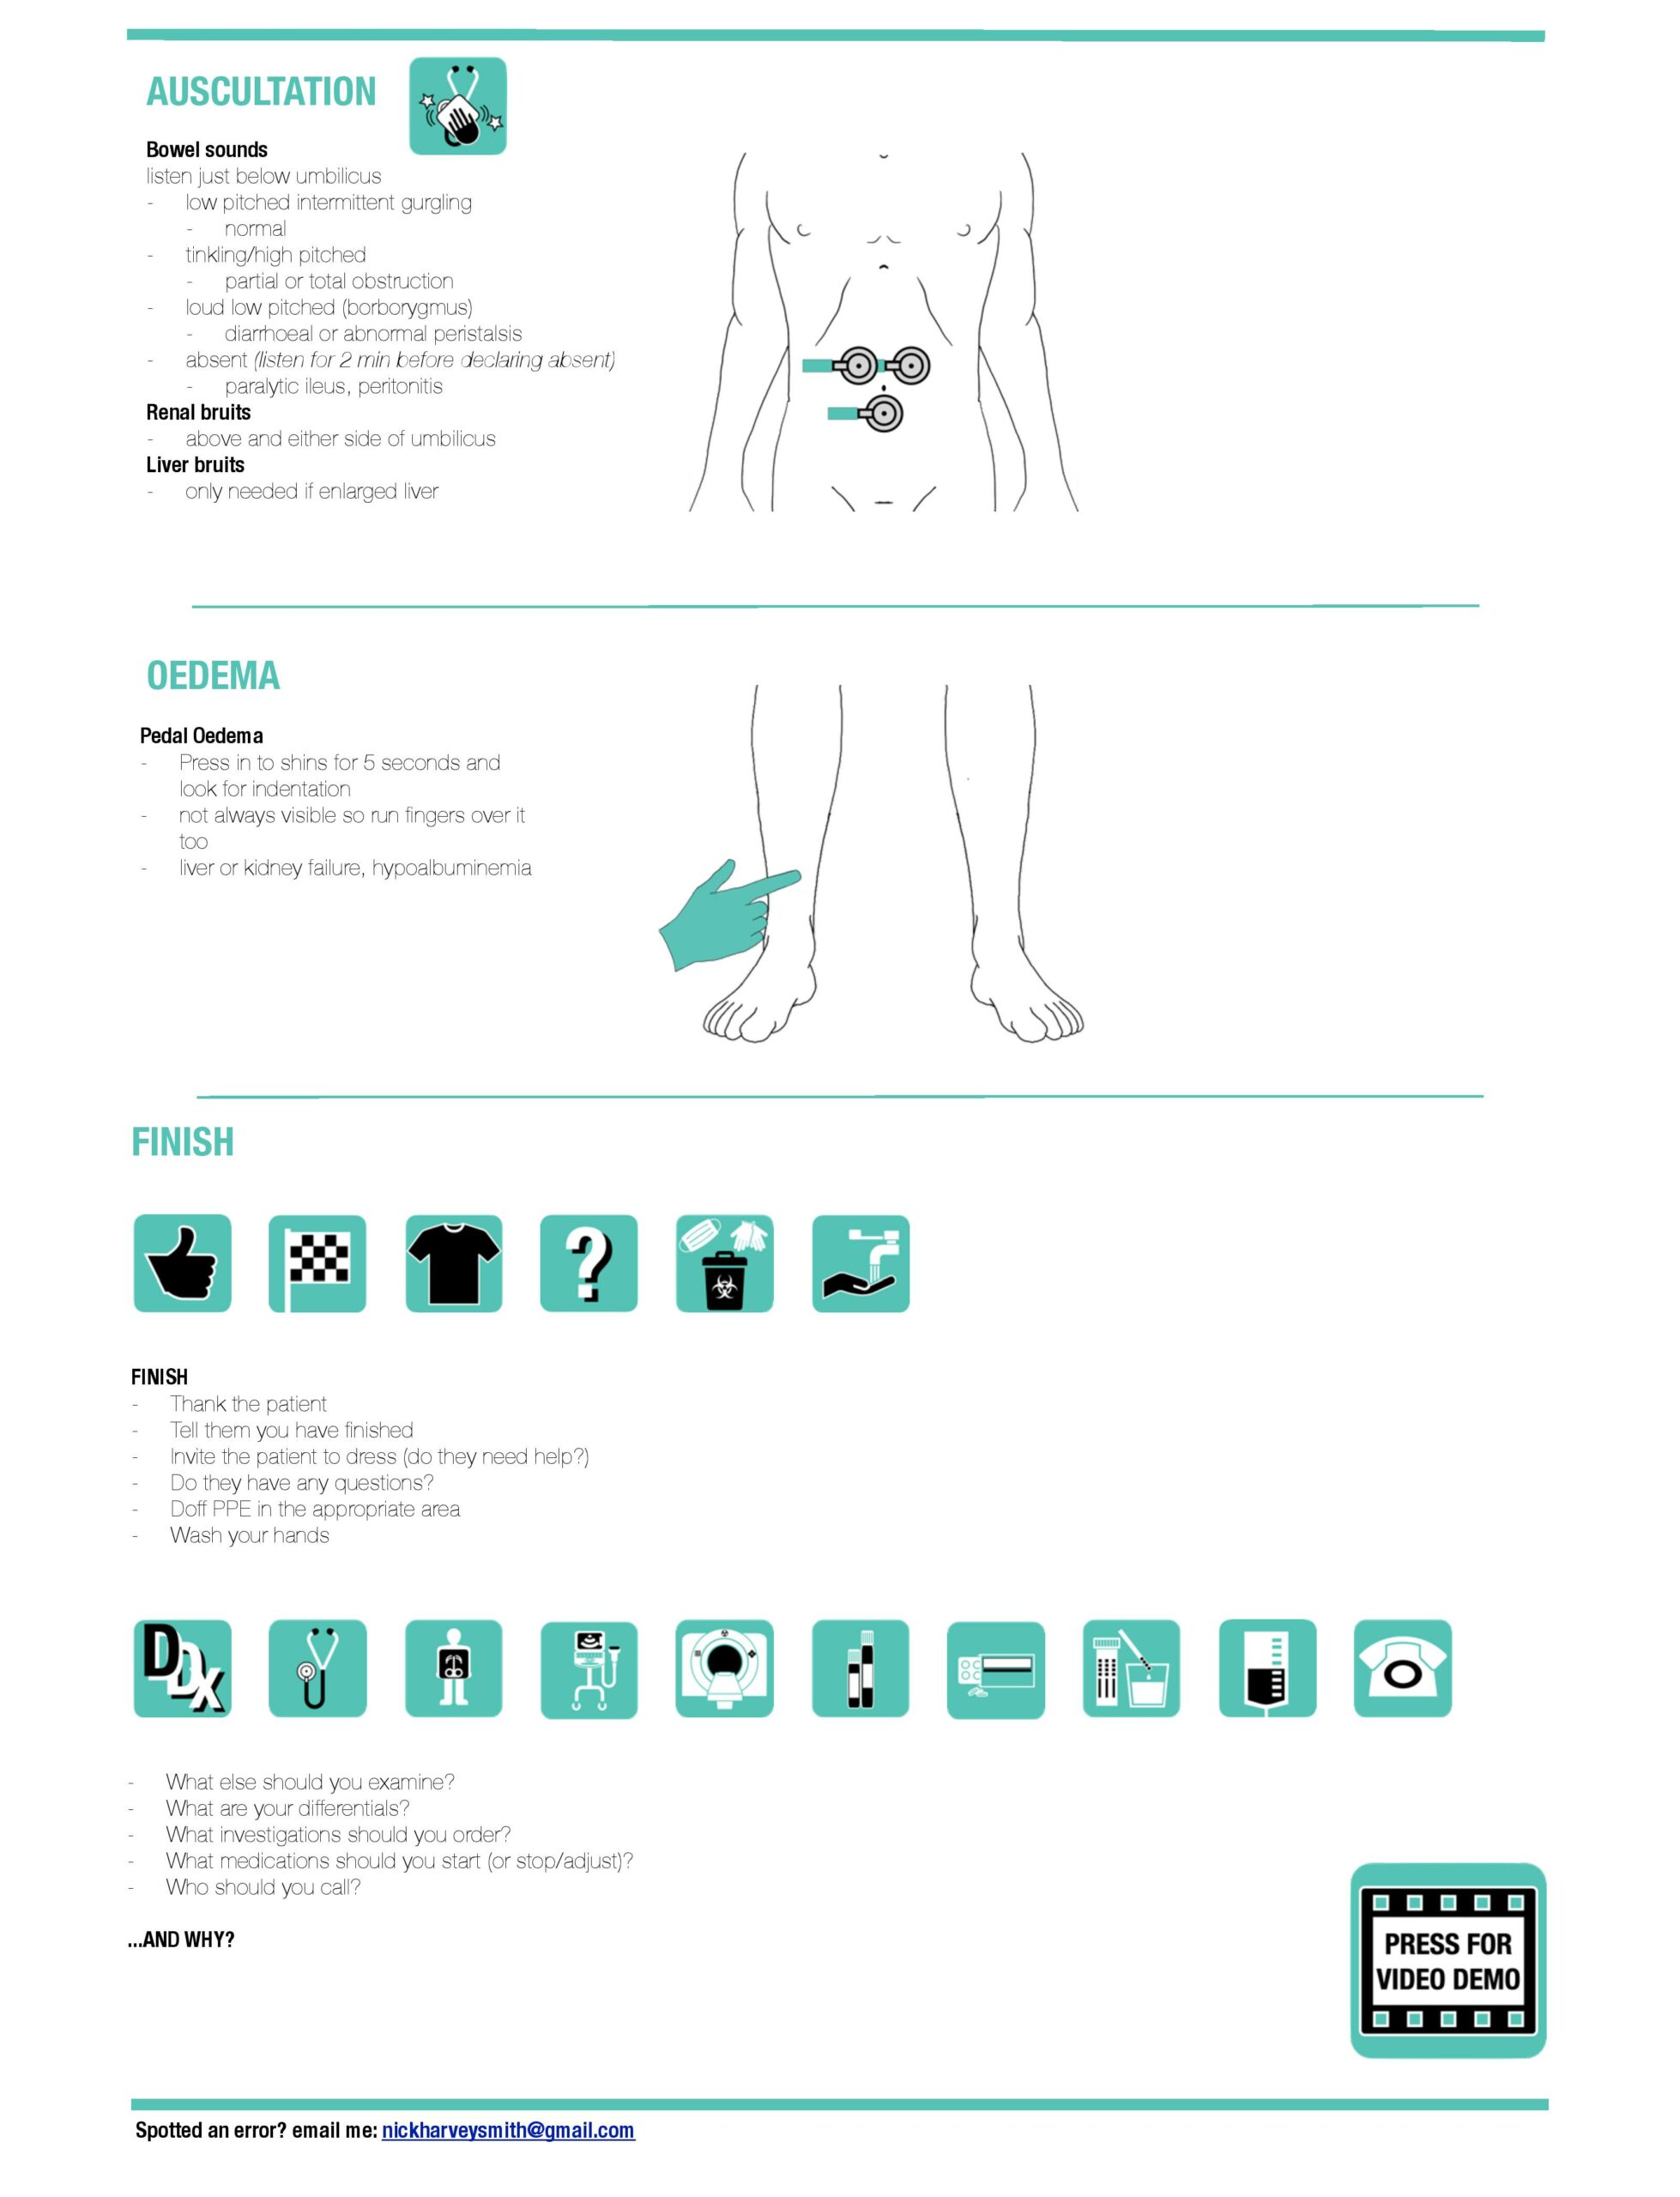
Auscultation
- Bowel sounds
- Femoral bruits
Close
Restore the patient’s comfort and privacy, thank them and summarise your actual findings. Use the interpretation below to explain the next steps and discuss them with the responsible clinician.
Further reading
Interpret and present your findings
Summarise the site and nature of tenderness, any guarding or rigidity, distension, masses and organ enlargement. Explain whether the findings suggest an urgent surgical or medical problem and what remains uncertain. Rectal, genital or pelvic examination is a separate, indication-dependent decision with consent and chaperone discussion. Choose urine, pregnancy testing where relevant, blood tests or imaging for the clinical question; routine abdominal radiography is not a universal completion step.
Reading the original illustration. The original illustration’s introduction mistakenly refers to examining the heart. Explain the abdominal examination instead. Its lists of physical signs are prompts for assessment, not diagnostic rules; bowel sounds and individual peripheral signs cannot reliably establish or exclude an abdominal diagnosis on their own.
Original abdominal infographics · Nick Smith
Original St Emlyn’s teaching artwork. Read with the updated written sequence and qualifications on this page.
05 / CHAPTER 6
Upper limb neurology
Find out whether the problem is weakness, altered sensation, pain or loss of coordination, and establish onset, handedness and functional effect. Compare sides systematically. A nerve root, peripheral nerve and central lesion can produce different patterns, so combine tone, power, reflexes and sensation rather than relying on one weak movement.
Work through tone, power, sensation, reflexes and coordination.
Upper limb neurology: sequence and example phrases
Introduction
Use the preparation and consent approach above, adapted to this examination. Introduce yourself by your actual role and agree supervision. Explain what you need to examine, ask about pain and keep the patient involved as you proceed.
Brief history
“Can you briefly tell me what the problem is?”
“Which hand do you write with?”
“Any trauma?”
“Any hobbies?”
“Are you currently working?”
General inspection
“I am looking at the…”
Patient for (standing; front; back; sides)
- wasting
- fasciculation
- posturing
- scars
Environment
- slings
- splints
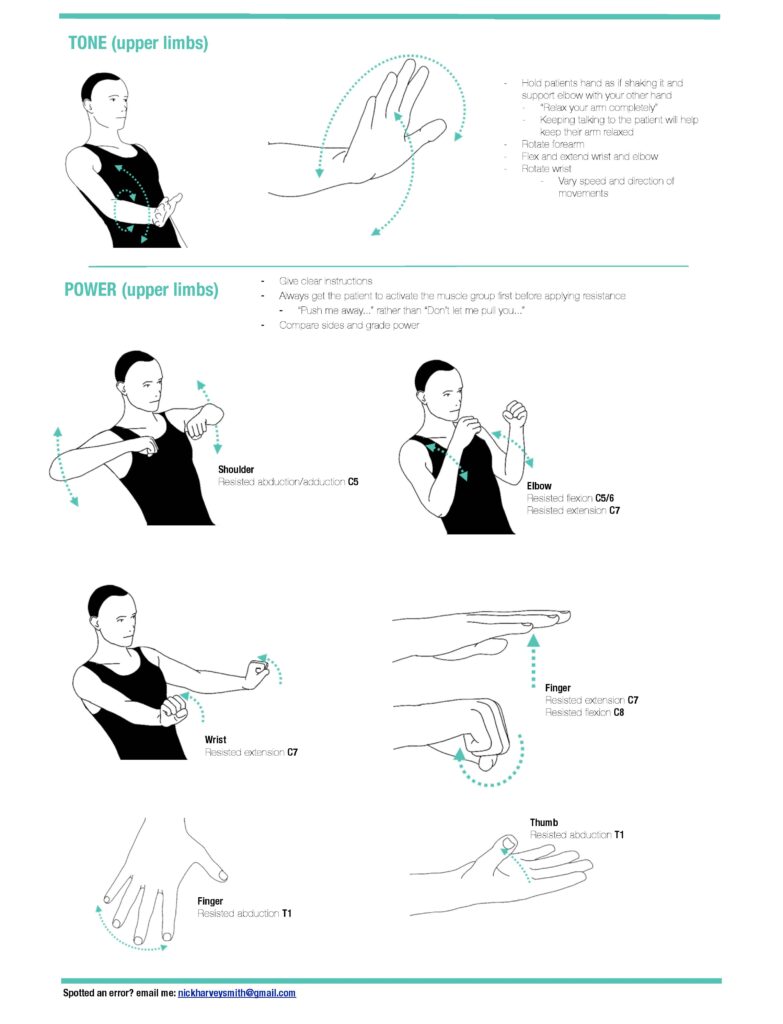
Tone
“I am going to hold each of your hands and do some movements with them to assess your tone…” (Flexion; extension; supination and pronation at the elbow)
“I am assessing whether tone is increased, reduced or normal.”
Power
“I need to assess your strength by asking you to make some movements against resistance.”
Compare sides, test proximal and distal groups, and document power on the MRC 0–5 scale, including pain or other limitations. Muscles have overlapping root supplies; these are useful key movements, not a complete map of each muscle’s innervation.
| Key movement | Clinical root anchor |
|---|---|
| Elbow flexion | C5 |
| Wrist extension | C6 |
| Elbow extension | C7 |
| Finger flexion (distal phalanx of middle finger) | C8 |
| Little-finger abduction | T1 |
Also assess shoulder abduction, wrist flexion, finger extension and relevant thumb movements. Specify the movement and peripheral nerve being assessed; thumb extension, opposition and finger abduction are not all simply “T1”.
ASIA: key muscles and neurological assessment
Sensation
“I need to test how well you can feel areas on your skin…”
- Can you feel here? (on upper chest)
- Bring your arms straight by your side with your palms facing forward (‘anatomical’ position).
- Please can you close your eyes and tell me when you feel something.
“I will compare sensation on both sides, test relevant dermatomes and peripheral nerve territories, and map any abnormality using:”
- Light touch (cotton wool)
- Sharp/dull (neurotip)
- Vibration sense (128Hz tuning fork): start on a distal bony prominence and move proximally
- Proprioception (joint position sense)
- Temperature
Reflexes
“Let your arm relax while I check the reflexes with this tendon hammer.”
- Support the limb and compare sides: biceps C5–C6, brachioradialis C5–C6 and triceps mainly C7.
- Describe whether reflexes are absent, reduced, normal or brisk, and use reinforcement if needed without contracting the muscle being tested.
Stanford Medicine 25 — tendon reflexes
Coordination
“Please touch your nose and then my finger, and repeat on the other side.”
- Assess finger–nose testing with eyes open for dysmetria and intention tremor.
- Test rapid alternating hand movements for dysdiadochokinesia.
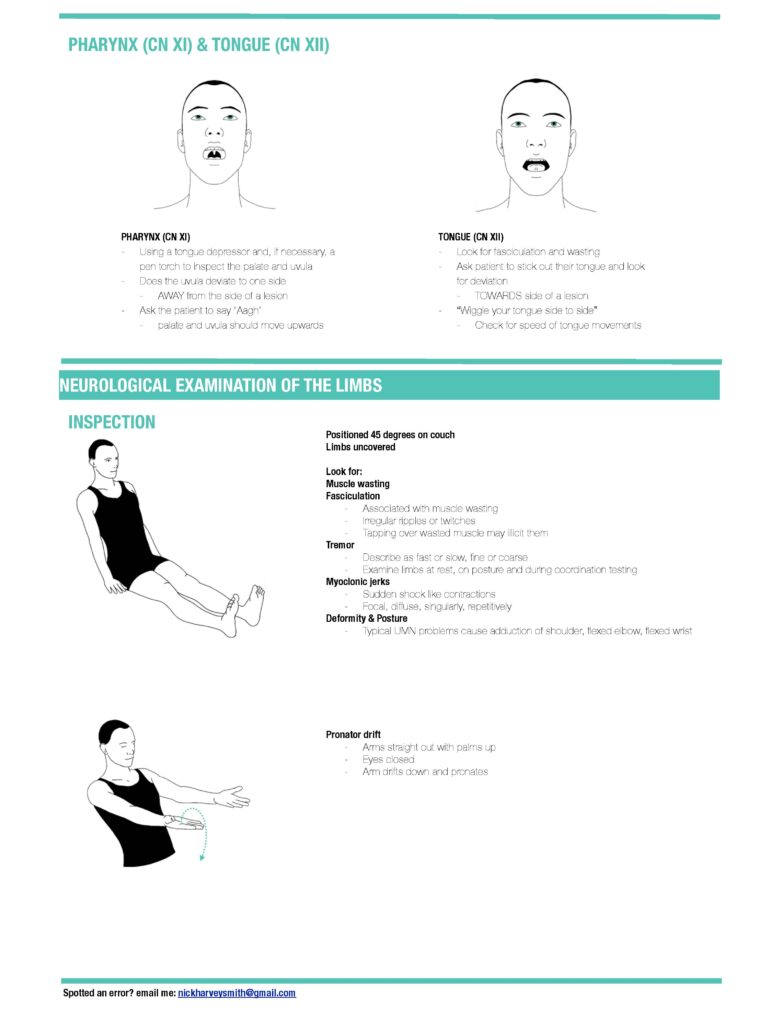
- Assess pronator drift with the arms extended forwards, palms upwards and eyes closed; look for pronation and downward drift.
University of Utah — motor examination
Close
Restore the patient’s comfort and privacy, thank them and summarise your actual findings. Use the interpretation below to explain the next steps and discuss them with the responsible clinician.
Further reading
- Geeky Medics — Upper limb neuro exam
- TeachMePhysiology — upper motor neurones
- TeachMePhysiology — lower motor neurones
- Geeky Medics — Cerebellar examination
- Geeky Medics — ascending spinal tracts
- Geeky Medics — descending tracts
- Geeky Medics — Dermatomes and myotomes
- Geeky Medics — Power grading: MRC
- NCBI Clinical Methods — Assessing reflexes
- ASIA — neurological assessment resources
- Stanford — reflexes
Interpret and present your findings
Describe the distribution and severity of weakness, sensory change, reflex differences and coordination findings. Consider whether the pattern is more consistent with a central, root, peripheral nerve or muscle problem, while acknowledging pain or poor comprehension that limited testing. Complete relevant neck, vascular or wider neurological assessment. New focal neurological symptoms require urgent assessment through the appropriate pathway.
Reading the original illustration. The original neurological artwork has some simplified or incorrect nerve labels. Use the written table for the key motor levels: wrist extension is the C6 key muscle, and thumb movements should be described by the actual movement and nerve tested rather than grouped under T1. Root supply overlaps; the key-muscle scheme is a clinical classification convention.
Original upper limb neurology infographics · Nick Smith
Original St Emlyn’s teaching artwork. Read with the updated written sequence and qualifications on this page.
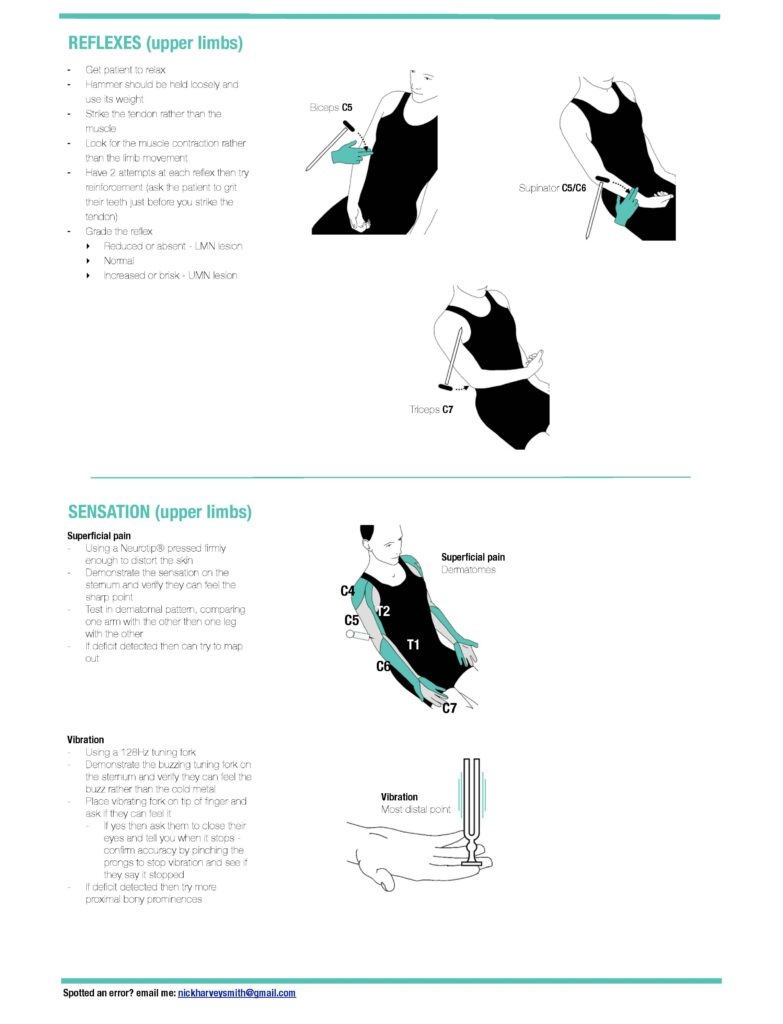
Original dermatome diagram

06 / CHAPTER 6
Lower limb neurology
Assess walking only when safe, with assistance and the person’s usual aid as needed. Observe gait and inspect for wasting, asymmetry and involuntary movement, then examine tone, power, sensation, reflexes and coordination. A painful joint may limit movement without representing neurological weakness, so ask about pain and support the limb.
Compare sides, assess gait safely and localise any deficit.
Lower limb neurology: sequence and example phrases
Introduction
Use the preparation and consent approach above, adapted to this examination. Introduce yourself by your actual role and agree supervision. Explain what you need to examine, ask about pain and keep the patient involved as you proceed.
Brief history
“Can you briefly tell me what the problem is?”
“Any trauma?”
“Any hobbies?”
“Are you currently working?”
General inspection
“I am looking at the…”
Patient for (standing: front; back; sides)
- gross deformity (varus/valgus)
- wasting
- fasciculations
- I will also assess:
- gait (broad based; shuffling; antalgic)
- hip extension
Environment
- walking aids (crutches; wheelchair; splints)
Tone
“Please lie back comfortably and let your legs relax while I move them gently.”
- With the patient supine and relaxed, compare resistance to passive movement at the hips, knees and ankles. Check for pain or restrictions before moving the joints.
- Leg rolling and lifting the knee while watching the heel can help assess tone; interpret the response with the rest of the examination.
- To assess ankle clonus when indicated, support the leg, briskly dorsiflex the foot and maintain gentle dorsiflexion. Record the beats and whether clonus is sustained.
Power
“I need to assess your strength by asking you to make some movements against resistance.”
Compare sides, test proximal and distal groups, and document power on the MRC 0–5 scale, including pain or other limitations. Muscles have overlapping root supplies; these are useful key movements, not a complete map of each muscle’s innervation.
| Key movement | Clinical root anchor |
|---|---|
| Hip flexion | L2 |
| Knee extension | L3 |
| Ankle dorsiflexion — bring the foot up | L4 |
| Great-toe extension — lift the big toe | L5 |
| Ankle plantarflexion — push the foot down | S1 |
Add hip extension, knee flexion, ankle inversion and eversion, and toe flexion as the presentation requires. Interpret the pattern together with sensation and reflexes.
ASIA: key muscles and neurological assessment
Sensation
“I need to test how well you can feel areas on your skin…”
Demonstrate sensation elsewhere first.
Legs in ‘anatomical’ position'
“I will compare sensation on both sides, test relevant dermatomes and peripheral nerve territories, and map any abnormality using:”
- Light touch (cotton wool)
- Sharp/dull (neurotip)
- Vibration sense (128Hz tuning fork): start on a distal bony prominence and move proximally
- Proprioception (joint position sense)
- Temperature
Reflexes
“Let your legs relax while I check the knee and ankle reflexes.”
- Compare knee reflexes L2–L4 (mainly L4) and ankle reflexes S1–S2 (mainly S1). Use reinforcement when needed.
- For the plantar response, use a blunt stimulus along the lateral sole from heel towards the forefoot, then medially. Record flexor, extensor or absent responses; an extensor great toe in an adult suggests corticospinal tract dysfunction. Distinguish this from withdrawal.
Stanford Medicine 25 — reflexes
Coordination
“I need to assess your co-ordination…”
- Can you put the heel of one foot below your knee and run your foot up and down your shin with eyes open; additional testing with eyes closed may help assess sensory contribution (repeat on other side).
Close
Restore the patient’s comfort and privacy, thank them and summarise your actual findings. Use the interpretation below to explain the next steps and discuss them with the responsible clinician.
Further reading
- Geeky Medics — Lower limb neurological exam
- Geeky Medics — Gait abnormalities
- TeachMePhysiology — upper motor neurones
- TeachMePhysiology — lower motor neurones
- Geeky Medics — Cerebellar examination
- Geeky Medics — ascending spinal tracts
- Geeky Medics — descending tracts
- Geeky Medics — Dermatomes and myotomes
- Geeky Medics — Power grading: MRC
- NCBI Clinical Methods — Assessing reflexes
- ASIA — neurological assessment resources
- Stanford — reflexes
Interpret and present your findings
Present whether the findings are symmetrical, proximal or distal and whether tone, reflexes and plantar responses fit the pattern. Record sensation by distribution, not simply “reduced”. Relate the examination to function and the history, and consider relevant spinal, hip, vascular or abdominal examination. Acute weakness, a sensory level or concerning bladder, bowel or saddle symptoms needs prompt assessment; do not use a routine limb examination to exclude a spinal emergency.
Reading the original illustration. Use the written key-muscle table and the linked ASIA worksheet when learning the motor levels. Distinguish ankle dorsiflexion, plantarflexion and great-toe extension explicitly. Interpret a plantar response and other signs in the patient’s age and clinical context.
Original lower limb neurology infographics · Nick Smith
Original St Emlyn’s teaching artwork. Read with the updated written sequence and qualifications on this page.
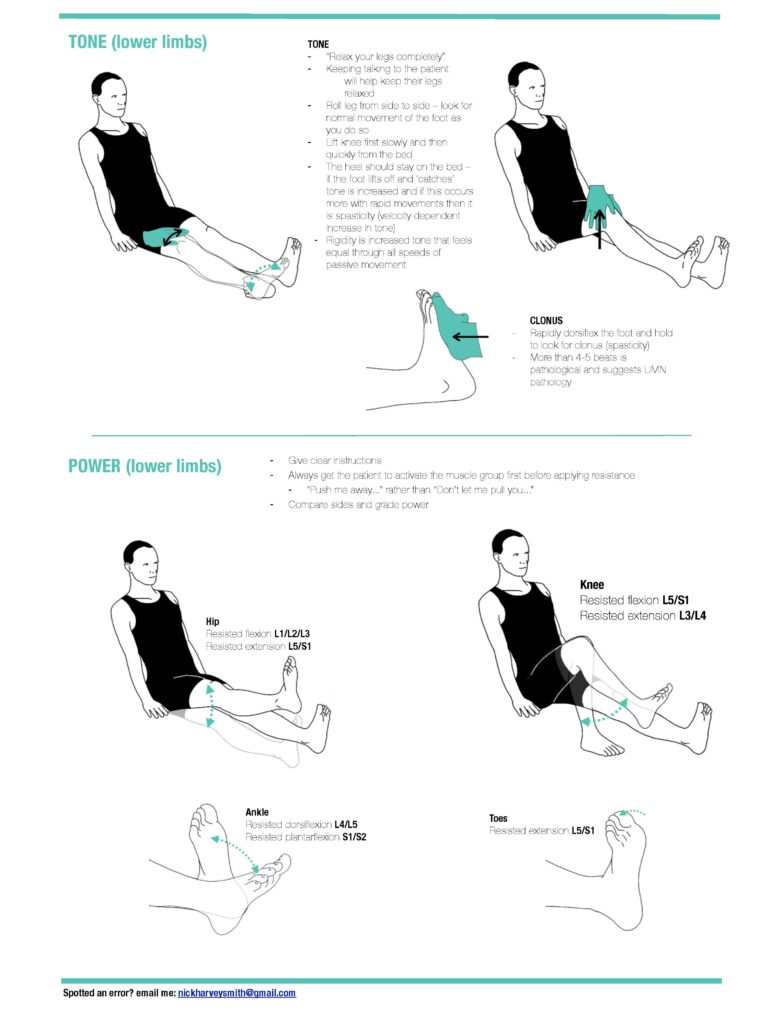
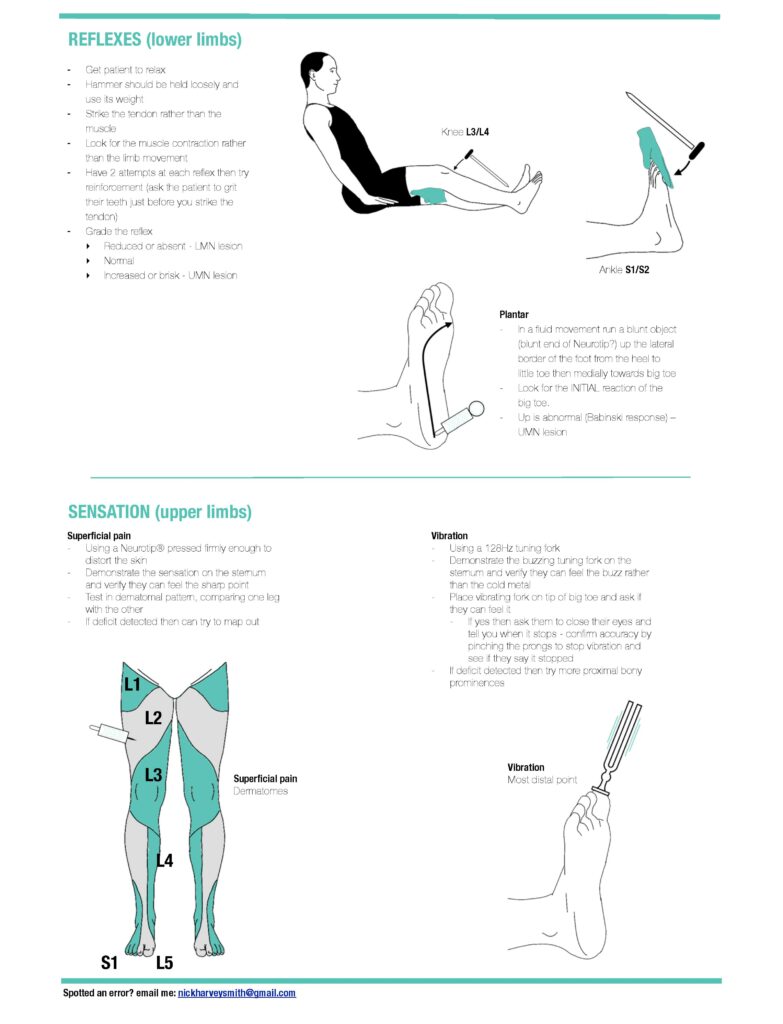
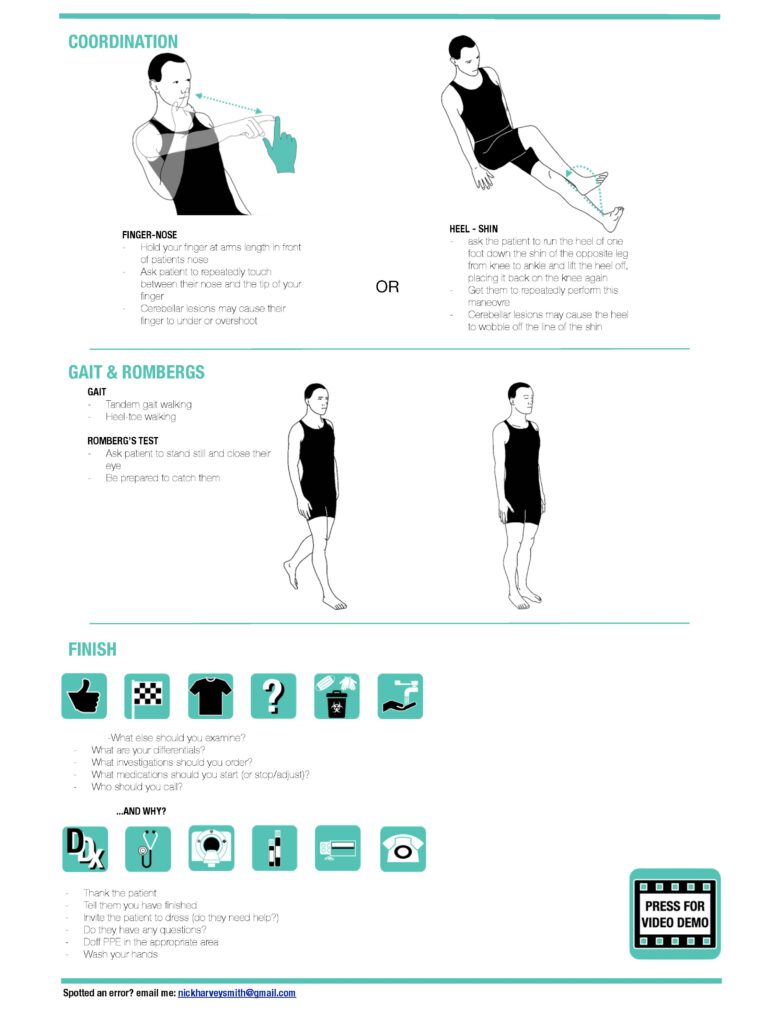
Original dermatome diagram

07 / CHAPTER 6
Cranial nerves
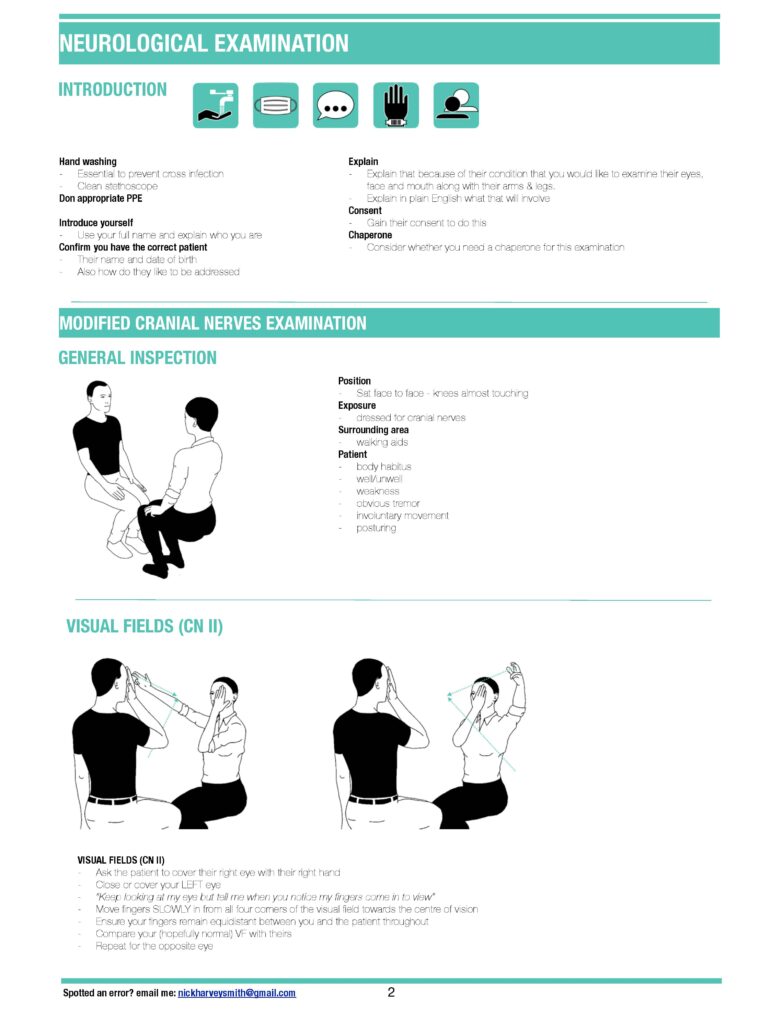
Begin with the symptoms and a general look at facial symmetry, eye position, pupils, speech and any hearing or visual aids. Explain each task and examine the requested nerves systematically. The aim is to identify and localise a deficit, not to perform every potentially uncomfortable reflex in every person.
Follow the nerves systematically, with targeted additional testing.
Cranial nerves: sequence and example phrases
Use the station brief
Focus on the requested nerves and symptoms. Corneal and gag reflexes are not routine tests in an otherwise standard conscious-patient station; explain any clinical indication and seek consent before an uncomfortable test.
Introduction
Use the preparation and consent approach above, adapted to this examination. Introduce yourself by your actual role and agree supervision. Explain what you need to examine, ask about pain and keep the patient involved as you proceed.
Brief history
“Can you briefly tell me why you've come to hospital today?”
General inspection
“I am looking at the…”
Patient for
- facial asymmetry
- rashes
- ptosis
- unequal pupils
- scars
” will now examine each nerve in turn…”
Environment
- glasses
- hearing aids
Cranial Nerve Examination
You may want to clarify aspects of the required examination with the examiner. Follow the station instructions and the clinical indication
Olfactory: Cranial Nerve I
“Have you noticed any change in your sense of smell?”
Examiner: "would you like me to formally examine this?"
Optic: Cranial Nerve II
Visual acuity
- "If you normally wear glasses please put them on, if haven’t got them with you, use pin hole.
- I will use this Snellen chart to assess acuity.
- Use the distance specified for this chart (six metres for a standard Snellen chart).
- Close one eye, read the lowest line possible, then change side."
Record acuity for each eye as the testing distance over the smallest line read, for example 6/9; record correction and pinhole results
Visual fields
- Please cover one eye. I will cover the opposite and we will look at each in turn
- I will sit opposite you. Please look at my nose; I will bring my finger in from the side, say yes when you see my finger and if you see it disappear at any time (assess all four quadrants in each eye)
Examiner: "Would you like me to formally assess blind spot (red hat pin) or for neglect?”
Colour vision
Examiner: "Would you like me to assess colour vision using Ishihara chart?“
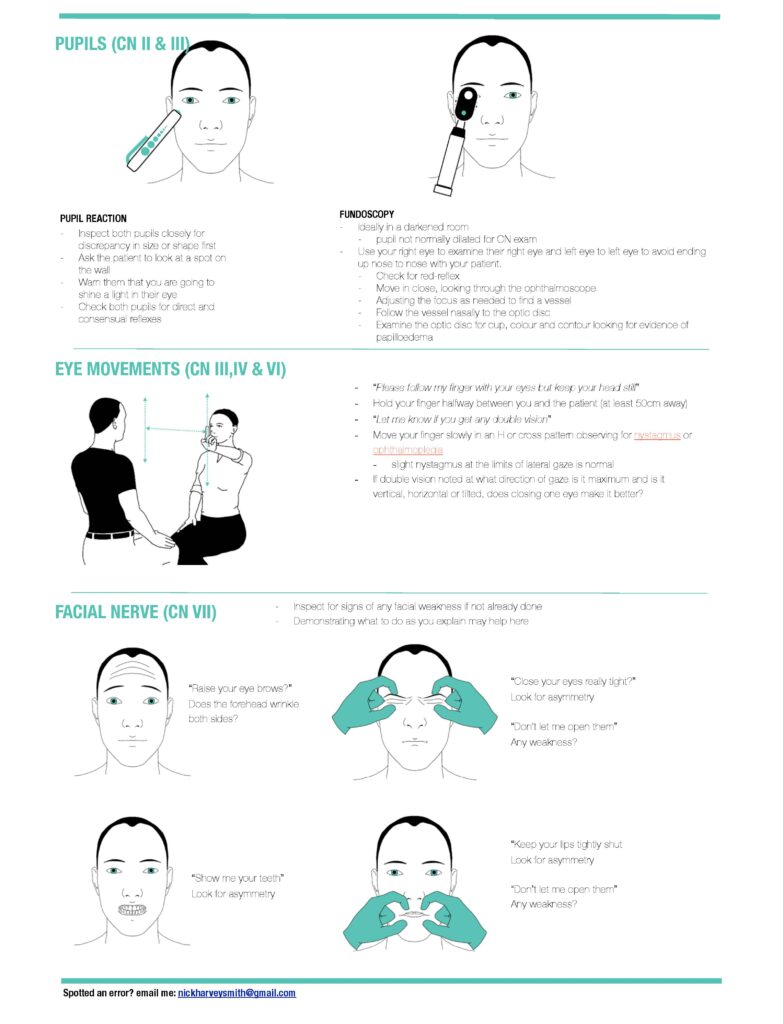
Pupils
"I am looking at the pupils for:
- size
- shape
- regularity
- ptosis
- normal lie
Pupillary reflexes (ask pt to focus on point in distance),
I am assessing for the following pupilliary reflexes:
- Direct
- Consensual
- Swinging-light reflex to assess for a relative afferent pupillary defect
“Depending on the findings and station brief, I would consider…”
- fundoscopy
- slit lamp examination when an ocular problem is suspected
- eversion of lids if FB concern.
- Examiner: "Would you like me to do this?"
Eye movements: Cranial Nerves III, IV, VI
- "Please keep your head still and follow my finger with you eyes.
- Tell if you have any pain or double or blurred vision.
- I am looking for nystagmus and ptosis."
Trigeminal: Cranial Nerve V
Motor
“Please can you clench and relax your teeth?”
“I am feeling over the:”
- Masseter
- Temporalis
Sensory
"Can you feel me touch you (dull, sharp, light etc)"…
- ophthalmic
- maxillary
- mandibular divisions?
“Does it feel the same on both sides?”
Reflexes
Examiner: "would you like me to assess…"
- Corneal reflex
- Jaw jerk
Facial: Cranial Nerve VII
Motor (muscles of facial expression)
- "Show me teeth; puff your cheeks out; purse your lips.
- Close your eyes tight; don’t let me open them.
- Raise your eyebrows and wrinkle your forehead
Sensory
Altered:
- hearing (hyperacusis)
- taste
Vestibulocochlear: Cranial Nerve VIII
Cochlear: hearing
- Ask about hearing change and tinnitus; inspect the ears and perform otoscopy when indicated.
- Assess each ear separately with an appropriate hearing screen. Rinne compares air and bone conduction; Weber assesses lateralisation, using a 512 Hz tuning fork. Interpret with the history and otoscopy.
Vestibular: balance
- For brief, position-triggered vertigo, consider Dix–Hallpike testing when appropriate and safe.
- HINTS is for an acute vestibular syndrome with ongoing symptoms and nystagmus, performed by a clinician trained and experienced in its use; it should not be used independently by an untrained student to exclude stroke. It is not a general test for every dizzy patient or for brief positional symptoms.
- Central or uncertain findings require urgent assessment through the stroke pathway. If trained HINTS assessment is unavailable and BPPV or postural hypotension does not explain acute vestibular syndrome, NICE recommends immediate referral.
NICE NG127 — dizziness and vertigo · SAEM GRACE-3
Glossopharyngeal: Cranial Nerve IX
Ask about swallowing difficulty and any relevant change in taste. Assess IX and X together through the history, voice and palatal movement.
If clinically indicated, the afferent (sensory) limb of the gag reflex is mainly IX; the efferent (motor) limb is X. Do not describe the afferent limb as a motor test or use the gag reflex alone to decide whether swallowing is safe.
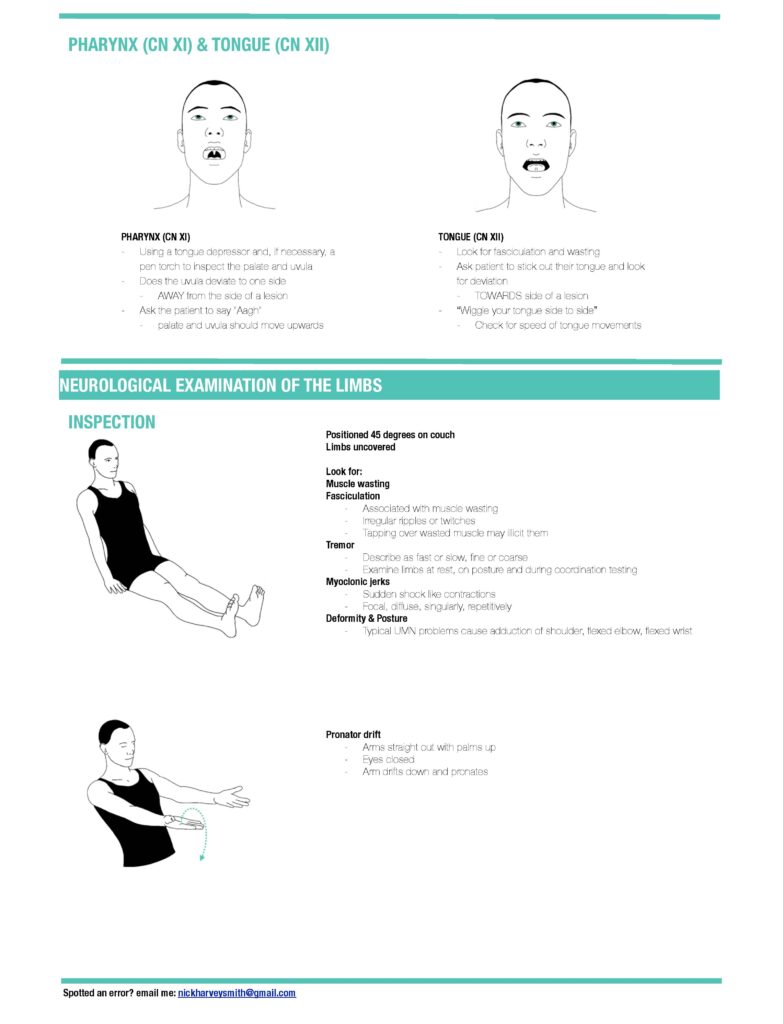
Vagus: Cranial Nerve X
“Please open your mouth and say “ah”.”
Listen for a hoarse or nasal voice and inspect palatal elevation and symmetry. Ask about dysphagia. The efferent (motor) limb of the gag reflex is X; test it only when clinically indicated and explain the procedure.
University of Utah — cranial nerve examination
Accessory: Cranial Nerve XI
Motor
- "Can you shrug your shoulders?" (assessing trapezius strength)
- "Turn your head into my hand?" (assessing sternocleidomastoid on both sides)
Hypoglossal: Cranial Nerve XII
Motor
- "Can you stick out your tongue?" (assessing for fasciculation and wasting)
- "Can you push your tongue into your cheek and don’t let me push it in." (assess each side)
Close
Restore the patient’s comfort and privacy, thank them and summarise your actual findings. Use the interpretation below to explain the next steps and discuss them with the responsible clinician.
Further reading
- Geeky Medics — Cranial nerve exam
- Geeky Medics — Visual pathway and visual field defects
- Geeky Medics — Optic nerve
- NICE CKS — Bells palsy
- NICE CKS — Hearing loss in adults
- Geeky Medics — Hearing assessment and otoscopy
- Geeky Medics — Sudden sensorineural hearing loss
- Oxford Medical Education — Rinnes and weber tests
- Geeky Medics — BPPV
- Geeky Medics — Dix-Hallpike and Epley
- Geeky Medics — HINTS exam
- NICE — recognition and referral of neurological conditions
- SAEM — GRACE-3 dizziness guideline
- University of Utah — cranial nerve examination
Interpret and present your findings
Describe each relevant abnormality and whether the findings fit one nerve, several nerves or a wider neurological pattern. Distinguish an eye or ear problem from a central neurological concern where possible, and state uncertainty when the examination does not resolve it. Complete appropriate limb, cerebellar, eye or ear assessment and arrange urgent review for acute focal findings.
Reading the original illustration. The original neurological illustration labels the pharynx “CN XI”. Palatal movement and voice mainly assess CN X; the gag reflex, when indicated, involves IX and X. CN XI supplies sternocleidomastoid and trapezius. The written sequence on this page makes these distinctions.
Original cranial nerves infographics · Nick Smith
Original St Emlyn’s teaching artwork. Read with the updated written sequence and qualifications on this page.
08 / CHAPTER 6
Eye examination
Establish symptoms, onset, trauma and contact-lens use, and assess visual acuity early. Use the correct chart distance and the patient’s usual distance correction; record each eye separately. Chemical injury needs immediate irrigation, while a suspected penetrating injury needs protection and urgent specialist help rather than routine manipulation.
Prioritise vision, pupils and symptoms requiring urgent specialist care.
Ophthalmological: sequence and example phrases
Prioritise vision and urgency. Check visual acuity early, before drops where practical. Suspected penetrating injury requires protection from pressure and urgent ophthalmology advice; do not perform tonometry or manipulate the eye. Chemical exposure requires immediate irrigation rather than waiting to complete a routine examination.
Introduction
Use the preparation and consent approach above, adapted to this examination. Introduce yourself by your actual role and agree supervision. Explain what you need to examine, ask about pain and keep the patient involved as you proceed.
Brief history
“Can you briefly tell me what the problem is?
“Any trauma or injury?”
“Do you wear glasses or contact lenses normally? Have you got them with you?”
General inspection
Face the patient
“In terms of general inspection I am looking at the…”
- External eye appearances: ptosis; proptosis; squint; head tilt; pupil symmetry
- Lids; lashes; lacrimal gland and duct: swelling of lids; position (ectropion/entropion); blepharitis; blepharospasm; follicles; crusting/pus
- Cornea; conjunctiva; sclera: Cornea (white/hazy); sclera (injection – diffuse/local)
- Foreign bodies: Examiner: "would you like me to evert eyelids, fluorescein and assess using the slit lamp?"
Pupils
- Appearance: size; shape; symmetry
- Reflexes
- Direct
- Consensual
- Swinging light test (RAPD – Marcus Gunn pupil)
- Accommodation: please focus on something in the background; now looking at my finger (pupils constrict on focusing from far to near objects)
- Squint: cover/uncover test
Visual acuity
"If you normally wear glasses please put them on. If haven’t got them with you I will use a pin hole.” (If vision improves this suggests a refractive error)
“I will examine each eye in turn…”
Far vision
- "I will use this Snellen chart to assess acuity
- Use the distance specified for this chart (six metres for a standard Snellen chart)
- Close one eye, read lowest line possible, then change side
Record acuity for each eye as the testing distance over the smallest line read, for example 6/9; record correction and pinhole results
Near vision
If near acuity is indicated, use a near-vision chart at its specified distance, with appropriate near correction and lighting. Test each eye separately and record the chart result and test distance.
Colour vision
Examiner: would you like me to assess colour vision using the Ishihara plates?
Visual fields
“Please cover one eye. I will cover the opposite and we will look at each in turn…”
“I will sit opposite you. Please look at my nose, I will bring my finger in from the side, say yes when you see my finger and if you see it disappear at any time (assess all four quadrants in each eye)…”
Examiner: "would you like me to formally assess blind spot (red hat pin) or for neglect?”
Eye movements
“Follow my finger with your eyes keeping your head still. Tell me if you get any pain or double vision."
Examiner: "I am looking for nystagmus and ptosis."
Fundoscopy
Examine in a dim room. Record pupil size and responses first. Dilating drops may improve the view, but require an appropriate indication, contraindication check and local protocol; do not present dilation as automatic in every ED eye examination. Explain transient blur and advise against driving until vision is normal.
- Look for the red reflex, then examine the optic disc, vessels, background retina and macula.
- Describe disc margins, colour and cup-to-disc ratio in context; a ratio of 0.3 is not a universal boundary between normal and abnormal.
- Report what you can actually see. Sudden visual loss, severe pain, a field defect or significant trauma needs urgent specialist assessment.
Stanford — fundoscopy · RCOphth — urgent eye symptoms
Close
Restore the patient’s comfort and privacy, thank them and summarise your actual findings. Use the interpretation below to explain the next steps and discuss them with the responsible clinician.
Further reading
- Geeky Medics — Examination of the eyes and vision
- Geeky Medics — Fundoscopy
- RCOphth — eye health and urgent symptoms
- Geeky Medics — eyelid disorders
- Geeky Medics — painless red eye
- Geeky Medics — painful red eye
- Geeky Medics — acute angle closure glaucoma
- Geeky Medics — retinal detachment
- Geeky Medics — painless sudden visual loss
- Geeky Medics — orbital and periorbital cellulitis
- Geeky Medics — eye drops
- AAO EyeWiki — measuring visual acuity
Interpret and present your findings
Report visual acuity with correction, pupils, fields, movements and the view obtained of the fundus. Explain if a structure could not be seen rather than declaring it normal. Sudden loss of vision, significant pain, a field defect or concerning trauma needs urgent specialist review. Slit-lamp assessment and pressure measurement depend on indication, training and safety; pressure must not be applied to a suspected open-globe injury.
09 / CHAPTER 6
Thyroid
Separate two questions: is there a structural thyroid abnormality, and are there signs of altered thyroid function? Ask about symptoms and any neck swelling, then examine peripheral signs, pulse, eyes and the neck. A comfortable seated position helps neck examination. Offer water only when swallowing is safe and appropriate.
Combine peripheral signs with careful examination of the neck.
Thyroid: sequence and example phrases
Introduction
Use the preparation and consent approach above, adapted to this examination. Introduce yourself by your actual role and agree supervision. Explain what you need to examine, ask about pain and keep the patient involved as you proceed.
Brief history
“Can you briefly tell me why you have come to hospital?”
General inspection
“I am looking at the patient for signs of…”
- Flushing
- Loss of outer ⅓ eyebrow
- Tremor
- Obvious eye signs
- Neck swelling or scars around the neck
- Body habitus
Hands and other observations
“I am feeling for…”
- warmth
- clamminess
- the pulse (rate; rhythm; quality)
“I am looking for…”
- Tremor (hold hands out)
- Nail changes (onycholysis; thyroid acropachy)
- Palmar erythema
- Thick coarse skin
Other observations
- Blood pressure
- Respiratory rate
- Oxygen saturations
- Temperature
- Blood glucose when clinically indicated
Face
“I am looking for…”
- Eyebrow: loss of outer ⅓
- Eye signs:
- lid retraction
- Lid lag on downwards gaze ("Please look down for me")
- Proptosis ("I will assess by looking from the side and down”)
- Eye movements: "Please follow my finger with your eyes and tell me if you get any double vision."
Neck
Inspection
“I am looking at the neck from the front and side for masses/swellings or scars”
Palpation
“I need to feel your neck:“
- Trachea central?
- Masses: size; shape; nodule; diffuse
- "Please can you take a sip of water and swallow" (thyroid swellings usually rise on swallowing)
- "Please can you stick out your tongue" (thyroglossal cysts will move on sticking the tongue out)
- I am just going to feel for any other lumps in the neck (Lymph nodes)
Percussion
"I am going to tap along your breast bone (retrosternal dullness may support suspicion but does not establish or exclude retrosternal extension)
Auscultation
"I am just going to listen to the neck" (assessing for bruits)
Lower limb reflexes
“Lastly I would like to…”
- Look at your shins for any evidence of pretibial myxoedema
- Test your reflexes
Close
Restore the patient’s comfort and privacy, thank them and summarise your actual findings. Use the interpretation below to explain the next steps and discuss them with the responsible clinician.
Further reading
- Geeky Medics — Thyroid status examination
- NICE CKS — Thyroid lump
- NICE CKS — Neck lump
- Geeky Medics — Neck lump examination osce guide
- NICE CKS — assessment of a neck lump
- NICE CKS — Hyperthyroidism
- Geeky Medics — Thyrotoxicosis and hyperthyroidism
- NICE CKS — Hypothyroidism
- Geeky Medics — Thyroid function tests
- NICE NG145 — thyroid disease
Interpret and present your findings
Describe the size and character of any swelling, its movement, nodules, tenderness and associated lymph nodes. State whether the clinical picture suggests altered thyroid function, while recognising that blood tests are needed to assess function. A neck lump also needs an appropriate structural assessment; signs such as percussion dullness do not establish or exclude retrosternal extension. Explain the indication for thyroid tests, imaging or referral.
10 / CHAPTER 6
Peripheral vascular examination
Ask about exertional pain, rest pain, wounds and sudden changes. Inspect both limbs, including feet, heels and between the toes, and compare perfusion, pulses, sensation and movement. An acutely painful, cold, pale, weak or numb limb is time-critical; do not delay urgent review to complete a routine ABPI.
Assess perfusion and recognise a threatened limb.
Peripheral vascular: sequence and example phrases
Introduction
Use the preparation and consent approach above, adapted to this examination. Introduce yourself by your actual role and agree supervision. Explain what you need to examine, ask about pain and keep the patient involved as you proceed.
Brief history
"Can you briefly tell me why you have come to hospital?
General inspection
“I am looking at the patient for signs of…”
- habitus (obese or cachetic)
- scars
- distended abdomen
- expansile abdominal mass
Legs
Inspection
- skin colour
- chronic changes e.g. hair loss; ulcers
- oedema: unilateral; bilateral; extent
- scars
- varicose or dilated veins
- infection
- gangrene
- Toes: web spaces and heels
Palpation
- Compare skin temperature along both legs using the back of your hand.
- Tenderness
- Capillary refill
- Pulses: dorsalis pedis; posterior tibial; popliteal; femoral – compare left to right
- Oedema: pitting vs non pitting
- Circumference
- Sensation; reduced or hyperaesthesia
Move
“Can you wiggle your toes for me?”
Special tests
- Use Doppler when pulses are difficult to feel, and document the arterial signals.
- Buerger’s test may demonstrate elevation pallor and dependent rubor. It is an adjunct to the assessment, not a stand-alone exclusion test.
Ankle–brachial pressure index (ABPI)
With the person resting supine, measure systolic pressures in both arms and at the ankle arteries using appropriate cuffs and Doppler. For each leg, divide its highest ankle pressure by the highest arm pressure.
| Result | Interpretation in context |
|---|---|
| Below 0.9 | Supports peripheral arterial disease. |
| Below 0.5 | Suggests severe disease. |
| Around 1.0–1.4 | Usually within the normal range. |
| Above 1.4 | May indicate non-compressible, calcified vessels. |
Borderline values and symptoms need further assessment. A normal or high ABPI does not exclude PAD in a person with diabetes. A suddenly painful, cold, pale, weak or numb limb needs urgent vascular assessment; do not delay referral for a routine ABPI.
NICE CG147 — PAD assessment · Stanford — ABPI
Close
Restore the patient’s comfort and privacy, thank them and summarise your actual findings. Use the interpretation below to explain the next steps and discuss them with the responsible clinician.
Further reading
Interpret and present your findings
Present the side, distribution and severity of perfusion findings, wounds and neurological changes. Distinguish possible acute limb ischaemia from chronic disease and from venous or other causes of swelling. Interpret Doppler and ABPI with symptoms and comorbidity, especially diabetes. Further cardiovascular examination, imaging or vascular referral should follow the clinical problem.
11 / CHAPTER 6
Genitourinary examination
Explain exactly which areas need examination and why, obtain specific consent and offer a trained chaperone. Arrange supervision appropriate to your role and give privacy for undressing. Acute testicular pain requires prompt consideration of torsion; no isolated sign safely excludes it, and investigation must not delay urgent surgical review when suspected.
Protect dignity and identify time-critical causes of pain.
Genitourinary: sequence and example phrases
Acute testicular pain: consider torsion promptly and obtain urgent surgical/urological review when suspected. No isolated examination sign safely excludes it; investigations must not delay urgent treatment.
Introduction
Use the preparation and consent approach above, adapted to this examination. Introduce yourself by your actual role and agree supervision. Explain what you need to examine, ask about pain and keep the patient involved as you proceed.
Brief history
“Can you briefly tell me why you have come to hospital?”
General inspection
“I am looking at the patient for signs of…”
- pain
- gait (if seen walking)
Abdominal examination
“Now I need to examine your abdomen. Are you ok to lie flat? If at any time you are in pain or want me to stop let me know…”
Work at the patient’s level and watch for discomfort.
Inspection
- Closer inspection, particularly left flank
Palpation
- Ask where it hurts, start away from the pain and palpate gently, then more deeply if appropriate, for tenderness, guarding and masses
- Organs: liver; spleen; kidney; bladder
- Aorta
Percussion
- Organs: liver; spleen; bladder
- Ascites (shifting dullness)
Auscultation
- Bowel sounds
- Femoral bruits
Testicular/penile examination
“I now need to examine your testicles and penis. Are you happy for me to continue?..”
Testes/scrotum
Inspection
- colour
- swelling
- transillumination
Palpation
- size; shape; consistency; mass
- epididymis
- Assess testicular lie, tenderness and swelling. Prehn’s sign is unreliable for excluding torsion.
- cremasteric reflex (its presence does not rule out torsion)
Penis
- erythema
- vesicles
- ulcers
- urethral discharge: select appropriate STI samples and urine testing according to the history and local protocol
Close
Restore the patient’s comfort and privacy, thank them and summarise your actual findings. Use the interpretation below to explain the next steps and discuss them with the responsible clinician.
Further reading
Interpret and present your findings
Describe the location of pain or swelling, testicular lie and tenderness, whether a mass is within or separate from the testis and any penile lesions or discharge. Transillumination is one part of assessing a swelling, not a diagnosis by itself. Choose urine or STI samples for the actual question and explain urgent referral or follow-up. Re-check comfort and ensure the patient can dress privately.
12 / CHAPTER 6
Gynaecological examination
Establish the indication, symptoms, pregnancy possibility and any urgent illness before an intimate examination. Explain the proposed abdominal, external, speculum or bimanual components separately, including likely discomfort, consent and supervision. Offer a trained chaperone and accommodate preferences where possible. The retained tampon or condom scenario below illustrates a focused examination; adapt your assessment to the actual symptoms and clinical question.
Explain each part, obtain consent and tailor the examination to the problem.
Gynaecological: sequence and example phrases
Introduction
Use the preparation and consent approach above, adapted to this examination. Introduce yourself by your actual role and agree supervision. Explain what you need to examine, ask about pain and keep the patient involved as you proceed.
Brief history
Tailor the history to the symptoms and the planned examination. A retained vaginal foreign body is one possible scenario.
“Can you briefly tell me why you have come to hospital?”
“Based on what you have told me you are concerned about retained tampon/condom. Is that correct?”
“When did this happen? What symptoms have you noticed?” Ask about sexual activity and contraception when relevant to the problem.
Plan
Base the examination on the symptoms and likely diagnosis. Explain each proposed part, including possible discomfort, and agree consent. Offer a trained chaperone and accommodate the patient’s preferences where possible; explain that they can stop at any time.
“A speculum would help me look for the retained object. I will explain each step, and we can stop whenever you need. Do you have any concerns before we begin?”
A bimanual examination is a separate, indication-dependent assessment; it is not automatically required before removing a visible retained tampon or condom.
Preparation/Procedure
Prepare
- Assess observations, pain, bleeding, pregnancy possibility and urgent illness first. Examine the abdomen as indicated.
- Prepare an appropriately sized speculum, suitable lubricant, a good light, gloves and appropriate equipment for the planned procedure. Arrange assistance if required.
- Provide privacy, a cover and a comfortable supported position. Agree how the patient will signal that they want to stop.
External and speculum examination
Inspect the external genitalia for relevant lesions, inflammation, discharge or trauma. With renewed permission, gently insert the speculum, open when appropriately positioned and visualise the cervix and vaginal walls. Take indicated samples. Remove a clearly visualised foreign body using suitable forceps only when trained, appropriately supervised and authorised for this procedure; stop and seek help if removal is difficult or painful. Check for remaining material and remove the speculum carefully, avoiding tissue entrapment.
Bimanual examination, when indicated
Explain and obtain consent separately. Using a gloved, lubricated hand with abdominal palpation, assess cervical motion tenderness, the uterus and adnexa as appropriate. Interpret findings with the history; a reassuring examination does not exclude ectopic pregnancy or other urgent pathology.
“Thank you. I will give you privacy to get dressed, then we can discuss the findings and next steps.”
Discussion
- Retained condom: consider pregnancy testing, emergency contraception and STI assessment according to timing and risk.
- Retained tampon: provide advice about fever, rash, vomiting, diarrhoea, dizziness or feeling very unwell; suspected toxic shock requires urgent assessment.
- Pregnancy-related bleeding or suspected tissue: assess haemodynamic stability, pain and pregnancy location; consider ectopic pregnancy. Arrange urgent gynaecology input for significant bleeding, instability or uncertainty. Agree early pregnancy follow-up and explicit safety-netting when discharge is appropriate.
NICE NG126 — ectopic pregnancy and miscarriage · GMC — intimate examinations
Close
Restore the patient’s comfort and privacy, thank them and summarise your actual findings. Use the interpretation below to explain the next steps and discuss them with the responsible clinician.
Further reading
Interpret and present your findings
Summarise the findings and limitations without assuming that a reassuring pelvic examination excludes ectopic pregnancy or other urgent disease. A retained condom may require discussion of pregnancy risk, emergency contraception and STI assessment. A retained tampon requires appropriate advice about systemic illness and toxic shock. Significant bleeding, instability or uncertainty about pregnancy-related tissue needs urgent gynaecology assessment; removal of tissue is not an independent student procedure.
13 / CHAPTER 6
Skin examination
Ask about onset, evolution, symptoms, medicines, products, exposure and systemic illness. Examine the distribution and morphology in good light, considering how signs appear across different skin tones. SOCRATES may help structure parts of the history, but a skin examination needs a description of lesions rather than a pain mnemonic.
Describe what you see before choosing a diagnosis and treatment.
Dermatology: sequence and example phrases
Introduction
Use the preparation and consent approach above, adapted to this examination. Introduce yourself by your actual role and agree supervision. Explain what you need to examine, ask about pain and keep the patient involved as you proceed.
Brief history
“Briefly tell me about this rash.”
- Recent medications
- Change in cosmetics/cleaning products
- Illnesses
- Foreign travel
- Systemic symptoms
General inspection
“In terms of general inspection I am assessing…”
Patient’s appearance
- level of comfort
- location of rash: symmetrical or extremities
Observations
- Blood pressure
- Respiratory rate
- Oxygen saturations
- Temperature
- Blood glucose when clinically indicated
Closer inspection
Describe site and distribution, number, size, shape, colour, surface and lesion type (for example macule, papule, plaque, vesicle or pustule). Assess blanching where relevant. Look for mucosal involvement, tenderness, warmth and systemic illness, taking skin tone into account.
Inspect hair, scalp, eyes, mouth and lymph nodes as indicated. Explain any need to examine other areas and obtain consent. The history mnemonic in Chapter 3 supports the history; it does not replace a morphological description.
Close
Restore the patient’s comfort and privacy, thank them and summarise your actual findings. Use the interpretation below to explain the next steps and discuss them with the responsible clinician.
Further reading
Interpret and present your findings
Describe the lesion type, size, shape, colour, surface and distribution, with relevant mucosal, hair, nail or lymph-node findings. Relate these to the history and severity before proposing treatment. Do not automatically prescribe an antibiotic for weeping eczema or a steroid for any dry rash. Explain when widespread blistering, mucosal involvement, rapidly progressive pain or systemic illness requires urgent review.