
ST EMLYN’S · MLA REVISION GUIDE
Procedures
01 / CHAPTER 9
Learn the skill and the care around it
A procedure begins with deciding whether it is needed and ends when the patient has an appropriate aftercare plan. Technical fluency matters, but so do consent, infection prevention, sample handling, recognising a complication and acting on the result. Learn each skill with supervised demonstration, explanation, practice and specific feedback. Reading a guide or watching a video does not establish competence.
This chapter covers everyday graduate skills and provides a separate resource library for specialist procedures. Use the graduate skills list to plan your practical learning; use advanced material to understand an indication, recognise a complication or assist an appropriately trained team. Inclusion in this chapter is not a claim that every procedure is an undergraduate assessment requirement.
The GMC practical skills and procedures requirements describe the minimum level expected when a newly qualified doctor starts work. They do not authorise a student to perform a procedure without the supervision required by their school, placement and competence. As experience develops, agree the level of supervision explicitly rather than assuming that repeated attempts make a skill independent.
02 / CHAPTER 9
A reliable procedure sequence
A CPSA task may ask you to perform a procedure on a model, explain it to a patient or interpret its result. Establish the exact task, demonstrate the practical steps and explain anything the simulation cannot represent. There is no verified universal allocation of marks to a generic routine, and a polished introduction does not compensate for an unsafe technique.
- Confirm the need and the patient. Check identity and indication, introduce yourself as a student when that is your role, and establish what the patient understands. Review relevant symptoms, medical history, medicines, allergies, previous procedural problems and investigations.
- Explain and agree. Discuss purpose, likely experience, benefits, relevant risks and reasonable alternatives. Invite questions and obtain consent with appropriate supervision. Use an interpreter or communication support where needed. See the communication chapter.
- Prepare. Agree supervision and assistance, confirm site or side and contraindications, position the patient, protect privacy and offer a chaperone where appropriate. Check equipment, asepsis, monitoring, analgesia and any required rescue plan. Do not offer food or drink without checking whether the procedure or sedation plan makes it inappropriate.
- Check medicines and equipment. Check concentrations, units, route, allergies and total doses, including medicines already given. For local anaesthetic, account for every planned source. Use the manufacturer’s instructions and current local procedure checklist.
- Perform and communicate. Maintain the required aseptic technique, explain the next step and observe the patient. Stop for unexpected pain, resistance, deterioration or loss of a safe view. Agree when an attempt should end and who will take over; repeated traumatic attempts are not perseverance worth demonstrating.
- Check the result and provide aftercare. Confirm the intended result, secure the device where relevant, reassess the patient and arrange procedure-specific observations or investigations. Handle sharps and waste safely, label samples at the bedside according to policy and ensure results will reach someone responsible for acting on them.
- Document and close. Record indication, consent, supervision, site, technique, medicines, findings, difficulties and the plan. Explain expected symptoms, warning signs, follow-up and whom to contact. Thank the patient and restore comfort and privacy.
A natural opening is: “I’m a medical student working with Dr Patel. We have been asked to take a blood sample to help understand your symptoms. Can I check what you have been told and explain what it involves?” Adjust this to the real procedure and supervising clinician; do not recite a role or consent statement that is untrue.
Practise the ending as well as the insertion. For a cannula, think about securement, function and site review; for a blood sample, labelling and prompt analysis; for a wound, dressing, follow-up and signs of infection. “Procedure complete” is not the same as “care complete”.
03 / CHAPTER 9
Graduate practical skills: what level is expected?
Direct supervision means that a supervisor is present observing the procedure. Indirect supervision means support is available and can be accessed when needed. Simulation means the graduate is ready to progress to patient care under direct supervision; it does not mean independent clinical performance. These are graduation outcomes, not automatic permissions during a placement.
| GMC item | Skill | Minimum level at graduation | Focus |
|---|---|---|---|
| 1 | Baseline observations | Indirect | Temperature, respiratory rate, pulse, blood pressure, oxygen saturation and urine output. |
| 2 | Peak expiratory flow | Indirect | Explain the technique, judge the effort and interpret the result. |
| 3 | Direct ophthalmoscopy | Indirect | Perform a basic examination and identify common abnormalities. |
| 4 | Otoscopy | Indirect | Perform a basic examination and identify common abnormalities. |
| 5 | Venepuncture | Indirect | Take, correctly label and send appropriate blood samples. |
| 6 | Peripheral blood cultures | Direct | Obtain samples using the appropriate infection-prevention technique. |
| 7 | Adult radial arterial blood gas sampling | Direct | Take the sample and interpret the result in its clinical context. |
| 8 | Capillary blood glucose | Indirect | Measure, record, interpret and respond appropriately. |
| 9 | Urine dipstick and pregnancy testing | Indirect | Explain collection, test appropriately and interpret the result. |
| 10 | Three- and twelve-lead ECG | Indirect | Apply leads correctly and obtain an appropriate recording. |
| 11 | Nose, throat, skin and wound swabs | Indirect | Collect or explain self-collection, label and send appropriately. |
| 12 | Scrub up for surgery | Direct | Use the required hand preparation, gowning and gloving technique. |
| 13 | Set up an intravenous infusion | Direct | Prepare and administer the prescribed infusion using the correct equipment. |
| 14 | Moving and handling | Indirect | Use safe techniques and seek assistance or equipment where needed. |
| 15 | Explain inhaled medicines | Indirect | Demonstrate a suitable device and check the patient’s technique. |
| 16 | Prescribe and administer oxygen | Indirect | Select and monitor appropriate oxygen treatment; students do not independently prescribe. |
| 17 | Prefilled IM, subcutaneous and IV injections | Direct | Check and administer the prescribed medicine safely. |
| 18 | Peripheral IV cannulation | Direct | Insert, secure and check a cannula with appropriate aftercare. |
| 19 | Blood transfusion | Simulation | Further training is required before administering transfusion to patients under direct supervision. |
| 20 | Male and female urethral catheterisation | Direct | Use appropriate consent, asepsis, technique and ongoing catheter care. |
| 21 | Wound care and basic closure | Direct | Clean, manage and close suitable wounds and arrange aftercare. |
| 22 | Nasogastric tube | Simulation | Practise insertion and safe position confirmation before progressing under direct supervision. |
| 23 | Local anaesthetic | Direct | Use appropriate injected or topical local anaesthetic, including safe dose calculation. |
Adapted from Practical skills and procedures, © 2023 General Medical Council, published April 2019 and updated July 2023. Read the full GMC document for the precise requirements, generic safety standards and explanation of supervision. The GMC permits accurate, acknowledged reproduction; this learning table does not replace your school’s assessment and supervision arrangements.
The list should prompt deliberate practice across placements, including community, maternity, paediatrics and older-person care. Keep a record of feedback and specific gaps in your experience. It is more useful to identify “I need to practise explaining an inhaler and checking technique” than simply to count procedures performed.
04 / CHAPTER 9
Vascular access and sampling
Venepuncture and blood cultures
Establish which tests are needed and why. Confirm the sampling requirements, tubes, labels and transport arrangements before beginning. Explain likely discomfort, ask about previous difficulties and choose a suitable site with your supervisor. Apply the approved skin preparation and allow it to dry; maintain the required aseptic technique. After sampling, release the tourniquet, remove the needle safely, apply pressure and check for bleeding or swelling. Label samples against the patient’s identity at the bedside and arrange prompt transport.
Blood cultures require particular care to avoid contamination: follow the local collection protocol for skin and bottle preparation, sample volume and labelling. An unlabelled or contaminated sample can mislead treatment as well as waste the patient’s procedure. Blood-culture collection is a directly supervised graduate skill. See NICE infection-prevention guidance and your local microbiology instructions.
Peripheral cannulation and infusion
Choose access for the intended treatment and examine the proposed limb. Check equipment, patency requirements and the prescribed infusion with the supervising practitioner. After insertion, remove and dispose of the introducer safely; never reinsert it into the plastic cannula. Secure the device with the appropriate dressing, check function using the approved technique and observe for pain, swelling or leakage. Document the site, size, attempts and review plan. An infusion needs the correct fluid or medicine, route, rate, connection and monitoring, not simply a line that appears to run.
Inspect and review the site during use and report pain, inflammation, leakage or concern about infiltration. The need for access should be reviewed as well as its condition. Central venous access, intraosseous access and arterial-line insertion are advanced procedures in this directory, distinct from peripheral cannulation and adult radial blood-gas sampling.
Adult radial arterial blood gas
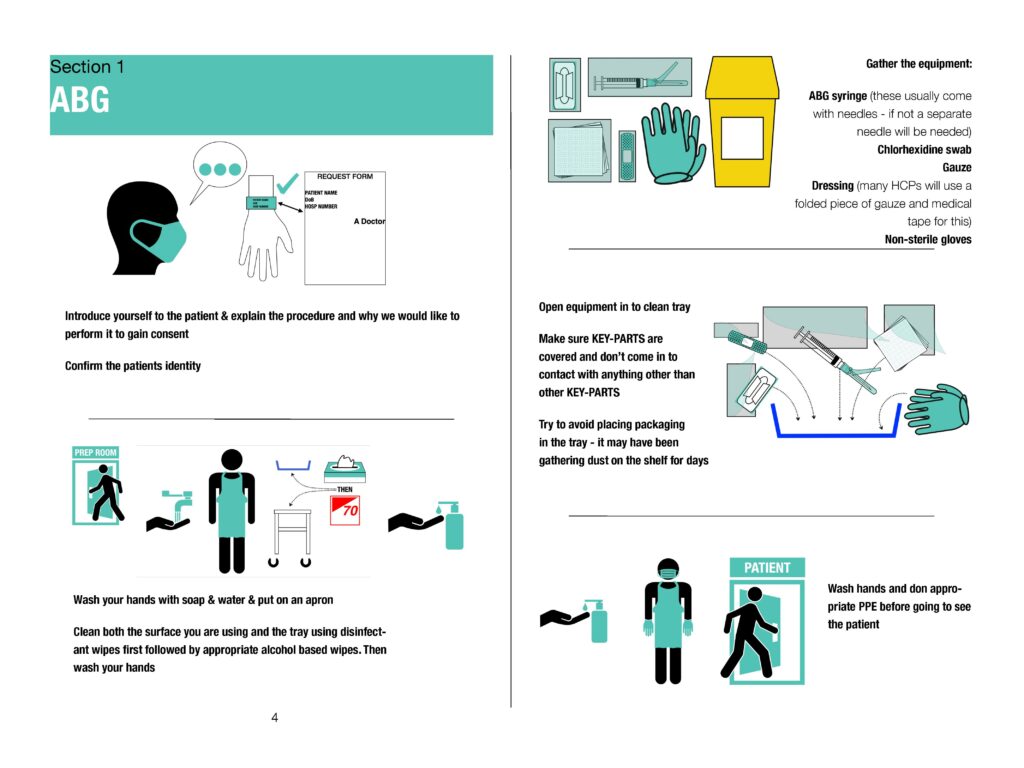
First identify the clinical question and whether an arterial sample is needed. Explain the procedure and obtain consent, assess bleeding risk, allergies, the proposed site and distal perfusion, and prepare analgesia and equipment according to local policy. Record oxygen delivery at the time of sampling; an oxygen result is difficult to interpret without it. The procedure should be directly supervised at the graduate level.
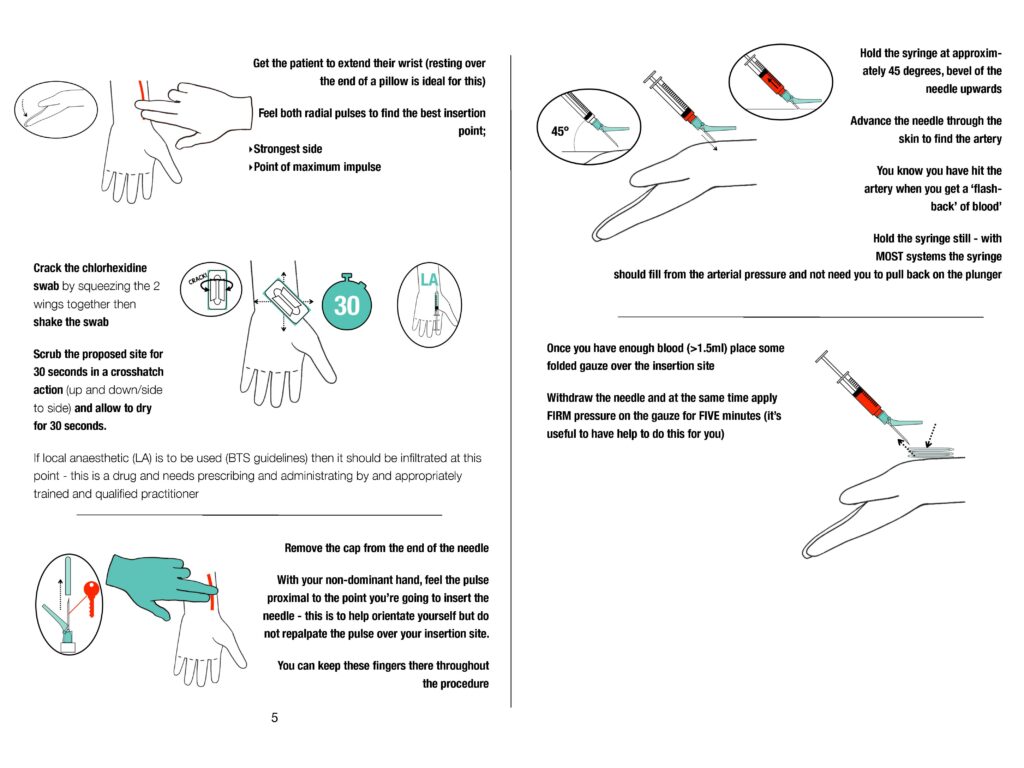
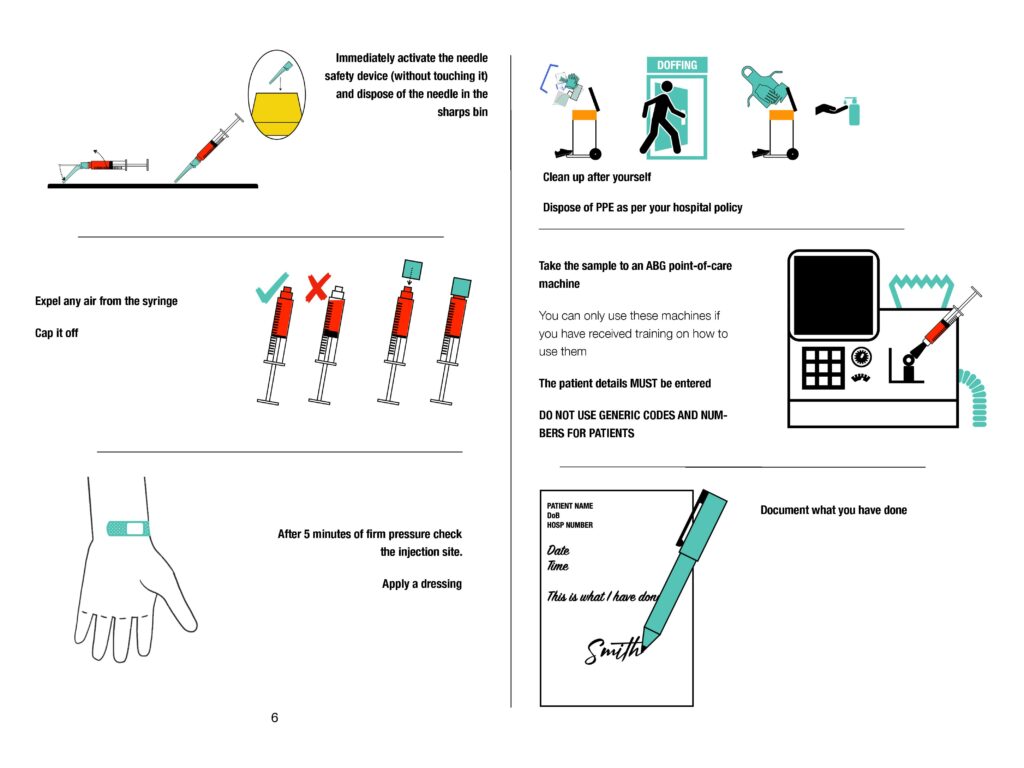
Use the locally taught aseptic technique and a suitable blood-gas syringe. Take care to avoid repeated probing or attempts. After withdrawing the needle, apply firm pressure and confirm haemostasis, allowing for increased bleeding risk. Remove air and handle, label and analyse the sample according to the analyser and local protocol. Reassess pain, bleeding and circulation. Interpret pH, carbon dioxide, bicarbonate and oxygenation together with the patient; a dangerous result needs a response, not merely a note in the record.
Potential problems include pain, bruising or bleeding, infection and vascular injury. The infographic below is a teaching aid alongside supervised practice. A perfusion check or a remembered test does not remove the need for site assessment, appropriate supervision and aftercare.
Using the original ABG illustration. Sample volume, skin-preparation contact time and handling depend on the equipment and local protocol; the printed volume and timing are not universal. Arrange appropriate local anaesthesia with the supervisor. Maintain pressure until haemostasis is secure, which may take longer with anticoagulation or a bleeding disorder. Cap the syringe with its intended safety cap after removing the needle; do not re-sheath a used needle.
Original arterial blood gas infographics · Nick Smith
Original St Emlyn’s teaching artwork. Follow the current written safety notes, local procedure and supervisor’s instructions.
05 / CHAPTER 9
Everyday skills: preparation, interpretation and aftercare
Observations, bedside tests and samples
Use the correct equipment and technique for age and circumstances. For blood pressure, position the patient and choose an appropriate cuff; for oxygen saturation, check the probe and whether the reading fits the patient. Record respiratory rate rather than estimating it from another observation. Record the context, including oxygen treatment, and report an unexpected or deteriorating result.
For capillary glucose, follow the meter’s quality and infection-control procedures, check identity and record the result promptly. For urine or swab sampling, explain the collection method, protect privacy and use the correct container and transport process. Interpret a result in context: a positive test is not automatically the explanation for every symptom. Check urgent or unexpected findings with the responsible clinician.
For an ECG, explain the need for chest exposure and offer a chaperone where appropriate. Position electrodes using anatomical landmarks, check recording quality and identify the patient and time correctly. Recognise when the clinical situation or tracing needs immediate review. For peak flow, demonstrate the manoeuvre, assess the effort and interpret the measurement with the patient’s clinical state. For inhalers, use the actual device or a training device, then ask the patient to demonstrate the technique back.
Urethral catheterisation
Confirm the indication, alternatives and review plan; an indwelling catheter is not simply a convenience. Review urinary history, previous difficulty or surgery and the possibility of urethral injury. Explain the intimate procedure, obtain consent, offer a trained chaperone and agree direct supervision. Choose the appropriate catheter and equipment and maintain asepsis. Use the locally taught technique and the device’s instructions for lubrication, insertion and balloon inflation. Never force against resistance or inflate a balloon without appropriate confirmation of position.
After insertion, ensure drainage, secure the catheter and replace the foreskin after male catheterisation where applicable to prevent paraphimosis. Record the indication, catheter and balloon details, urine, difficulties and plan for review or removal. Report pain, bleeding, failure to drain or concern about injury promptly. Suprapubic insertion and penile blocks are separate advanced procedures. NICE guidance on urinary catheter care supports assessment, asepsis and ongoing review.
Wounds, injections and local anaesthetic
For a wound, assess mechanism, contamination, depth, foreign-body risk and underlying tendon, nerve, vascular or joint injury before considering closure. Review relevant tetanus history and the need for specialist assessment. Explain cleansing, analgesia, closure choices and aftercare. Practise basic closure under direct supervision with appropriate equipment and follow-up; not every wound should be sutured.
Before an injection or local anaesthetic, check the prescription, patient factors, medicine, concentration, route, expiry and total dose. Select the correct equipment and site, maintain asepsis and dispose of sharps safely. Explain expected effects and observe for adverse reactions. Local anaesthetic infiltration is a graduate skill under direct supervision; a regional nerve block has additional anatomical, monitoring and competency requirements. Use Chapter 10 to rehearse the medicine check.
Nasogastric tubes and transfusion
The minimum graduate level for these two skills is simulation. Before performing either on patients, obtain the required training and direct supervision. Nasogastric tube insertion also requires a safe plan for confirming position. NHS England identifies an appropriate aspirate-pH result or correctly interpreted X-ray as the acceptable initial confirmation methods. Nothing should be introduced through the tube before position is confirmed and documented; the “whoosh test” and absence of respiratory distress are not safe substitutes. Use the enduring NHS nasogastric safety standards and the local confirmation pathway.
Transfusion requires the local competence programme, consent and prescription, positive patient identification, compatibility and product checks, appropriate administration and observation. Learn how to recognise and respond to a suspected transfusion reaction through supervised simulation and local training. A transfusion is not equivalent to hanging an ordinary fluid bag.
Asepsis, moving and handling, and examination skills
Hand hygiene, protective equipment, surgical scrubbing, safe sharps disposal and moving a patient safely are practical skills in their own right. Ask for the people and equipment needed for a safe transfer. Direct ophthalmoscopy and otoscopy belong in your examination practice; Chapter 6 covers interpretation and the broader system examination. Record what you could actually see rather than declaring an unseen structure normal.
06 / CHAPTER 9
Vascular resources
Venepuncture is an indirectly supervised graduate skill; peripheral cannulation and adult radial ABG are directly supervised skills. IO access, central access and arterial-line insertion are advanced material for understanding and observation.
Access, sampling and device care.
Vascular access: guidance and resources
Practise choosing the appropriate access, explaining the indication and maintaining asepsis. Include confirmation of position or function, securement, sample labelling and the monitoring or removal plan. Central and arterial access require procedure-specific competence and checks.
Practical teaching and procedure links
07 / CHAPTER 9
Diagnostic aspiration and drainage
Lumbar puncture, paracentesis, ascitic drains, joint aspiration, pleural aspiration and chest drains are not in the GMC’s 23-item minimum practical list. Learn the indications, contraindications, sample interpretation and complications; perform them only with procedure-specific training and supervision.
Aspiration, drainage and interpretation of samples.
Diagnostic procedures: guidance and resources
For pleural fluid procedures, use ultrasound to select a safe site immediately before the procedure with the patient in the intended position. For lumbar puncture, assess contraindications and the clinical indication; in suspected meningitis, urgent treatment must not be delayed for an unsafe or deferred LP.
After uncomplicated pleural aspiration in an asymptomatic patient, a routine chest radiograph is not always required. Chest drain insertion has a different post-procedure imaging plan. Use the BTS statement for the relevant procedure.
- BTS — pleural procedures clinical statement (2023)
- NICE NG240 — lumbar puncture in suspected bacterial meningitis
- Merck Manual — knee arthrocentesis
Practical teaching and procedure links
08 / CHAPTER 9
Cardiac procedures
ECG recording is an indirectly supervised graduate skill. Recognition of cardiac arrest, CPR and AED use form part of emergency-care learning. Pacing, synchronised cardioversion, manual defibrillation and pericardiocentesis require the corresponding training and team oversight; they are not interchangeable interventions.
ECG recording, pacing and electrical therapies.
Cardiac procedures: guidance and resources
Know which treatment the rhythm and clinical state require. Rehearse defibrillator safety, synchronisation for cardioversion and assessment of electrical and mechanical capture during pacing. Plan analgesia/sedation where appropriate and reassess the patient after treatment.
- RCUK — adult ALS (2025)
- RCUK — bradyarrhythmia algorithm (2025 PDF)
- RCUK — tachyarrhythmia algorithm (March 2026 PDF)
Practical teaching and procedure links
09 / CHAPTER 9
Airway, anaesthesia and sedation
Learn basic airway support and ventilation through practical resuscitation training. Adjuncts, supraglottic devices, intubation, rapid-sequence induction, ventilator use, sedation and front-of-neck access require different levels of expertise. A student must not independently sedate a patient or manage a specialist airway. NIV settings and monitoring require a prescribed plan and trained support.
Prepare the airway plan, monitoring and recovery.
Airway, anaesthesia and sedation: guidance and resources
For procedural sedation, prepare appropriately trained staff, a safety brief, rescue equipment and monitored recovery. RCEM recommends ECG, oxygen saturation, blood pressure and continuous capnography monitoring. Sedation and analgesia need separate consideration.
Confirm tracheal tube placement using sustained waveform capnography and ongoing clinical assessment. Rehearse the failed-airway plan and escalation. For a neck-airway emergency, distinguish tracheostomy from total laryngectomy: a person with a total laryngectomy breathes through the neck stoma.
- RCEM — procedural sedation guideline (2022)
- Difficult Airway Society — adult difficult intubation guidance (2025)
- National Tracheostomy Safety Project — emergency guidance
- BTS/ICS — acute hypercapnic respiratory failure and NIV
Practical teaching and procedure links
- Procedural sedation: Adult; Paediatric;
- RCEM sedation guideline and drug guidance
- Airway adjunct: OPA; NPA
- BVM ventilation
- Supraglottic airway insertion
- Endotracheal intubation/Rapid sequence induction
- Oxylog 3000 plus setup
- Neck-airway emergencies: tracheostomy algorithm; laryngectomy algorithm
- Front of neck access
- Non-invasive ventilation: BiPAP (BTS/ICS guidance); CPAP
The Oxylog page is device-specific teaching. Use the manufacturer’s instructions and local training for the ventilator available to you.
10 / CHAPTER 9
Obstetrics and gynaecology
Prepare for birth, newborn care and recognition of shoulder dystocia, cord prolapse, haemorrhage and eclampsia. Your immediate contribution includes recognising the emergency, calling the appropriate team and providing trained assistance. Emergency operative procedures such as resuscitative hysterotomy are specialist care, not graduate practical competencies. Speculum examination requires indication, consent, chaperone discussion and appropriate supervision.
Prepare for maternal and newborn care together.
Obstetrics and gynaecology: guidance and resources
Call the appropriate obstetric, midwifery, neonatal and anaesthetic help early. Use the current obstetric emergency pathway and prepare for newborn care alongside maternal care. For intimate examination, explain each step, obtain consent, offer a chaperone and preserve dignity.
- RCOG — shoulder dystocia guidance
- RCOG — umbilical cord prolapse guidance
- NICE NG235 — intrapartum care and postpartum haemorrhage
- NICE NG133 — hypertension in pregnancy and eclampsia
- RCUK — newborn life support (2025)
- RCUK — maternal cardiac arrest and resuscitative hysterotomy (2025)
Practical teaching and procedure links
11 / CHAPTER 9
Urological resources
Male and female urethral catheterisation are directly supervised graduate skills; urine testing is indirectly supervised. Suprapubic catheter insertion, paraphimosis reduction and penile block are additional procedures requiring specific training and supervision. Understand urgency and indications without assuming independent procedural authority.
Catheterisation, reduction and assessment.
Urology: guidance and resources
Clarify the indication, consent and need for a chaperone. For catheterisation, review previous urological problems or surgery, assess difficulties and follow the local escalation pathway. Avoid repeated traumatic attempts. Include drainage, securement, documentation and the ongoing catheter plan.
Practical teaching and procedure links
12 / CHAPTER 9
Trauma, immobilisation and wound care
Basic wound care and closure are directly supervised graduate skills. Learn simple supports and mobility aids with instruction and safety checks. Collar application, traction devices, tourniquets, reduction and plaster application need indication-specific training; specialist trauma procedures including thoracotomy, escharotomy and lateral canthotomy are retained for recognition and understanding.
Reduction, immobilisation, wound care and emergency trauma procedures.
Trauma and orthopaedics: guidance and resources
Choose immobilisation and intervention for the injury and patient. Reassess neurovascular status before and after reduction, splinting or plaster application. Explain swelling precautions, pressure symptoms, weight-bearing advice and follow-up.
Airway, haemorrhage and trauma procedures require the relevant team, equipment and current trauma protocol. Collar application is part of a selective spinal-injury assessment; the video below demonstrates a technique rather than deciding who needs immobilisation.
- NICE NG41 — spinal injury assessment and immobilisation
- NICE NG39 — major trauma
- RCUK — traumatic peri-arrest and cardiac arrest (2025)
Practical teaching and procedure links
Trauma
- Neck collar
- Lateral canthotomy
- Splints: Kendrick traction splint, Thomas, SAM
- Combat tourniquet
- Trauma chest drain
- Thoracotomy and traumatic arrest: RCUK guidance
- Escharotomy
Fracture/dislocation
- Distal radius (Colles) fracture
- Elbow dislocation
- Pulled elbow
- Shoulder dislocation
- Hip dislocation
- Patellar dislocation
Other
- Suturing techniques
- Slings:
- Broad/high arm
- Polysling
- Dressings:
- POP application:
- Walking boot
- Use of crutches
The Kendrick link is Defence Medical Command guidance for deployed care; use your own device instructions and local indications.
13 / CHAPTER 9
Regional anaesthesia and blocks
The GMC local-anaesthetic outcome does not make all regional blocks core graduate procedures. Facial, penile, digital, wrist, ankle, femoral and fascia iliaca blocks, haematoma blocks and intravenous regional anaesthesia require specific training, dose and site checks, monitoring and a rescue plan. These resources are retained for understanding and supervised learning.
Choose the block, check the side and plan safe local anaesthesia.
Regional anaesthesia and blocks: guidance and resources
Before a block, confirm the indication, correct side, baseline neurological findings, contraindications and the total local anaesthetic dose. Use the local block safety check, appropriate monitoring and an agreed rescue plan for local anaesthetic toxicity.
- RCEM — fascia iliaca block guideline (October 2025)
- RCEM — Bier’s block guidance (revised November 2017)
- Association of Anaesthetists — local anaesthetic toxicity guidance
The Bier’s block document is an older RCEM resource; follow your department’s current IV regional anaesthesia policy and competency requirements.
Practical teaching and procedure links
- Facial blocks
- Bier’s block
- Haematoma block
- Wrist blocks: landmark / ultrasound
- Digital nerve blocks
- Fascia iliaca block: RCEM 2025 guidance, including landmark and ultrasound approaches
- Ultrasound-guided femoral nerve block
- Ankle blocks: landmark/ultrasound
14 / CHAPTER 9
Other practical resources
Hand hygiene and protective equipment apply throughout. Peak-flow measurement is an indirectly supervised graduate skill; nasogastric insertion is a simulation-level outcome. Nasal packing and point-of-care ultrasound are additional skills requiring appropriate training; an ultrasound image must be interpreted within competence and the clinical question.
Everyday techniques, device checks and bedside ultrasound.
Other practical skills: guidance and resources
NG tube placement: confirm and document position using the approved aspirate-pH or X-ray pathway before putting anything through the tube. NHS England identifies pH 1–5.5 or appropriately interpreted X-ray as acceptable initial checks; auscultation after injecting air is not a safe confirmation method.
For nasal packing, use the instructions for the exact product and arrange an appropriate review/removal plan. For ultrasound, use a defined clinical question, document findings and limitations, and work within your training.