
ST EMLYN’S · MLA REVISION GUIDE
Musculoskeletal examination
01 / CHAPTER 7
A purposeful musculoskeletal examination
A reliable examination sequence helps you concentrate on the patient rather than on remembering the next movement. Start by finding out where the problem is, how it began and what it prevents the person from doing. Pain, stiffness, swelling, weakness and loss of function are related but different complaints. A gardener with gradual thumb pain needs a different assessment from someone with a laceration and new loss of finger movement.
Introduce yourself by your actual role, confirm identity, explain the examination and obtain consent. Ask about pain and use appropriate hand hygiene and protective equipment. Expose the area sufficiently to compare sides while protecting privacy. Offer a chaperone when appropriate. Explain that the patient can stop you at any point, and agree supervision for unfamiliar manoeuvres. You can say, “I would like to look at the joint, feel gently around it and then see how it moves. Please tell me if anything hurts.”
- Look: compare posture, alignment, skin, swelling, scars and muscle bulk. Observe function and gait when safe.
- Feel: start away from the painful area, compare temperature and identify the anatomical site of tenderness.
- Move: assess active movement first. Add gentle passive movement and resistance where safe and useful. Pain-limited movement is not automatically muscle weakness.
- Test a clinical question: select special tests because the history and initial findings suggest a problem. Do not force an unstable or acutely injured joint to complete a routine.
- Interpret and complete: consider the joint above and below, neurological and vascular findings, and the effect on daily life. Explain relevant next steps.
After injury, record mechanism, timing, previous function and neurovascular findings. Assess skin breaches and contamination, and establish tetanus vaccination history where relevant. If fracture, dislocation, tendon injury, infection or a neurovascular problem is possible, protect the affected part and involve the responsible clinician promptly. A student should be able to recognise the problem and propose a safe plan without independently deciding on manipulation or discharge.
At the end, restore comfort and privacy. Present what you actually found, what the pattern suggests and what you could not assess. For example: “The right knee is warm with an effusion and markedly restricted movement. Given the acute onset and fever, I am concerned about joint infection and would arrange urgent assessment.” A list of normal movements is less useful than a clear account of the clinical problem.
Examination illustrations and demonstrations by Nick Smith.
02 / CHAPTER 7
Hand and wrist
The hand brings together joints, tendons, nerves and circulation in a small space. Ask about hand dominance, work, hobbies and the exact task that has become difficult. Inspect both surfaces and compare sides. A distribution across several joints may suggest inflammatory disease, whereas local pain after trauma needs a focused injury assessment.
Follow the anatomy: joints, tendons, nerves and useful function.
Hand and wrist: sequence and example phrases
Introduction
Use the introduction, consent and preparation described above, explaining the particular area and movements involved. Protect privacy and adapt the examination to pain, mobility and the clinical question.
Brief history
“Can you briefly tell me what the problem is?”
“Which hand do you write with?”
“What is your occupation?”
“Do you have special hobbies in which you use your hands?”
Lacerations:
- Establish the full tetanus vaccination history, including previous doses and the date of the last dose.
- Assess wound type, contamination and delay to treatment; use the current UKHSA wound-management guidance to decide prophylaxis.
Inspection
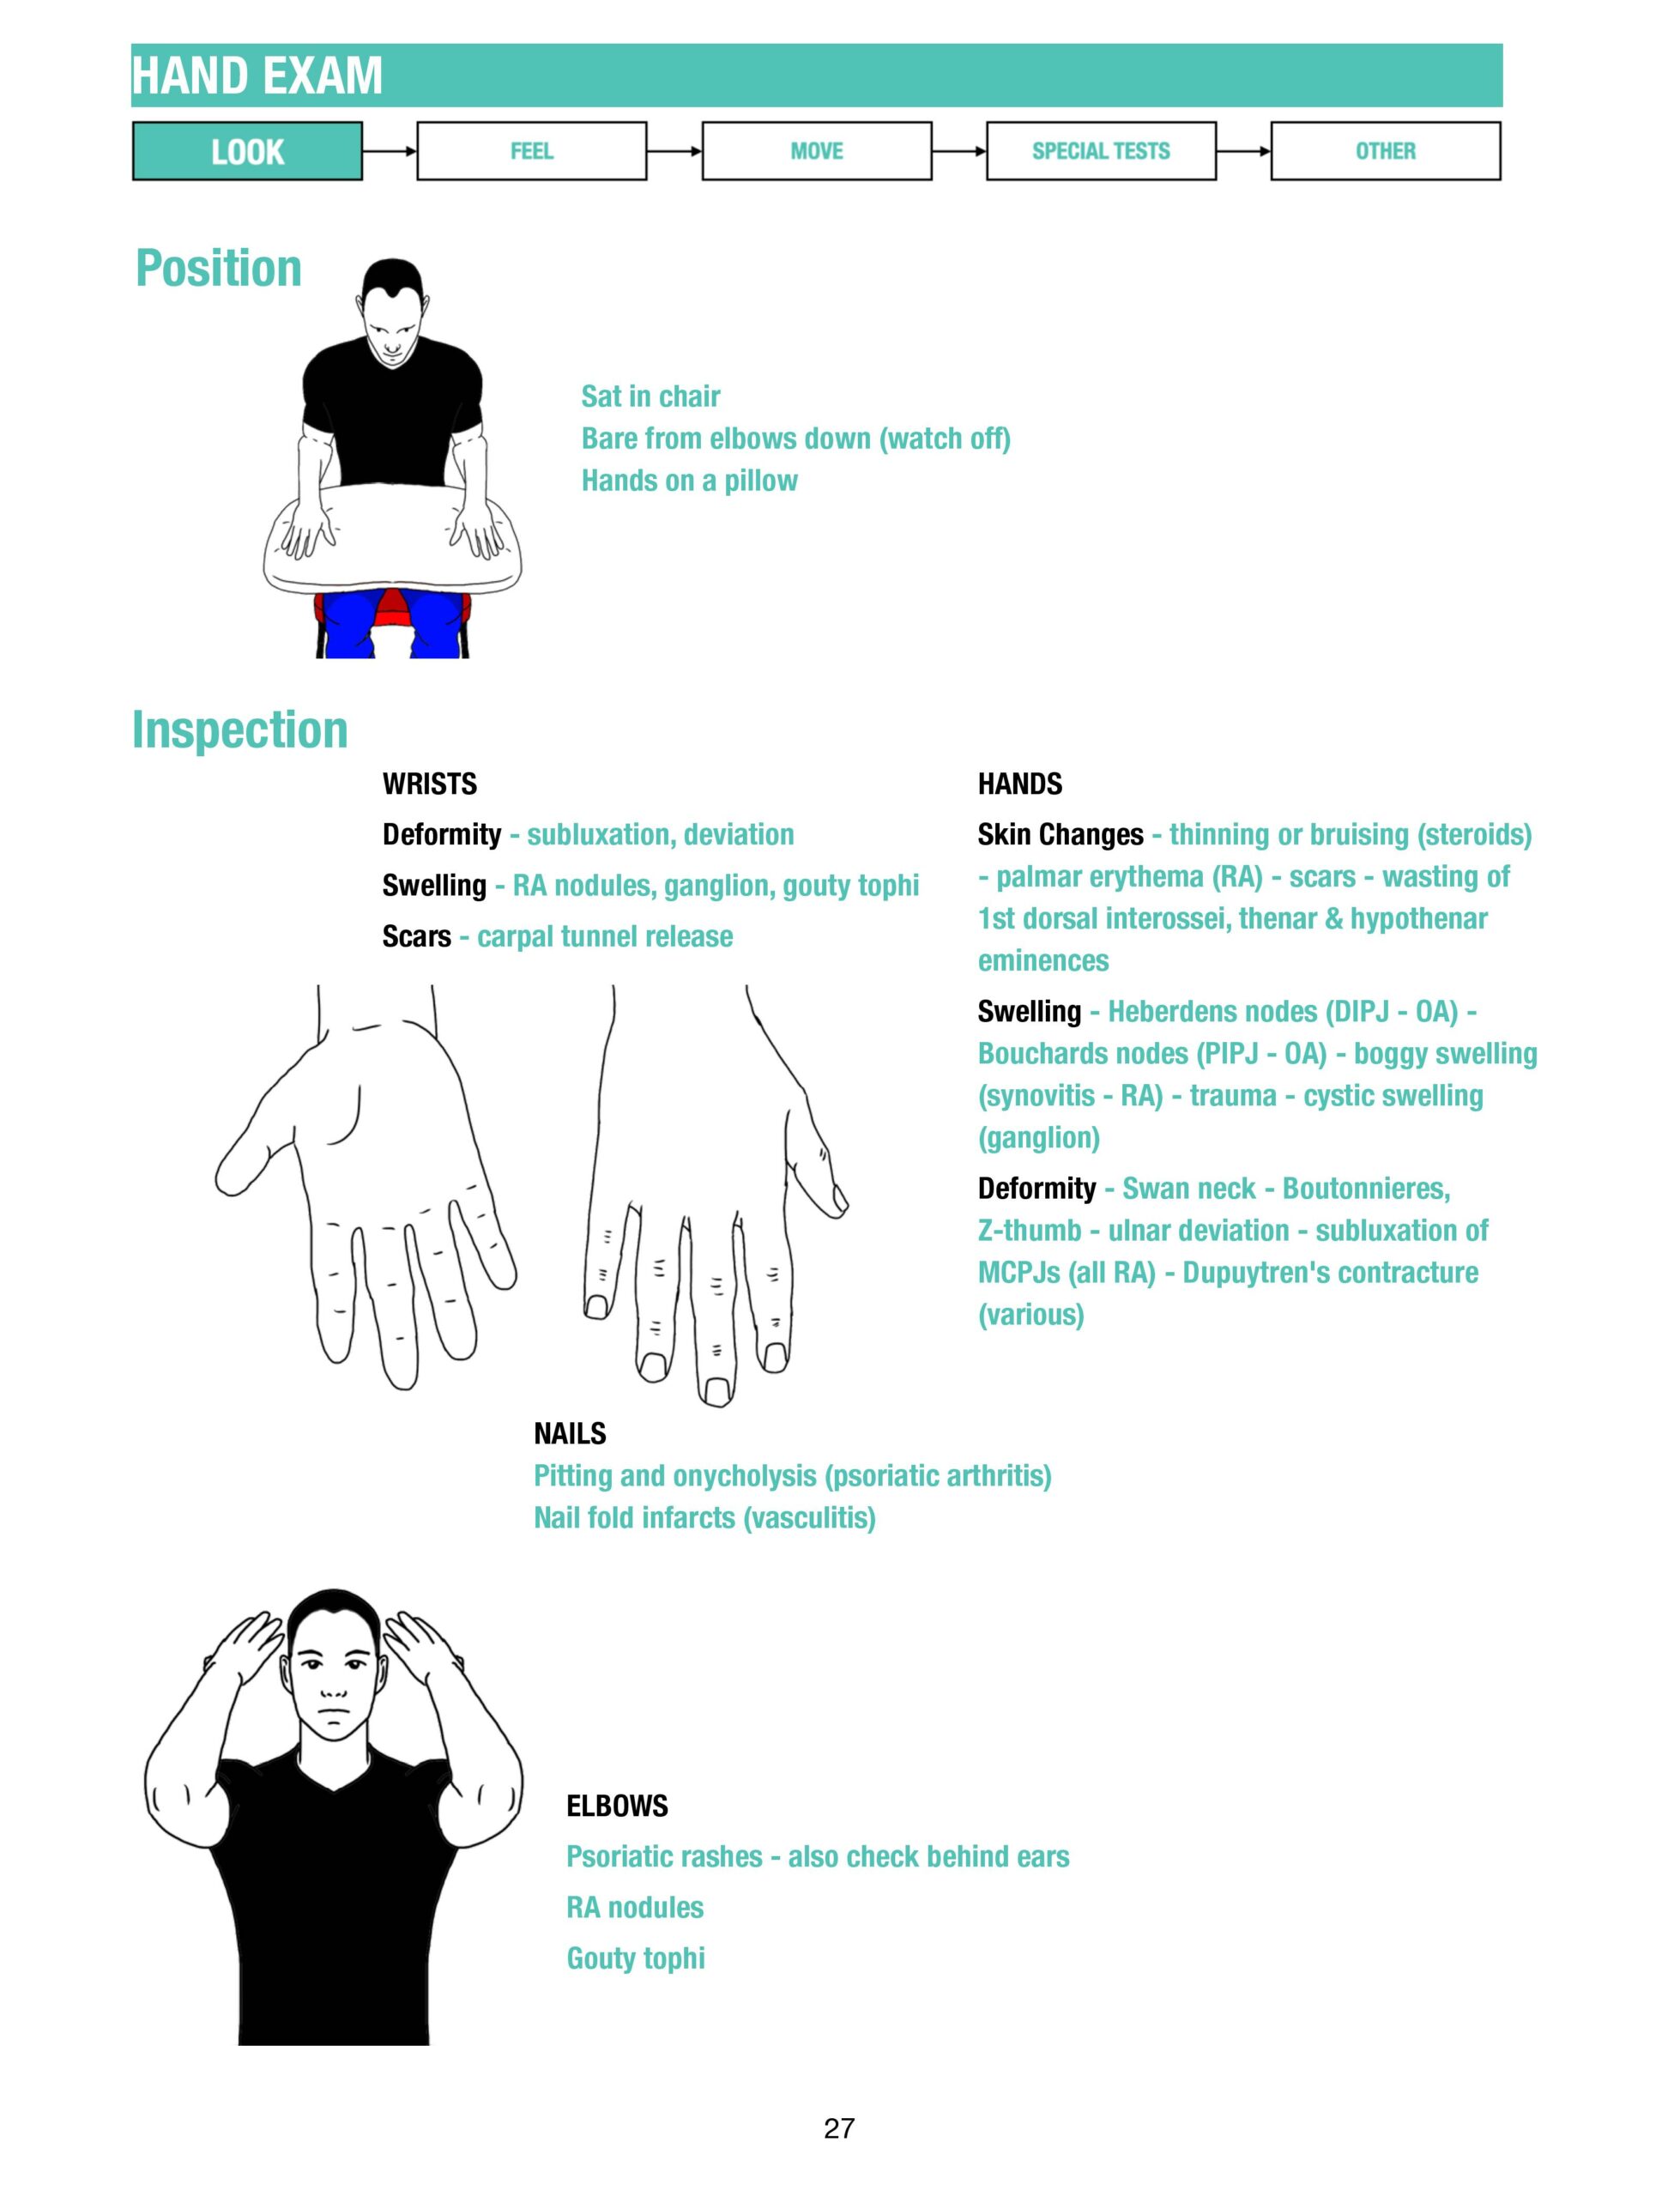
Compare both hands, including the dorsal and palmar surfaces.
“Please place your hands palm down on the table.”
“I am inspecting the DORSUM hands for:
- Any gross: deformities; swellings; scars; wasting; contractures,
- For swelling in particular looking for any pattern of swelling (e.g. Rheumatoid arthritis: MCPJ/PIPJ)
- Nail changes: pitting; koilonychia; onycholysis; splinter haemorrhages"
'Please turn your hands over, I am inspecting the PALMAR aspect of the hands for:
- any gross: deformities; swellings; scars; wasting; contractures
- for swelling in particular looking for any pattern of swelling (e.g. RA: MCPJ/PIPJ)
- nail changes: pitting; koilonychia; onycholysis; splinter haemorrhages
- palmar erythema
- the cascade"
"Please gently bend your fingers into a fist. I am checking the finger cascade, looking for overlap or scissoring that suggests rotational deformity, and observing any triggering.”
“Please can you bend your arm so I can look at your elbows: rheumatoid nodules; psoriatic plaques”
Palpation
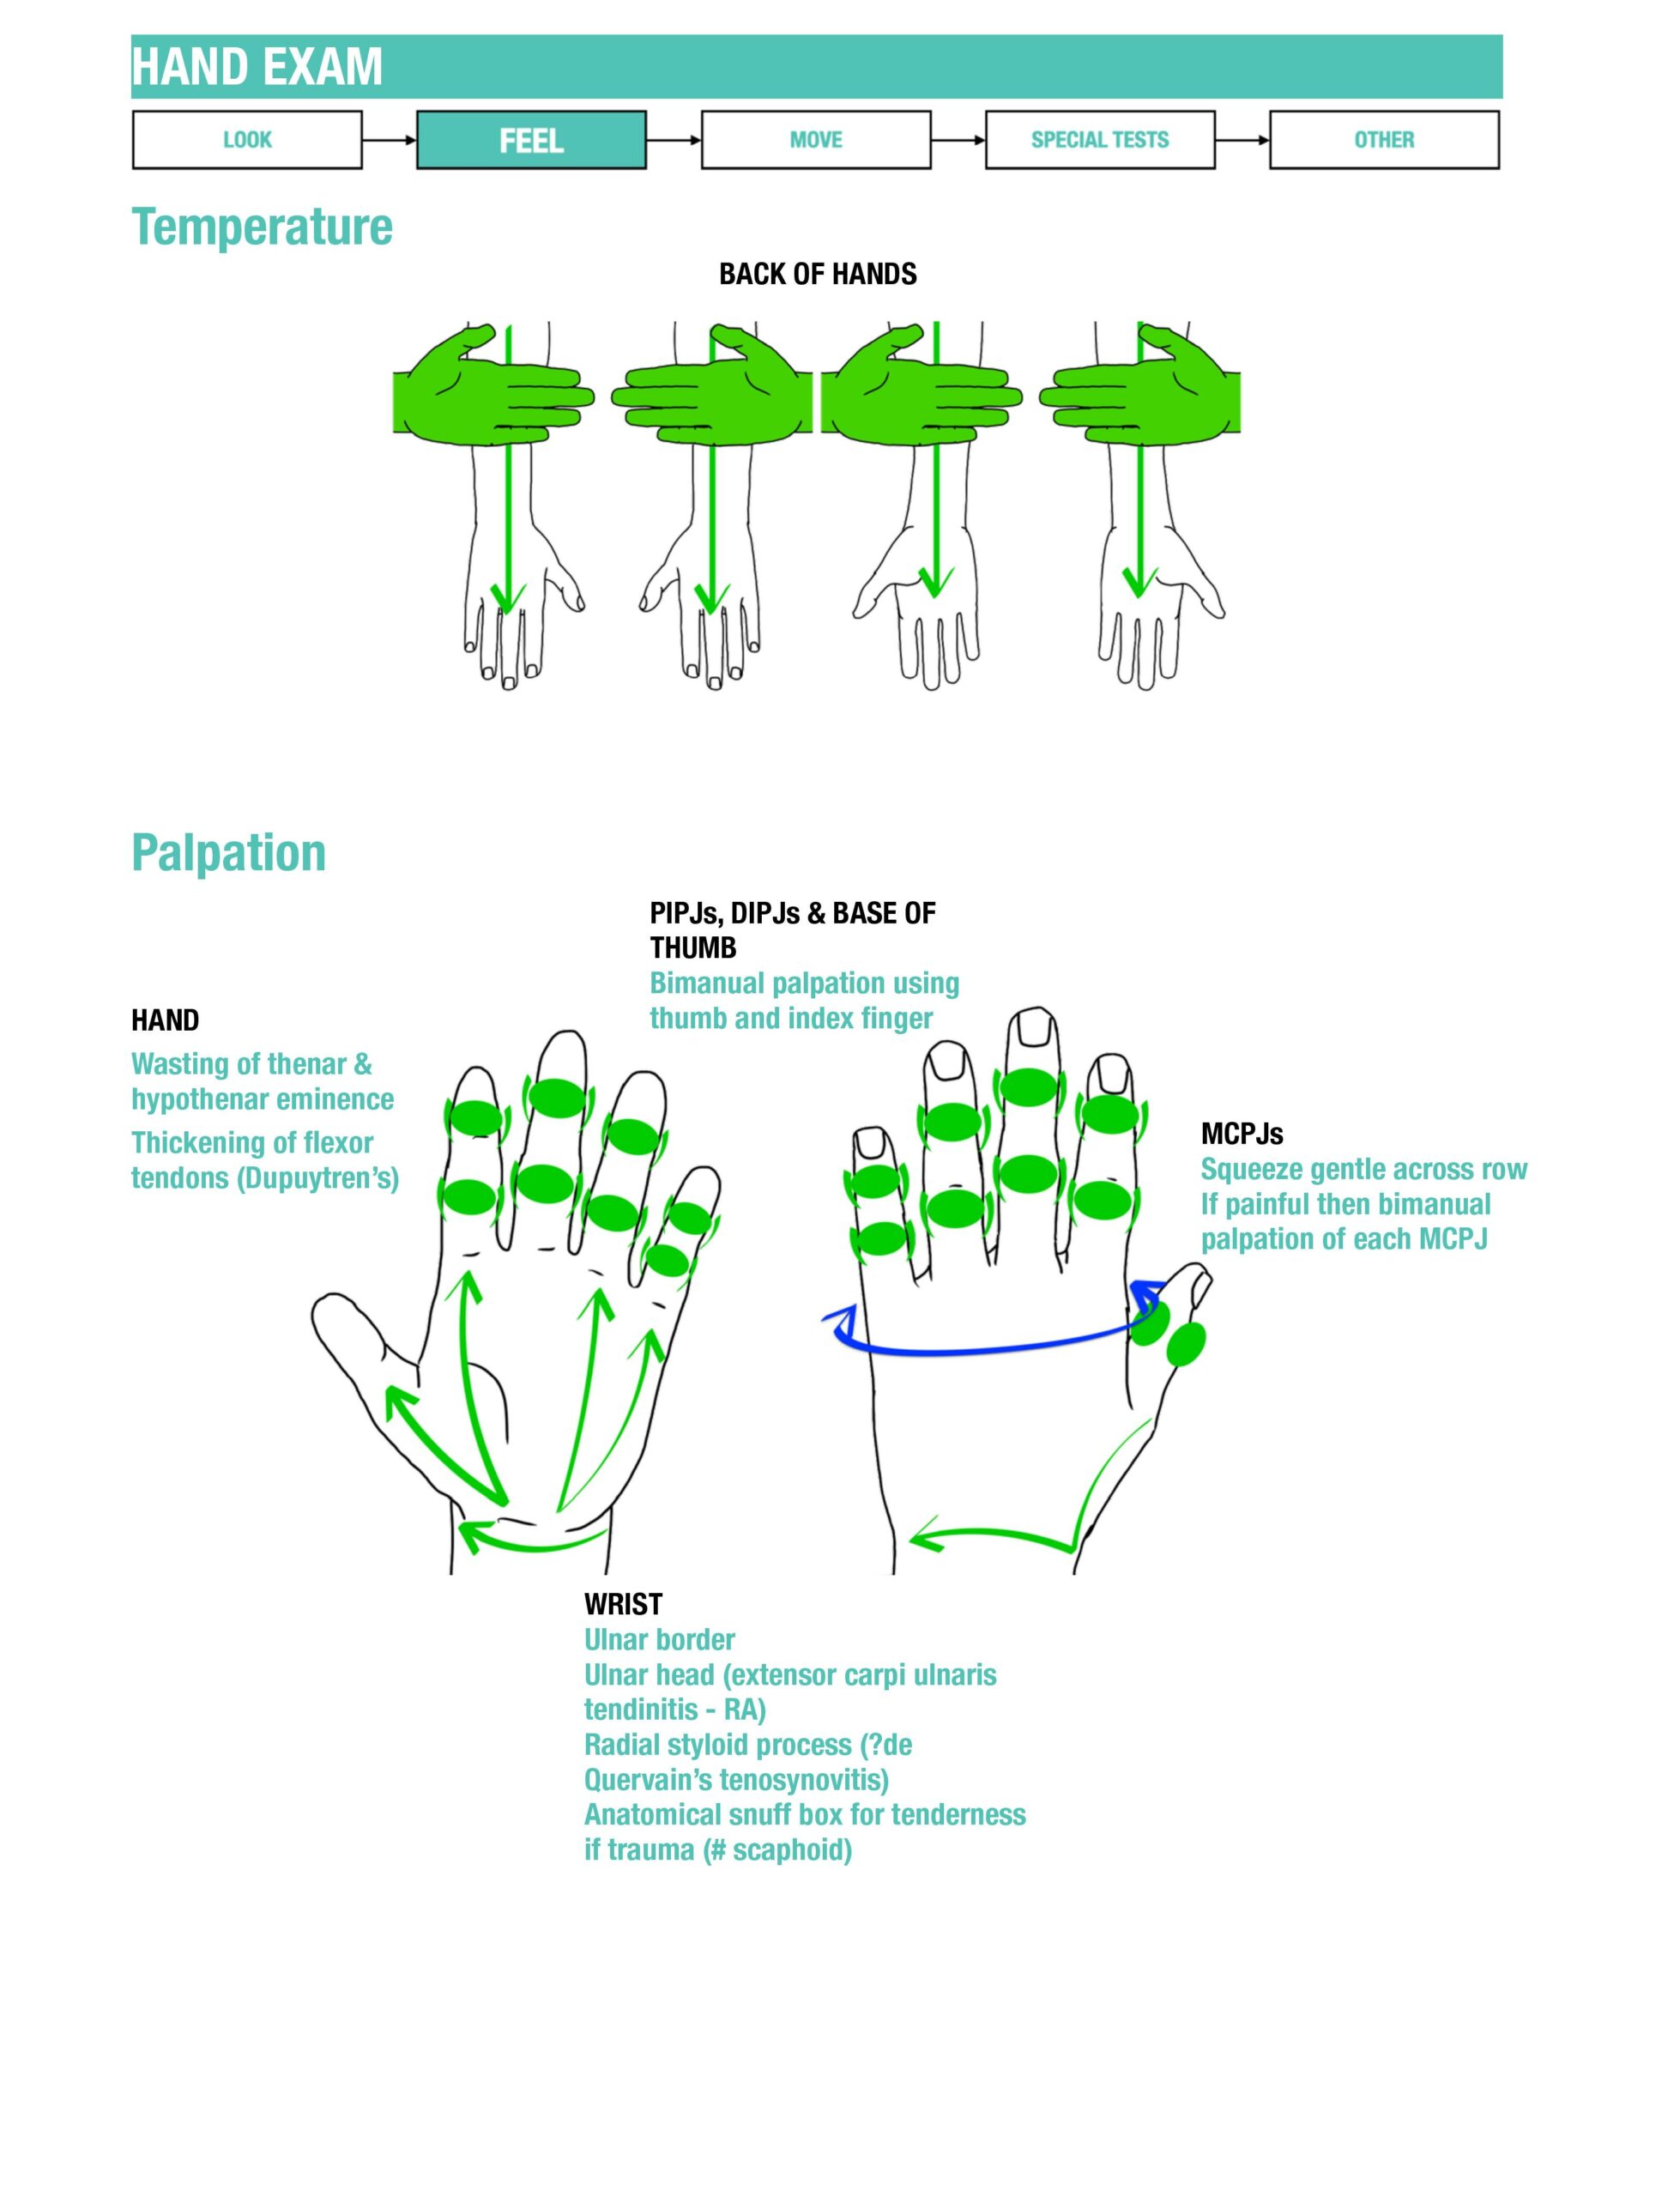
“Please show me where it hurts. I will start away from that area and feel gently.”
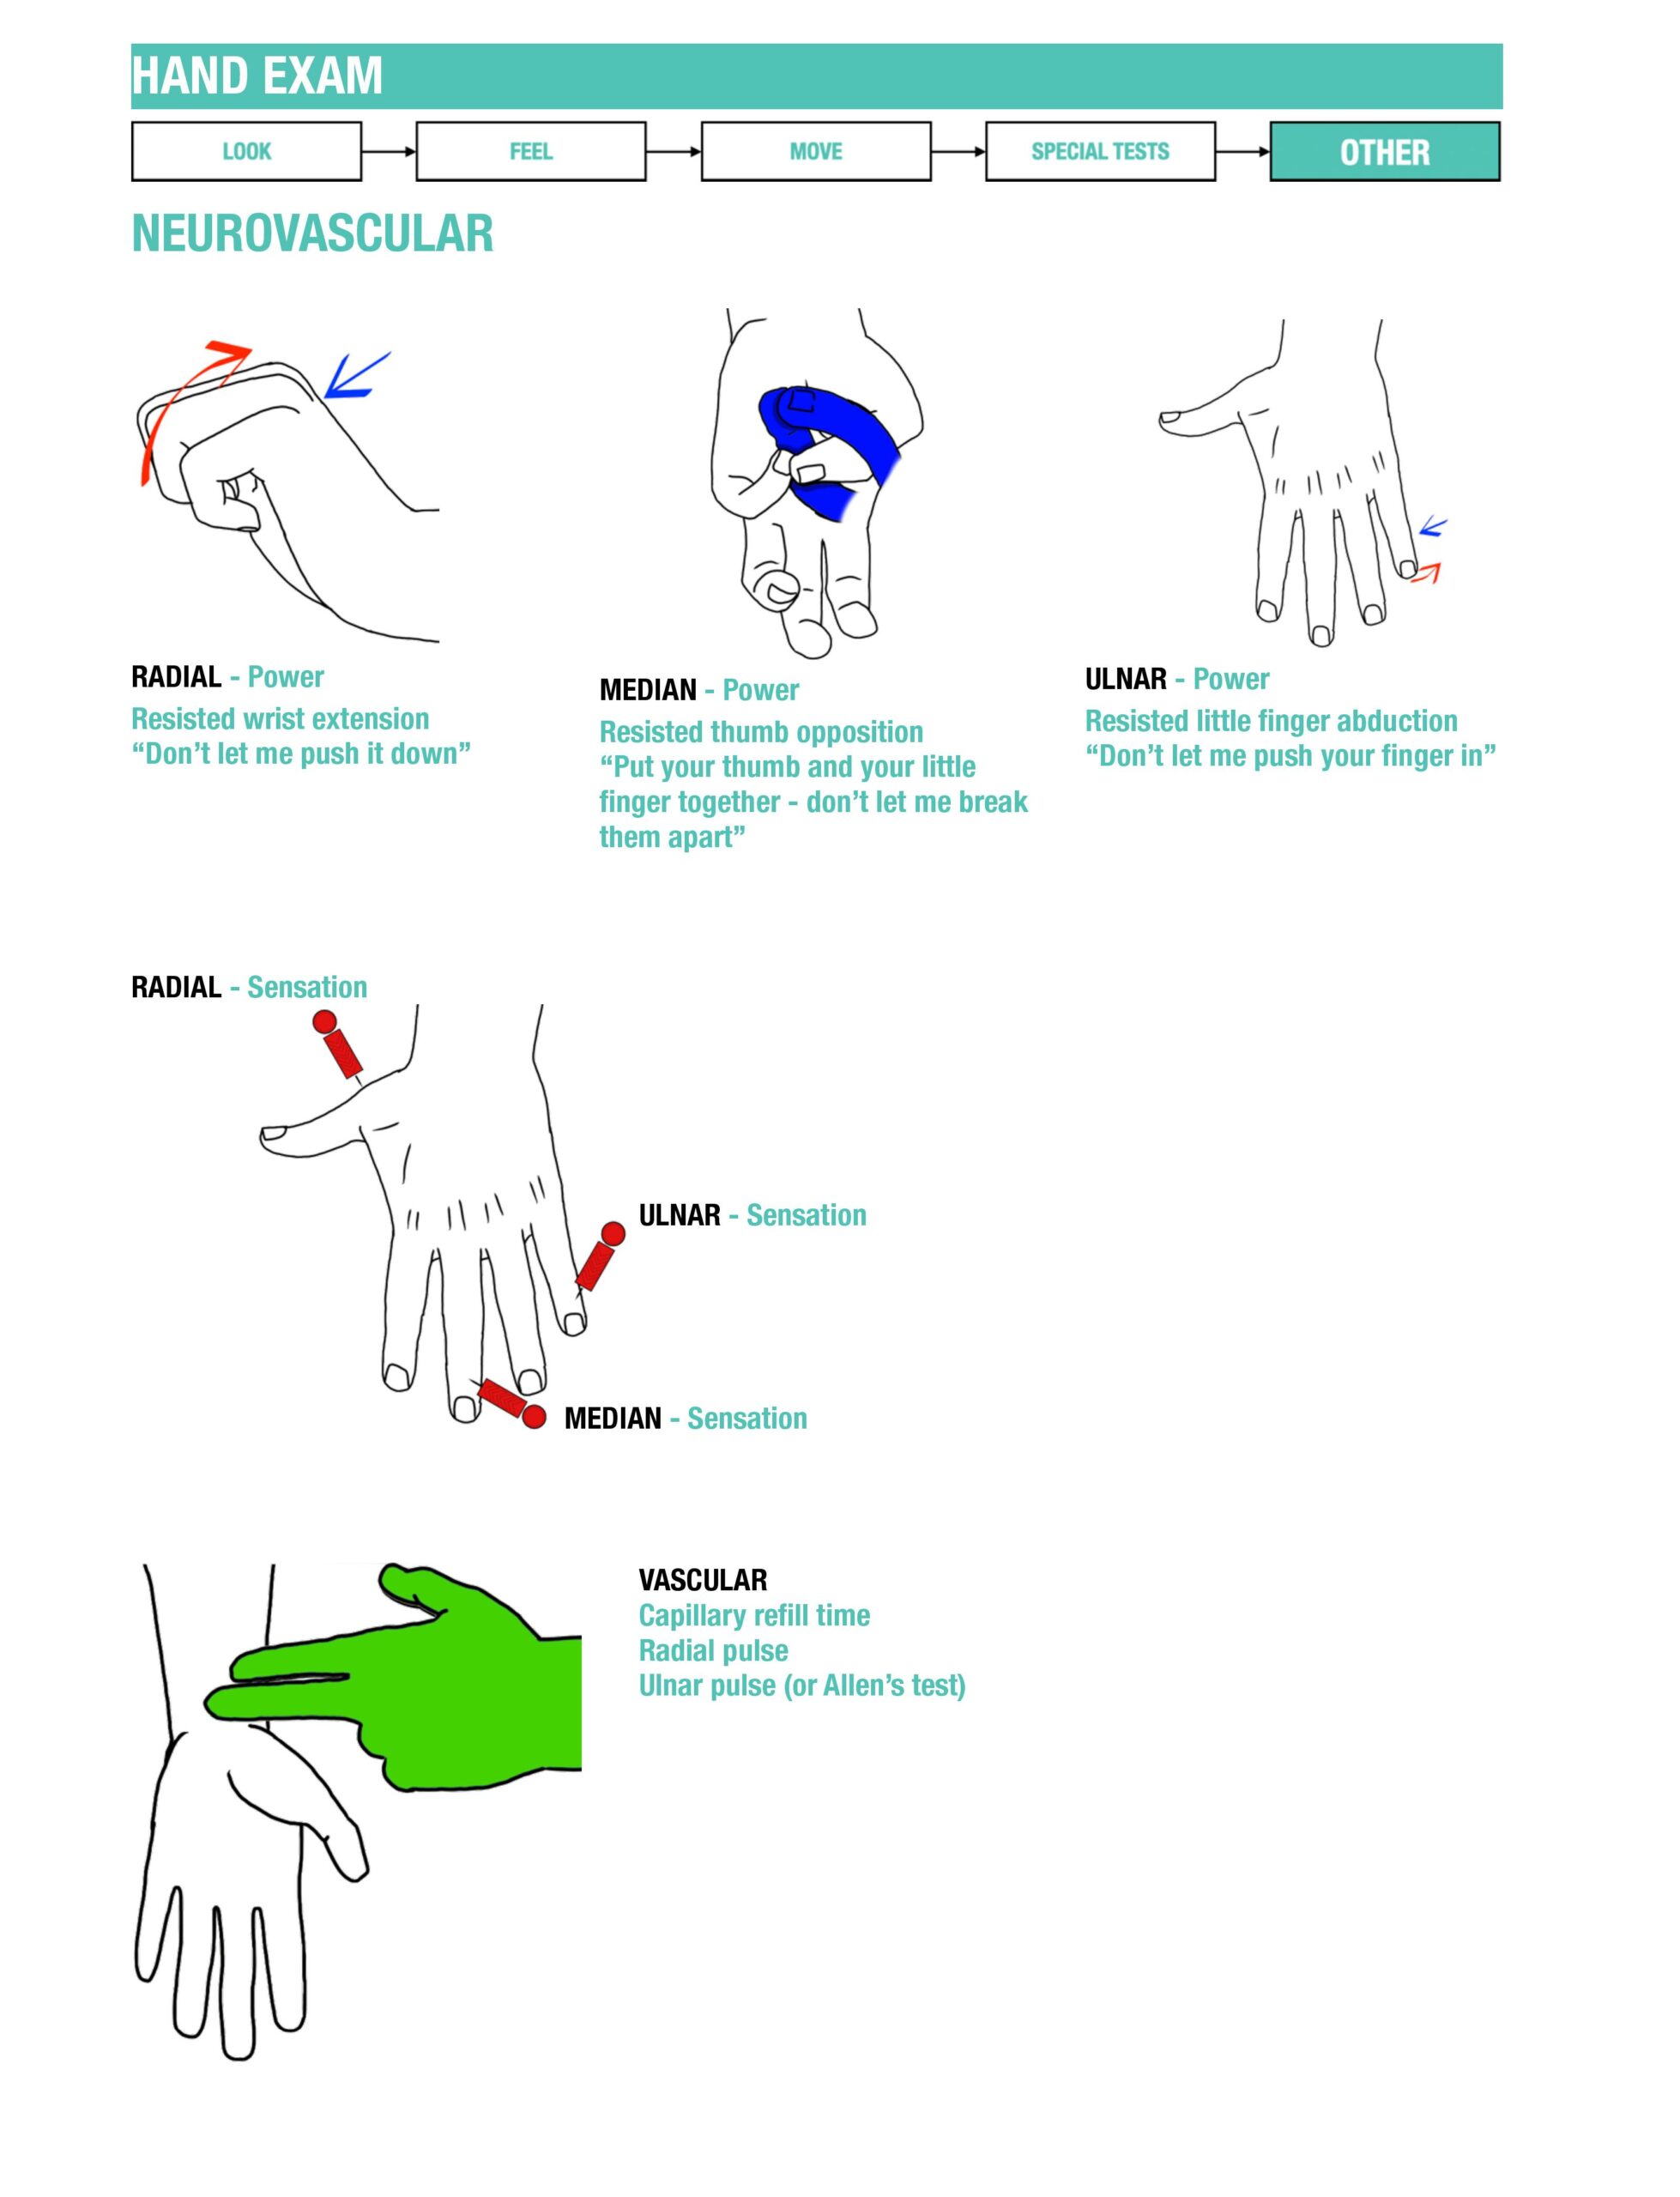
- Compare temperature, capillary refill and radial/ulnar pulses as indicated.
- Palpate relevant bones and joints, thenar and hypothenar areas, palm and tendon sheaths; use a gentle MCP squeeze only when appropriate.
- After trauma, assess the anatomical snuffbox and scaphoid tubercle. A normal initial X-ray does not exclude a scaphoid fracture; immobilise and arrange the appropriate imaging/follow-up pathway if suspicion remains.
- Allen’s test addresses a specific arterial-perfusion question; it is not required in every hand examination or a guarantee of adequate perfusion.
BSSH — suspected scaphoid fracture
Move
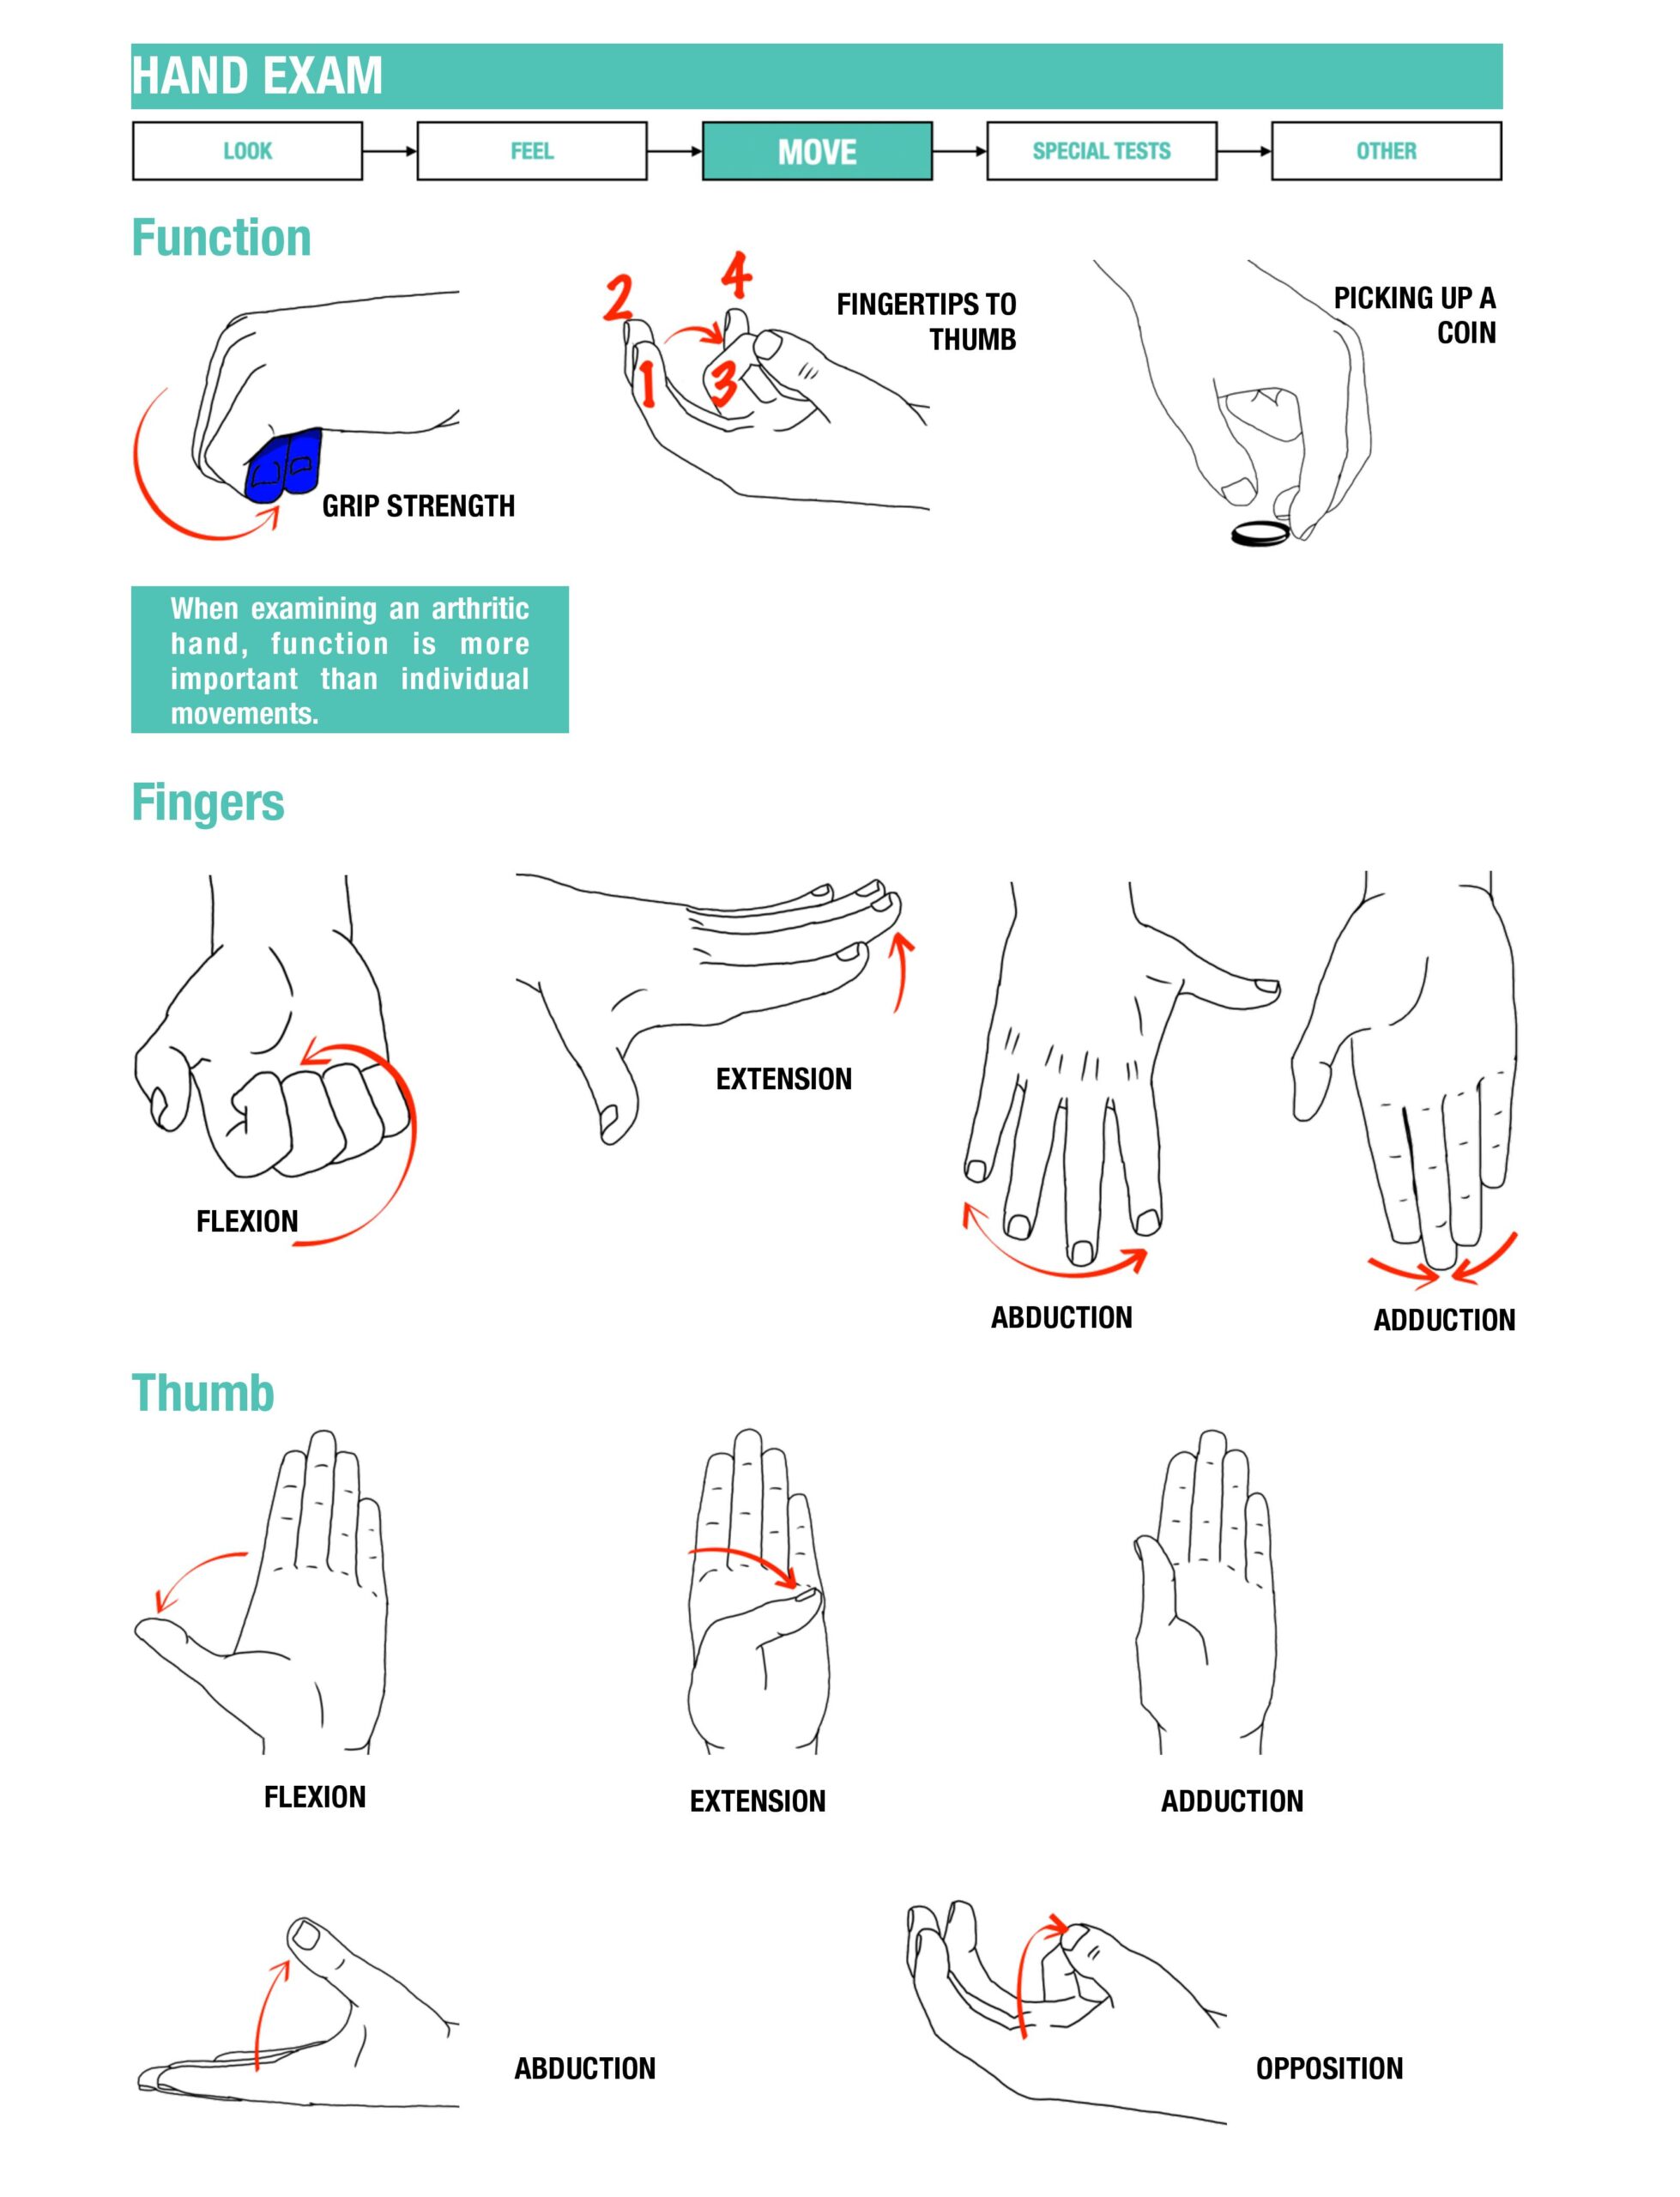
Compare active movement first. Add gentle passive movement and resisted testing when safe; suspected fracture or significant tendon injury may limit testing.
Wrist and forearm
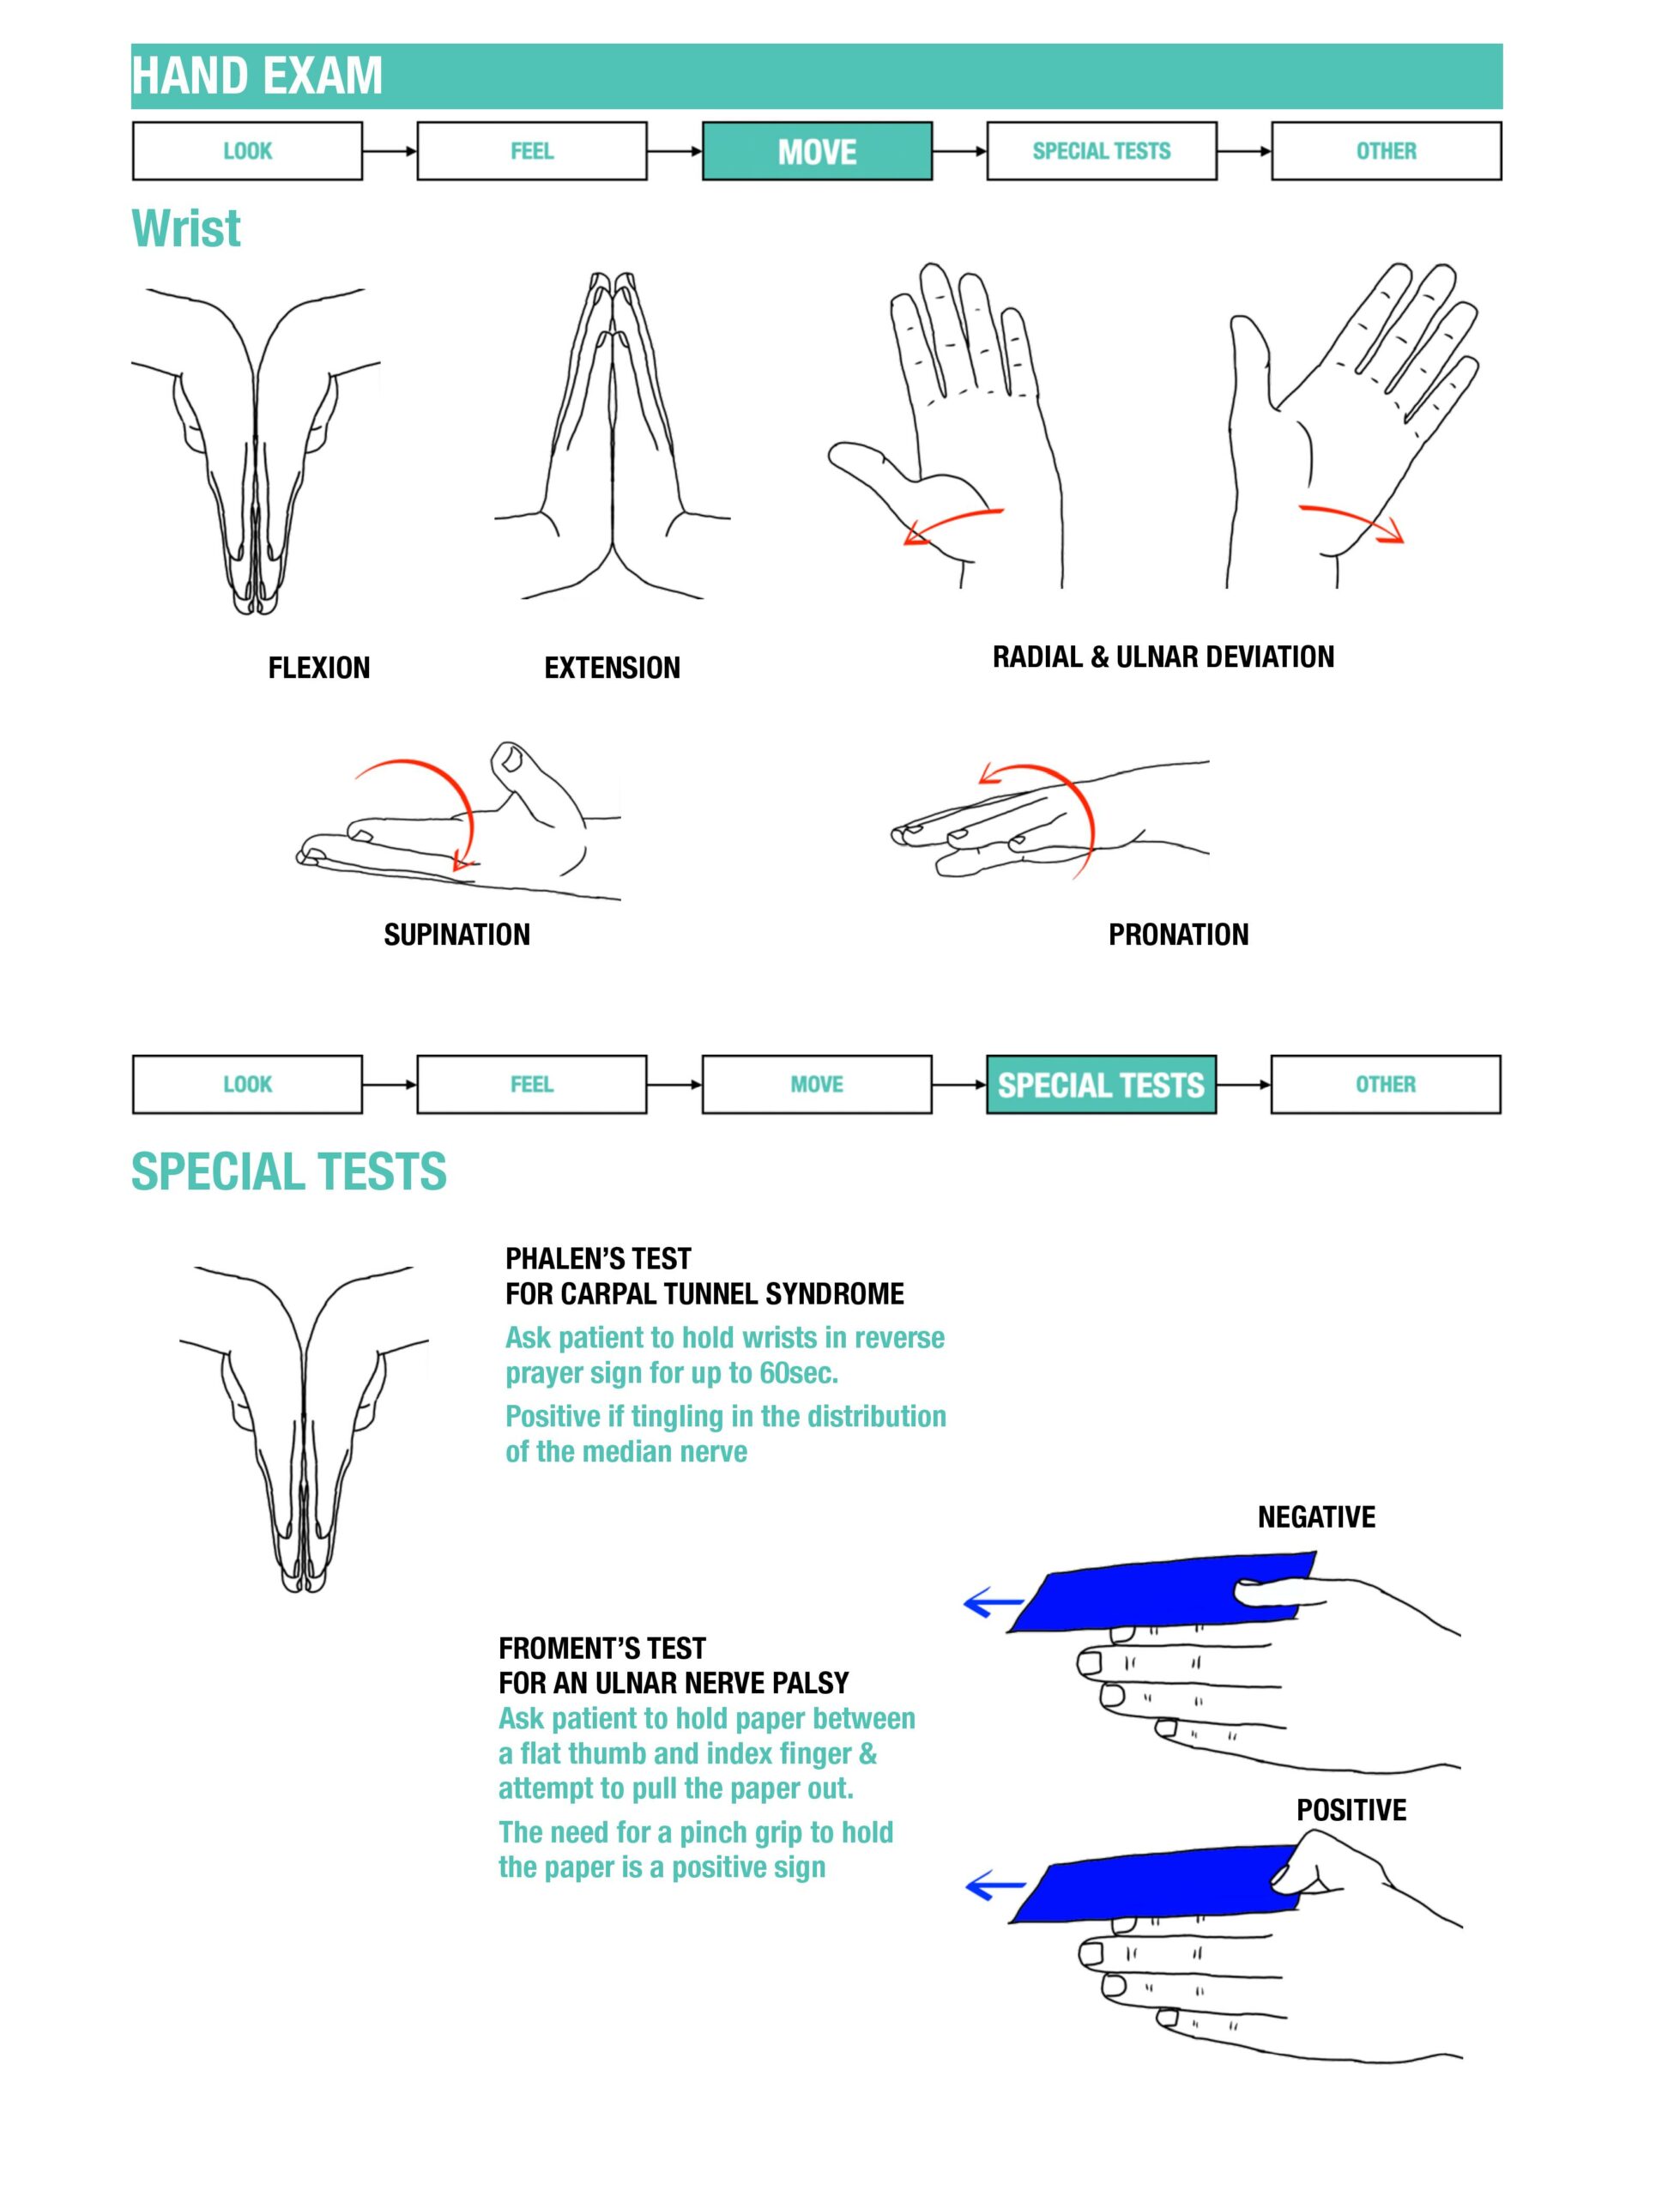
- Wrist flexion, extension, radial and ulnar deviation.
- Forearm pronation and supination, with the elbow supported.
Fingers and tendons
- Assess MCP, PIP and DIP flexion and extension; look for an extension lag. Test finger abduction and adduction.
- FDP: hold the PIP joint extended and ask the patient to bend the fingertip at the DIP joint. Test each digit.
- FDS: keep the other fingers extended and ask the patient to flex the PIP joint of the selected finger. Interpret an absent little-finger FDS action cautiously because anatomical variation occurs.
- Inspect wounds carefully: preserved movement does not exclude a partial tendon injury.
Thumb
- Assess flexion, extension, opposition, abduction away from the palm and adduction back towards it.
- The thumb ulnar collateral ligament stabilises the MCP joint. If assessment is appropriate after considering fracture, stabilise the metacarpal and apply gentle valgus stress to the proximal phalanx, comparing laxity and the end point. Avoid repeated painful stress and seek specialist advice when uncertain.
MCP = metacarpophalangeal; PIP = proximal interphalangeal; DIP = distal interphalangeal. FDP = flexor digitorum profundus; FDS = flexor digitorum superficialis.
Special tests
De Quervain’s tenosynovitis
Radial-styloid pain with appropriate gentle provocation supports this diagnosis. The thumb-inside-a-fist manoeuvre with ulnar deviation is Eichhoff’s test, often mislabeled Finkelstein’s. It can provoke pain in people without the condition. Do not force either manoeuvre or diagnose from one test alone.
Finkelstein versus Eichhoff — primary study
Peripheral nerves
| Nerve | Useful sensory and motor checks |
|---|---|
| Radial | Sensation in the first dorsal web space; wrist, finger and thumb extension. |
| Median | Sensation at the palmar index-finger pulp; thumb palmar abduction and opposition. The “OK” sign tests the anterior interosseous motor branch. |
| Ulnar | Sensation at the little-finger pulp (ulnar/medial one-and-a-half digits); finger abduction and adduction. Froment’s sign is thumb IP flexion compensating for weak adductor pollicis when holding paper. |
Compare sides and map any deficit; these are useful test points rather than a complete sensory map. Record perfusion as well as nerve function.
Carpal tunnel
Phalen’s wrist-flexion test and Tinel’s percussion over the median nerve are supportive when they reproduce the patient’s typical median-distribution tingling or numbness. Pain alone, or a rigid time threshold, is not diagnostic.
Functional assessment
- Grasp cup
- Pinch something
- Grip strength
- Hook – yours and patient’s fingers together and try to straighten against resistance.
Close
Help the patient return to a comfortable position, offer privacy for dressing and thank them. Present the findings and your proposed next steps to the responsible clinician, then explain the agreed plan to the patient.
Further reading
Interpret and present your findings
Present the pattern of joint involvement, tendon function, sensory and motor findings, and perfusion. A wound near a tendon or nerve needs careful assessment even if some movement remains. Explain what imaging, protection or specialist assessment would answer the remaining question; do not reassure solely on the basis of a normal initial radiograph.
Original hand and wrist infographics · Nick Smith
Original teaching artwork, retained with its credit. Use the written sequence on this page for the corrected technique and safety qualifications.
03 / CHAPTER 7
Elbow
Ask about injury, repetitive activity, swelling and restriction. Pain reproduced by a tendon-loading test is different from a mechanical block to joint movement. Expose enough of the arm to inspect both elbows and assess the joints on either side where relevant.
Compare movement, tendon function and distal neurovascular findings.
Elbow: sequence and example phrases
Introduction
Use the introduction, consent and preparation described above, explaining the particular area and movements involved. Protect privacy and adapt the examination to pain, mobility and the clinical question.
Brief history
“Can you briefly tell me what the problem is?”
“Which hand do you write with?”
“What is your occupation?”
“Do you have special hobbies?”
Inspection
“Please can you stand up and face me, with your arms out by your sides, palms facing forward.”
“I am inspecting from front; back and sides looking for…”
- scars
- deformity including: swelling; bruising; redness (note normal slight valgus position)
- hyperextension
- wasting
- fasciculations
- rheumatoid nodules
Assess the carrying angle with the elbows extended and forearms supinated, comparing both sides.
Palpation
“I am going to feel your elbows, assessing for…”
Comment on:
- warmth
- swelling
- bogginess
- crepitus in movement
- pain
Structures:
- medial epicondyle
- olecranon
- lateral epicondyle
- elbow flexed: radial head (thumb on head, supinate and pronate)
- biceps tendon (hook test)
- brachial and radial pulse
Move
Active; passive and resisted
- Flexion
- Extension
- Supination and pronation (flexed elbow; thumbs up and thumbs down)
Special tests
| Nerve | Useful sensory and motor checks |
|---|---|
| Radial | Sensation in the first dorsal web space; wrist, finger and thumb extension. |
| Median | Sensation at the palmar index-finger pulp; thumb palmar abduction and opposition. The “OK” sign tests the anterior interosseous motor branch. |
| Ulnar | Sensation at the little-finger pulp (ulnar/medial one-and-a-half digits); finger abduction and adduction. Froment’s sign is thumb IP flexion compensating for weak adductor pollicis when holding paper. |
Compare sides and map any deficit; these are useful test points rather than a complete sensory map. Record perfusion as well as nerve function.
Epicondylar tendinopathy
- Lateral: palpate the lateral epicondyle while testing resisted wrist extension with the forearm pronated. Reproduction of the usual lateral pain supports extensor tendinopathy.
- Medial: test resisted wrist flexion and forearm pronation, looking for pain at the medial epicondyle.
- Interpret these tests with the history, tenderness and range of movement. Assess distal biceps integrity after an appropriate mechanism; the hook test should be performed gently by a clinician familiar with the technique.
Close
Help the patient return to a comfortable position, offer privacy for dressing and thank them. Present the findings and your proposed next steps to the responsible clinician, then explain the agreed plan to the patient.
Further reading
Interpret and present your findings
Describe the position of tenderness, range of movement, swelling and distal function. Relate these to the history before proposing tendinopathy, bursitis, arthritis or injury. Marked pain, warmth and restricted movement require assessment for infection and other urgent causes; a special test does not replace that assessment.
04 / CHAPTER 7
Shoulder
Observe how the person moves the arm before touching it. Ask about trauma, night pain, work or sport, and pain or altered sensation extending from the neck. Compare active and passive movement: a large difference may help distinguish pain or weakness from a more general restriction, but it does not make a diagnosis by itself.
Observe movement before selecting focused rotator-cuff tests.
Shoulder: sequence and example phrases
Introduction
Use the introduction, consent and preparation described above, explaining the particular area and movements involved. Protect privacy and adapt the examination to pain, mobility and the clinical question.
Brief history
“Can you briefly tell me what the problem is?”
“Which hand do you write with?”
“What is your occupation?”
“Do you have special hobbies?”
Inspection
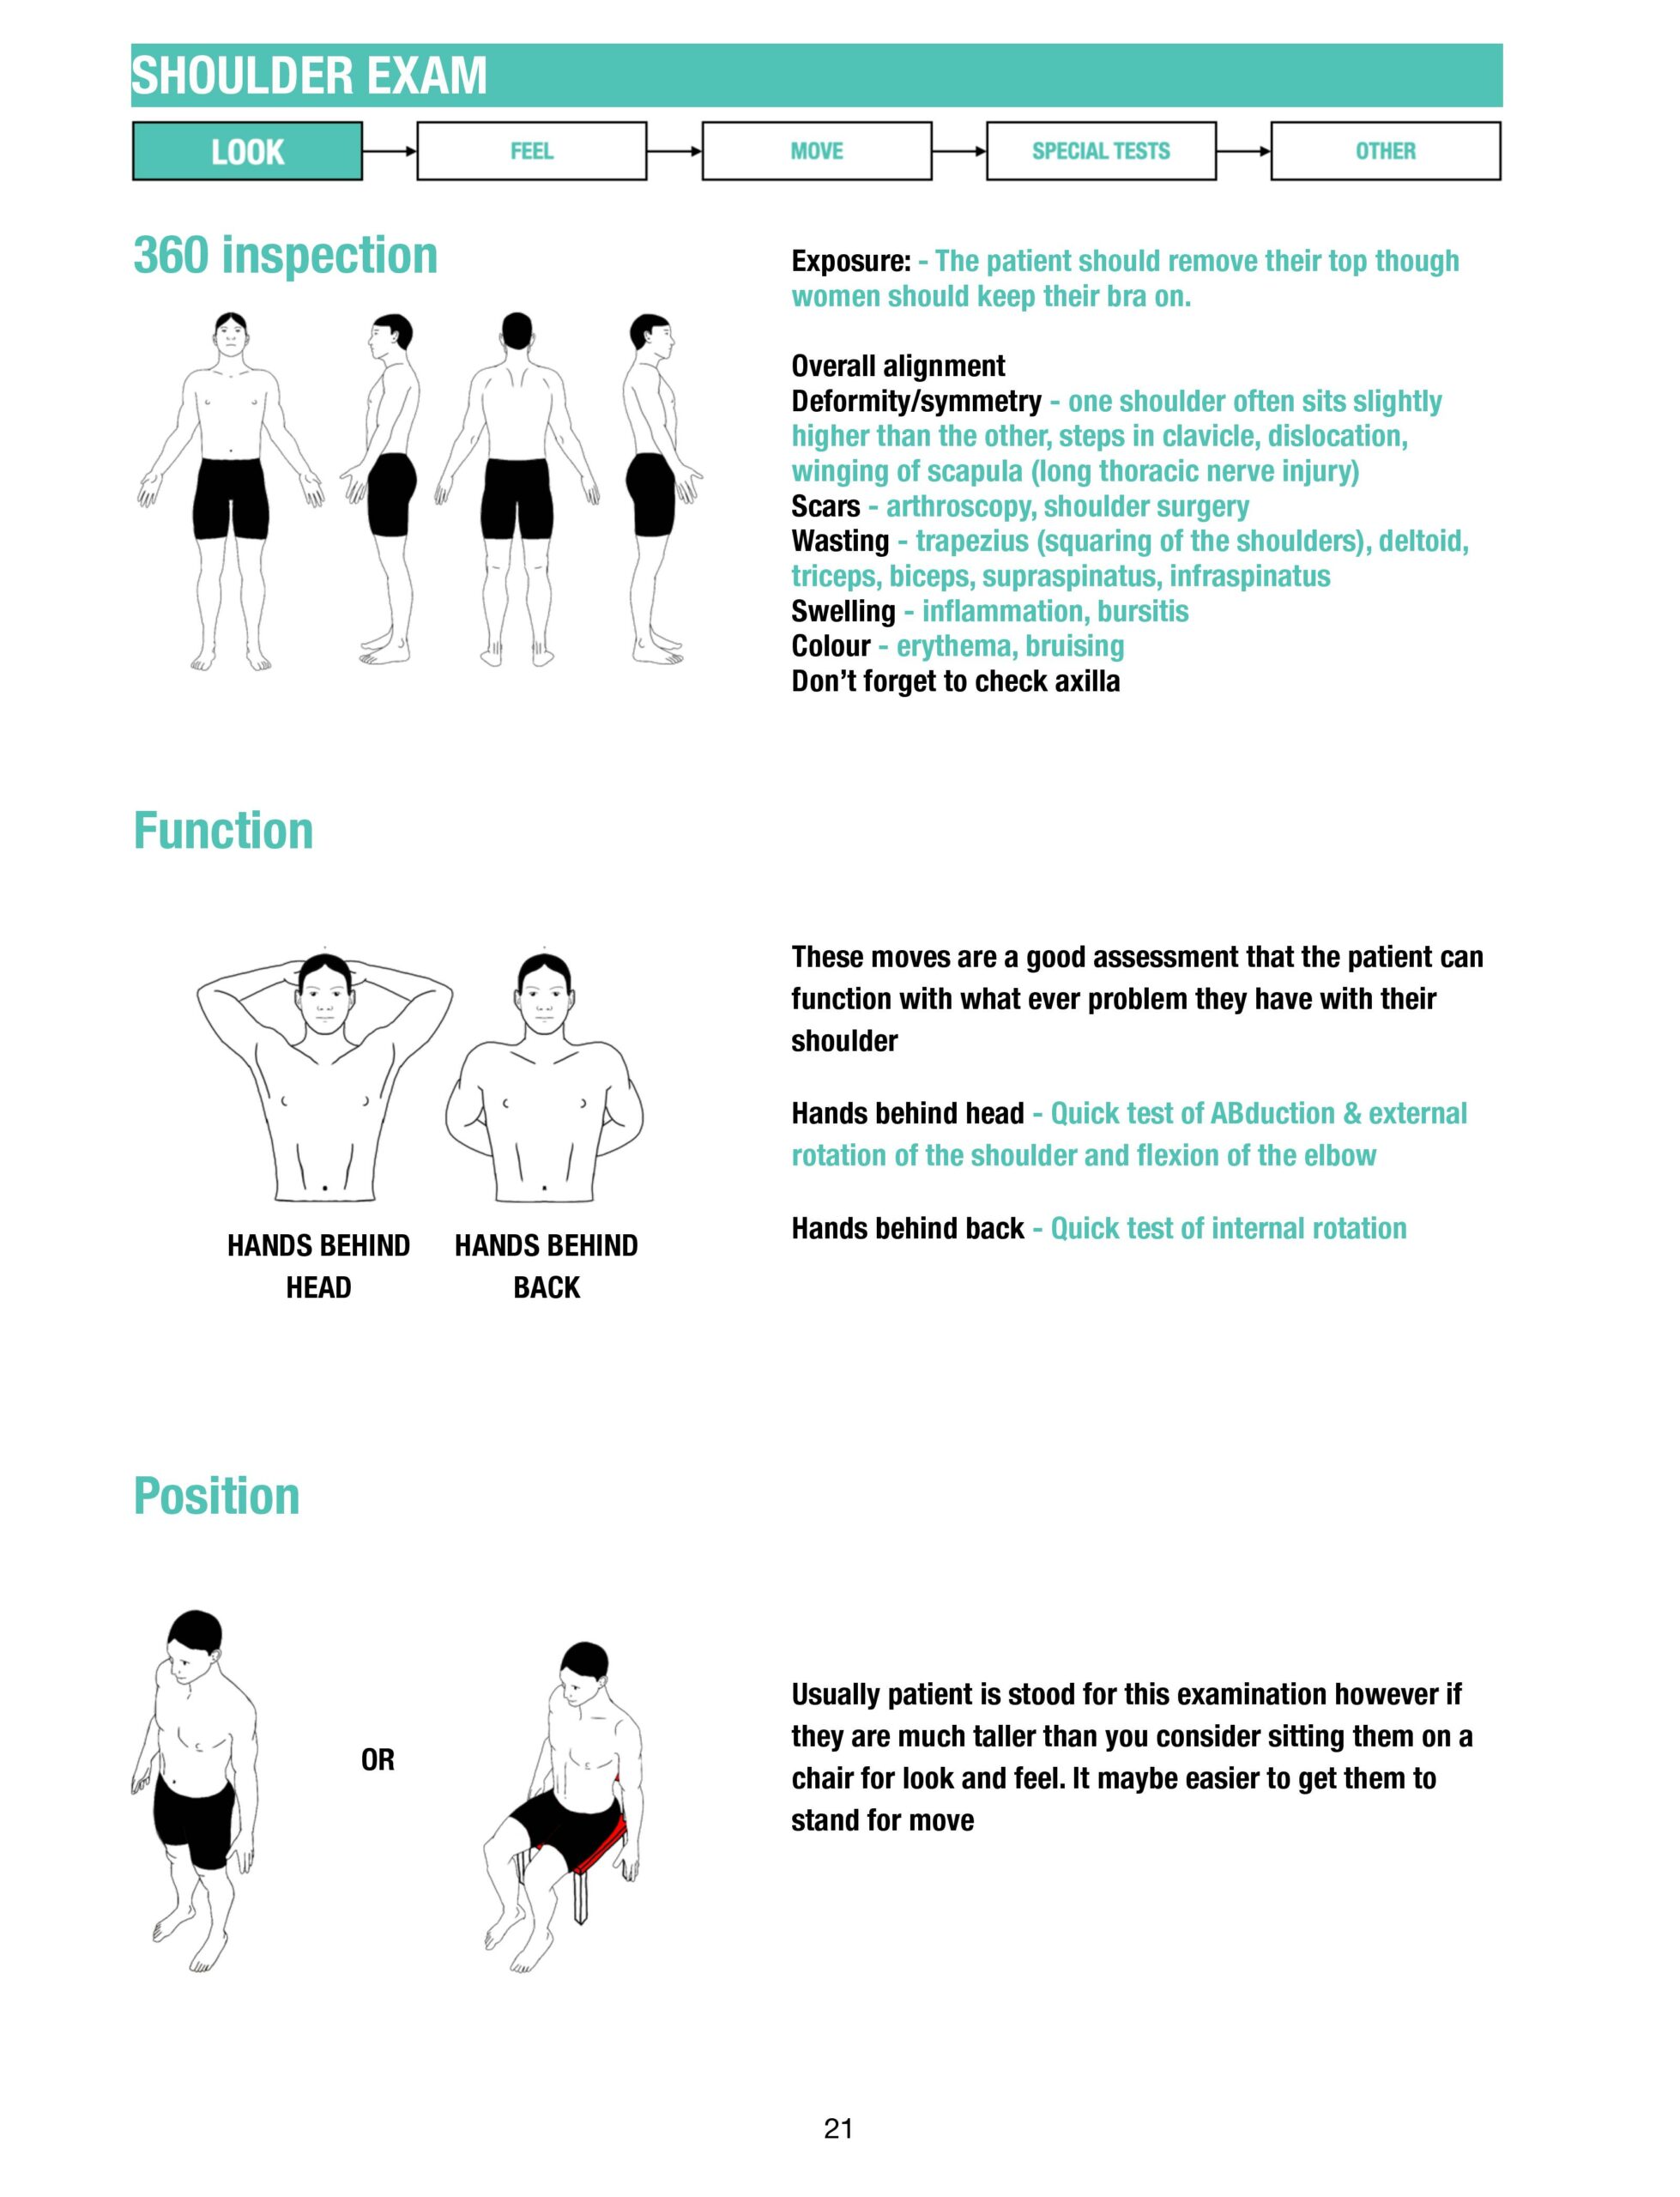
“Please can you stand up and face me, with your arms out by your sides, palms facing forward.”
“I am inspecting from the front; back; sides and axilla looking for…”
- scars
- deformity including: swelling; bruising; redness
- wasting
- fasciculations
Palpation
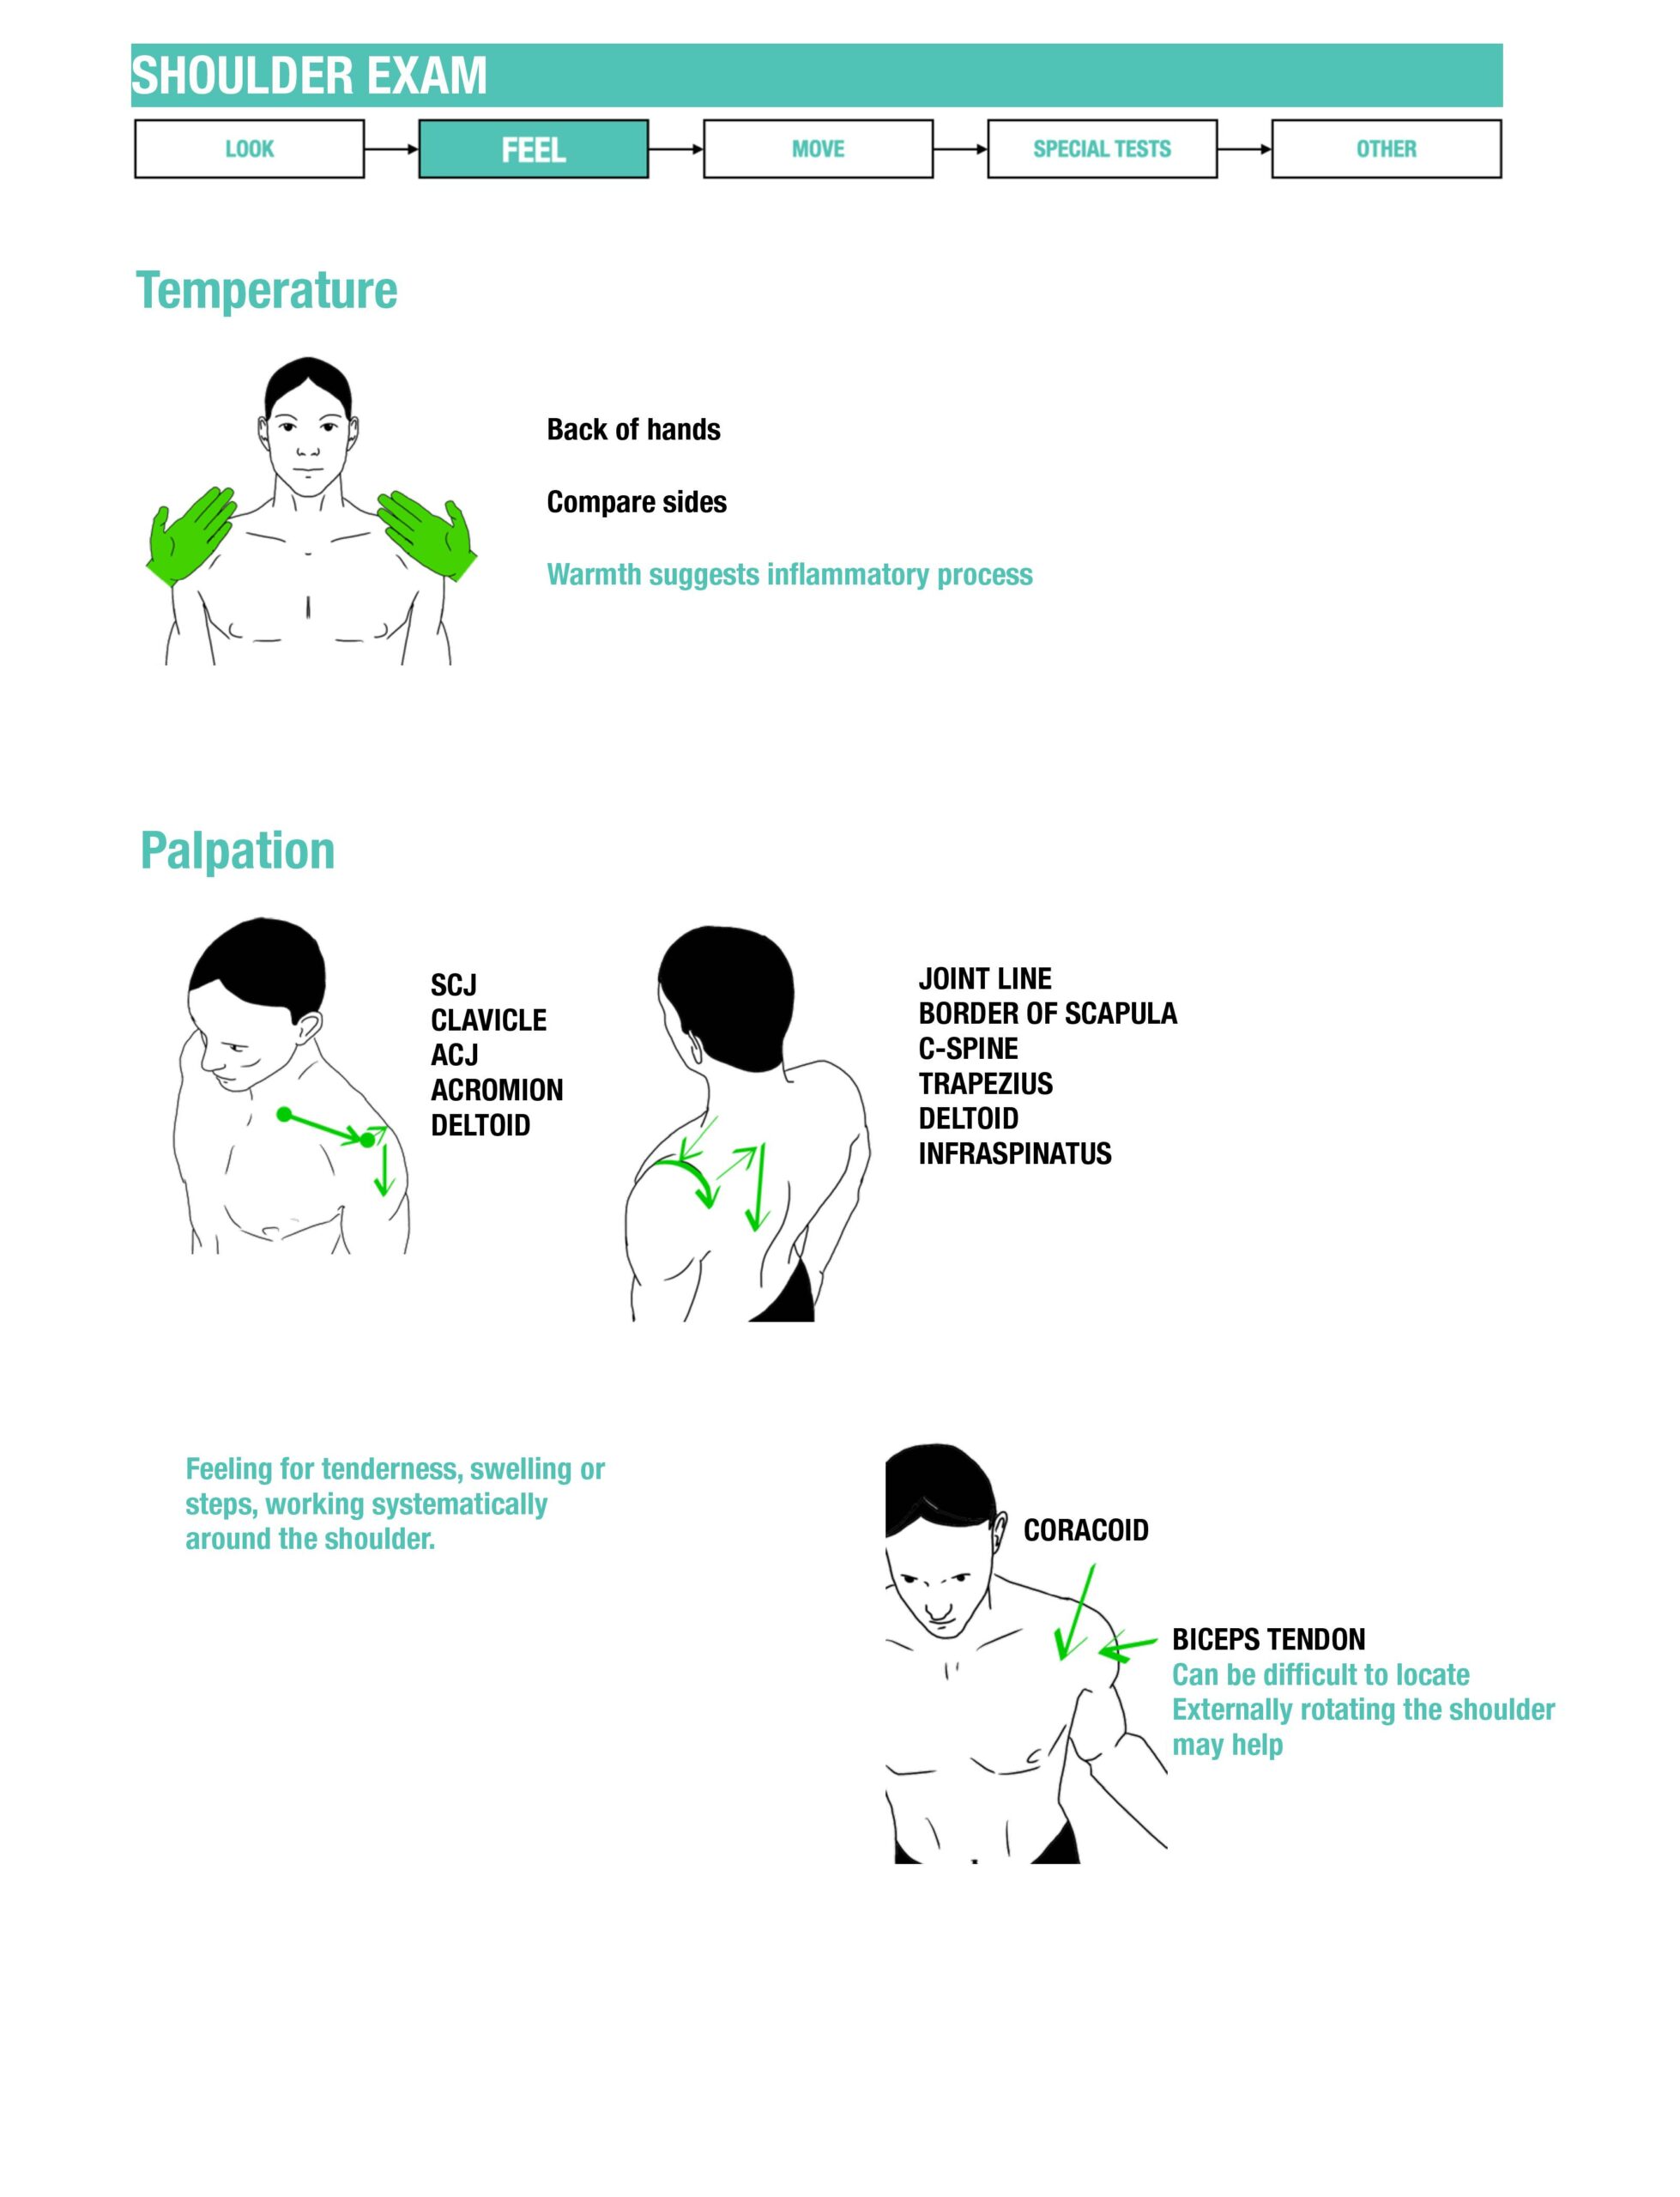
“I am going to feel your shoulders. I am palpating..”
Anteriorly: SCJ → Clavicle → Acromoclavicular joint → coracoid process → long-head biceps tendon in the bicipital groove → greater tuberosity of humerus
Posteriorly: Acromion → spine of scapula → suprascapular and interscapular muscles
Move
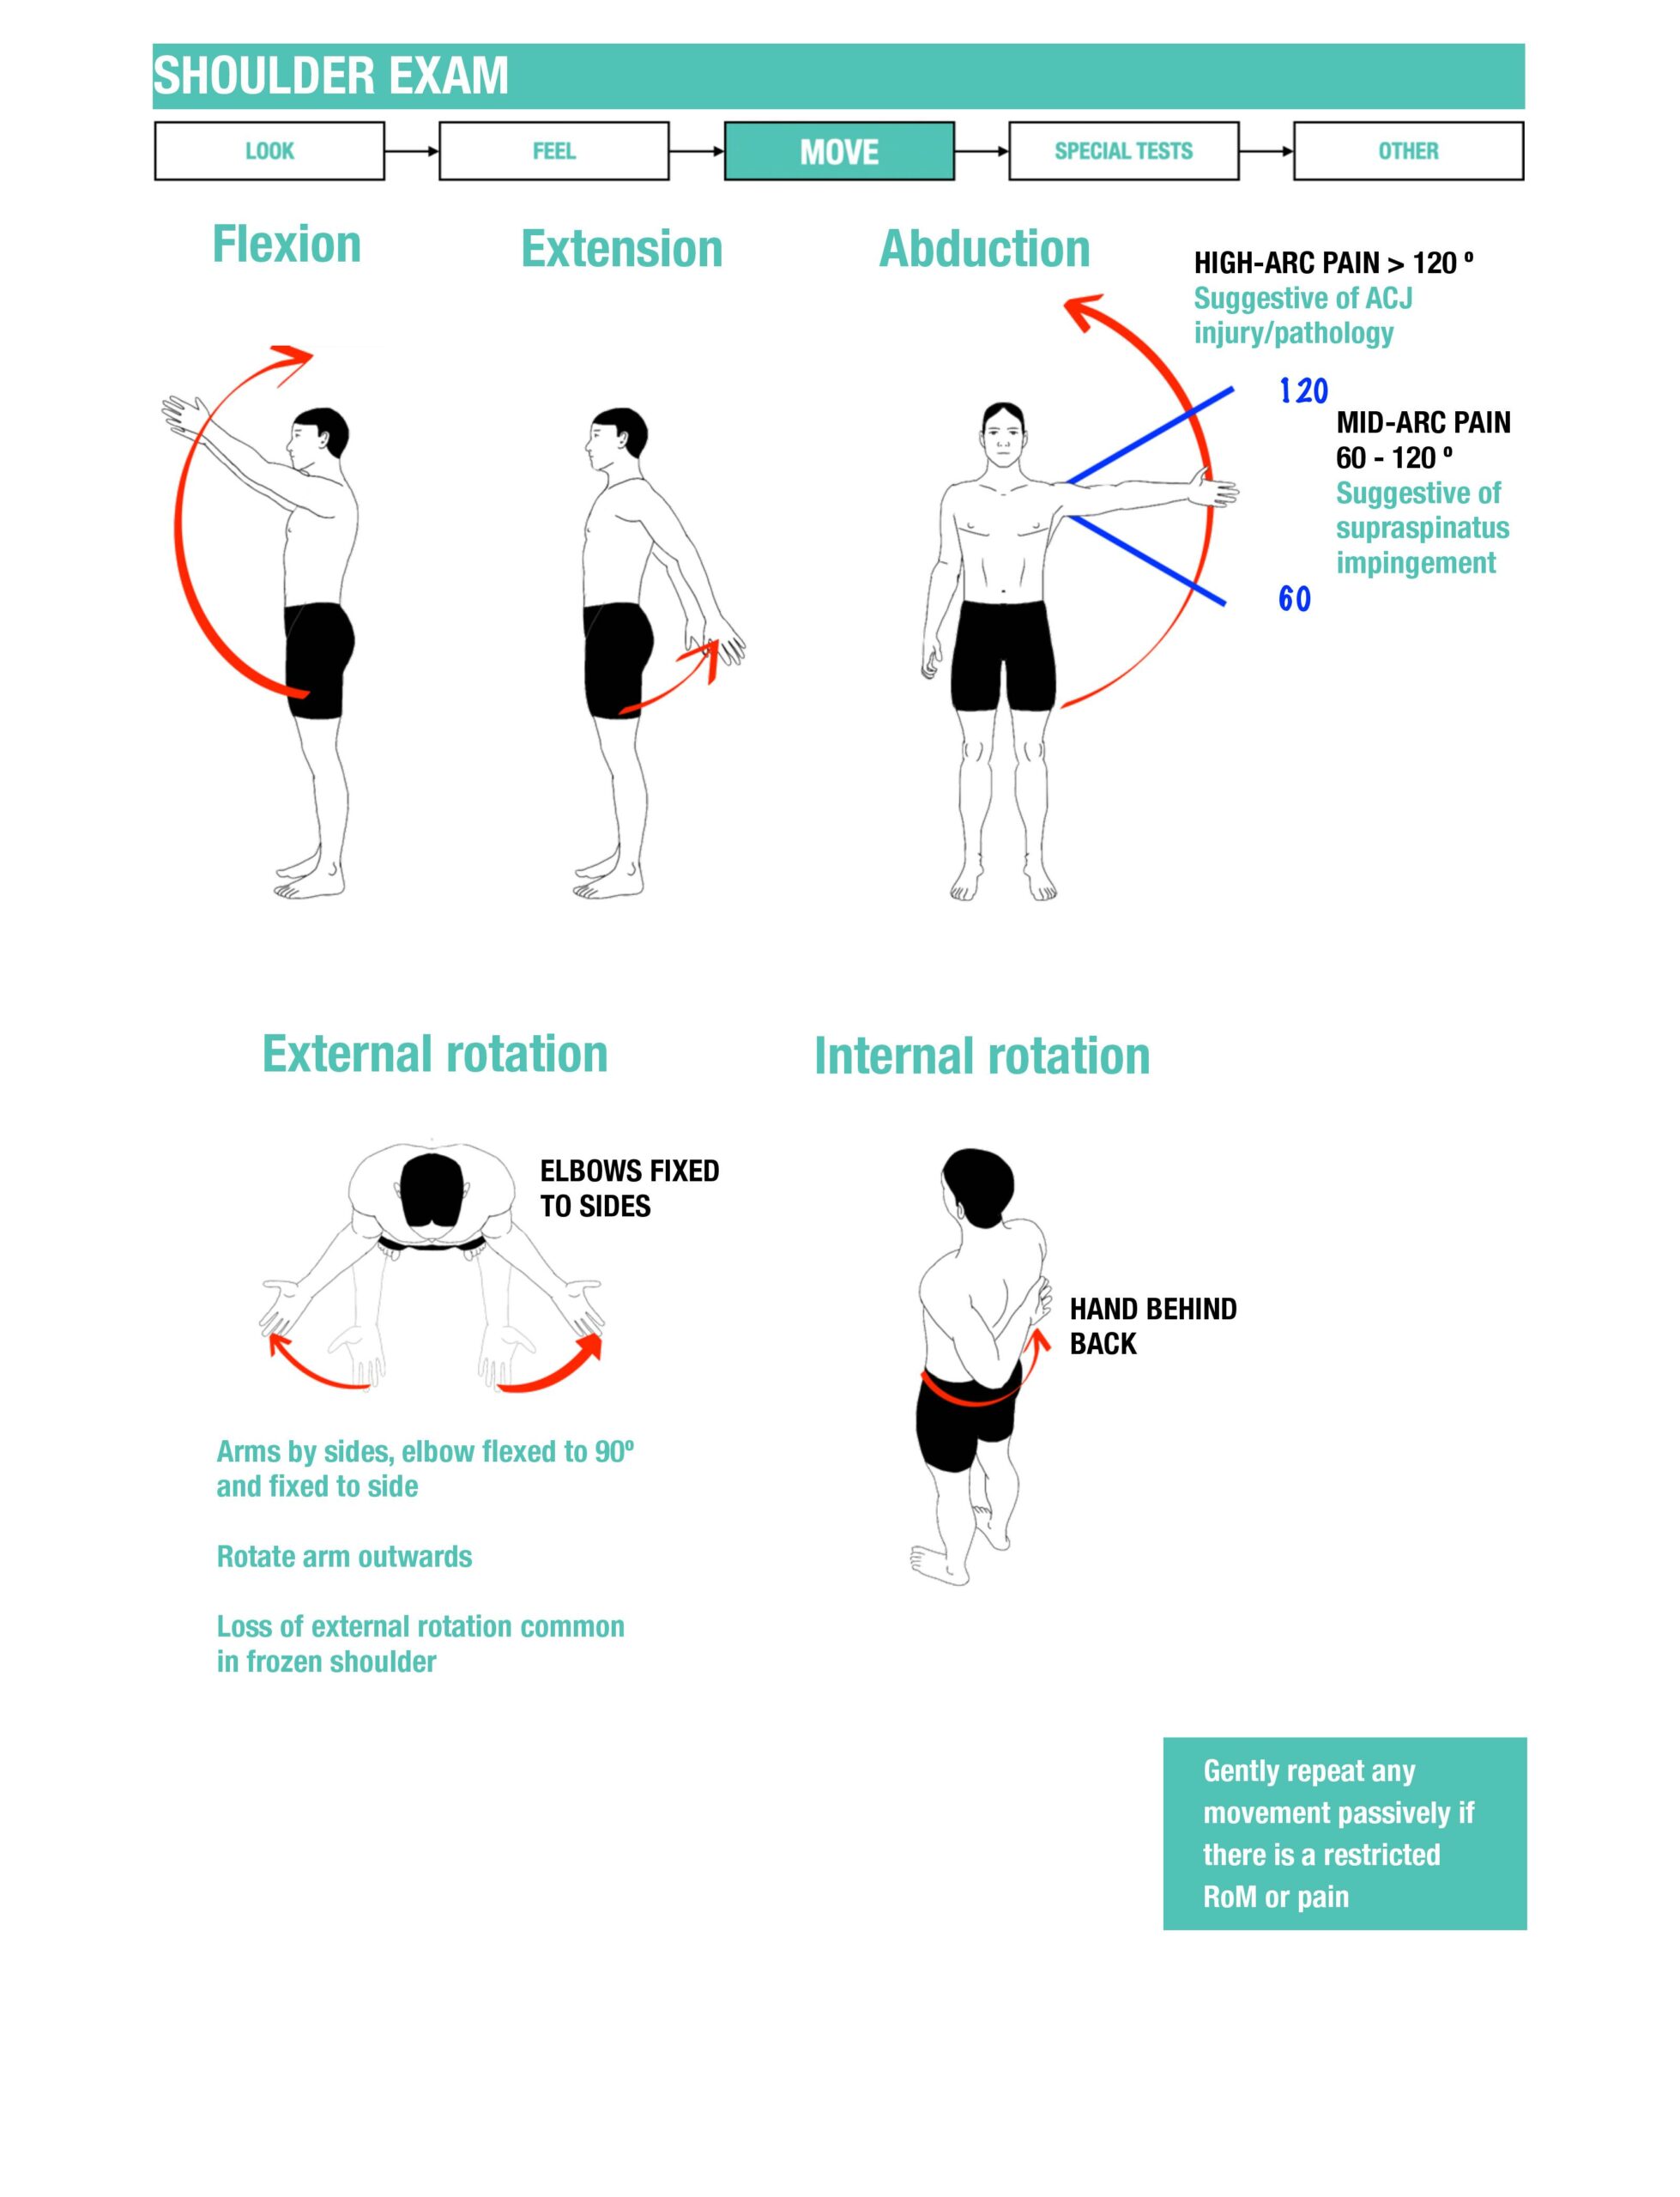
- Observe active flexion, extension, abduction, adduction and internal/external rotation, including scapular movement.
- Compare sides and distinguish pain-limited movement from weakness. Add gentle passive movement if safe; stabilise the scapula when specifically isolating glenohumeral movement.
- Use resisted testing to assess relevant muscle groups. Stop if pain or suspected acute injury makes testing inappropriate.
Special tests
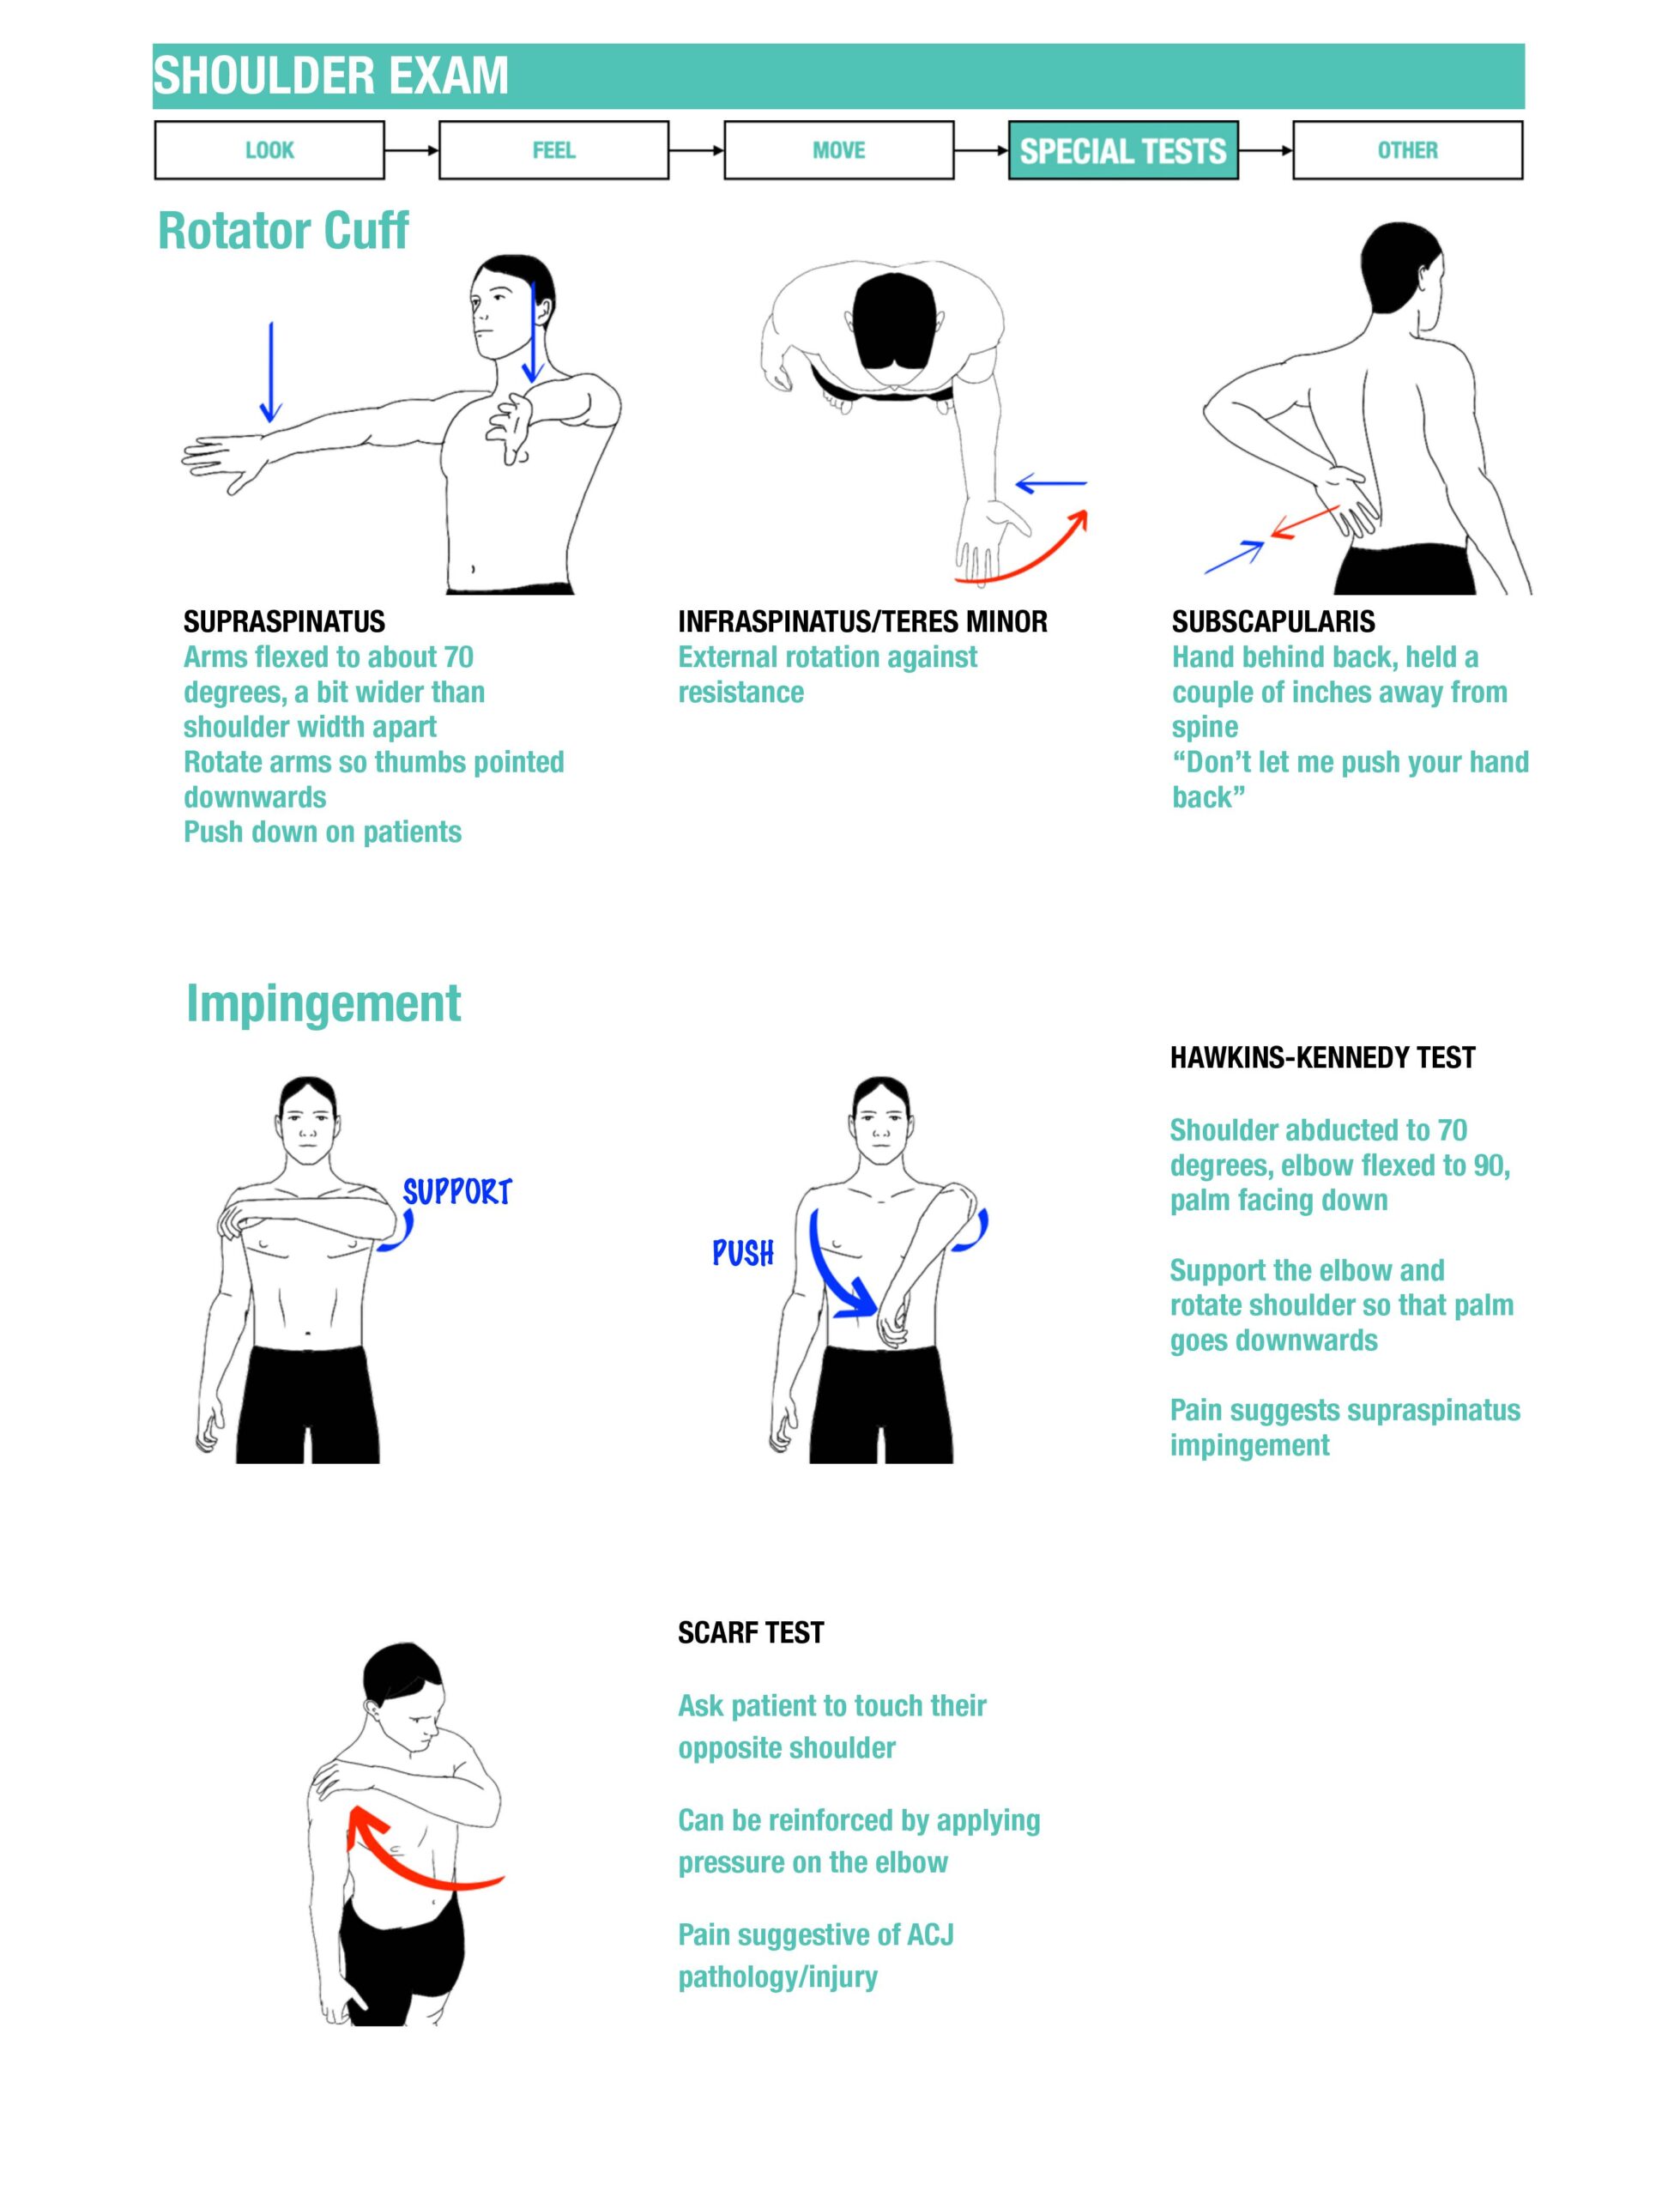
Select tests for the clinical question. Pain, weakness and laxity need interpretation together; no isolated test establishes a tear or symptomatic instability.
- Empty can — supraspinatus: elevate the arms to approximately 90° in the scapular plane (about 30° forward of the coronal plane), thumbs down, and apply gentle downward resistance. Note pain and weakness.
- Drop arm: from about 90° abduction, ask for controlled lowering. Inability to control the descent raises concern for rotator-cuff dysfunction.
- Gerber lift-off — subscapularis: with the dorsum of the hand against the lower back, ask the patient to lift it away; add gentle resistance if appropriate.
- Resisted external rotation: elbows by the sides and flexed to 90°. Assess infraspinatus/teres minor function, noting pain and weakness.
- Neer manoeuvre: stabilise the scapula and gently elevate the internally rotated arm. Stop with pain; never force to the limit.
- Sulcus sign: gentle downward traction on the relaxed arm may reveal inferior laxity. Interpret alongside symptoms and comparison with the other shoulder.
Stanford — shoulder examination
Close
Help the patient return to a comfortable position, offer privacy for dressing and thank them. Present the findings and your proposed next steps to the responsible clinician, then explain the agreed plan to the patient.
Further reading
Interpret and present your findings
Summarise active and passive ranges, the location of pain, strength and any neurological findings. Explain how the findings support the differential and whether pain limited the tests. In an acutely injured shoulder, assess for fracture or dislocation before provocative manoeuvres. If symptoms could be referred from the neck, chest or abdomen, investigate that clinical possibility rather than assuming every shoulder pain is a local tendon problem.
Reading the original illustration. The original artwork places the empty-can and Hawkins–Kennedy tests at about 70 degrees. Use the written descriptions: the empty-can test uses approximately 90 degrees of elevation in the scapular plane; Hawkins–Kennedy starts with approximately 90 degrees of forward flexion and the elbow flexed. Pain on one manoeuvre is not a diagnosis by itself.
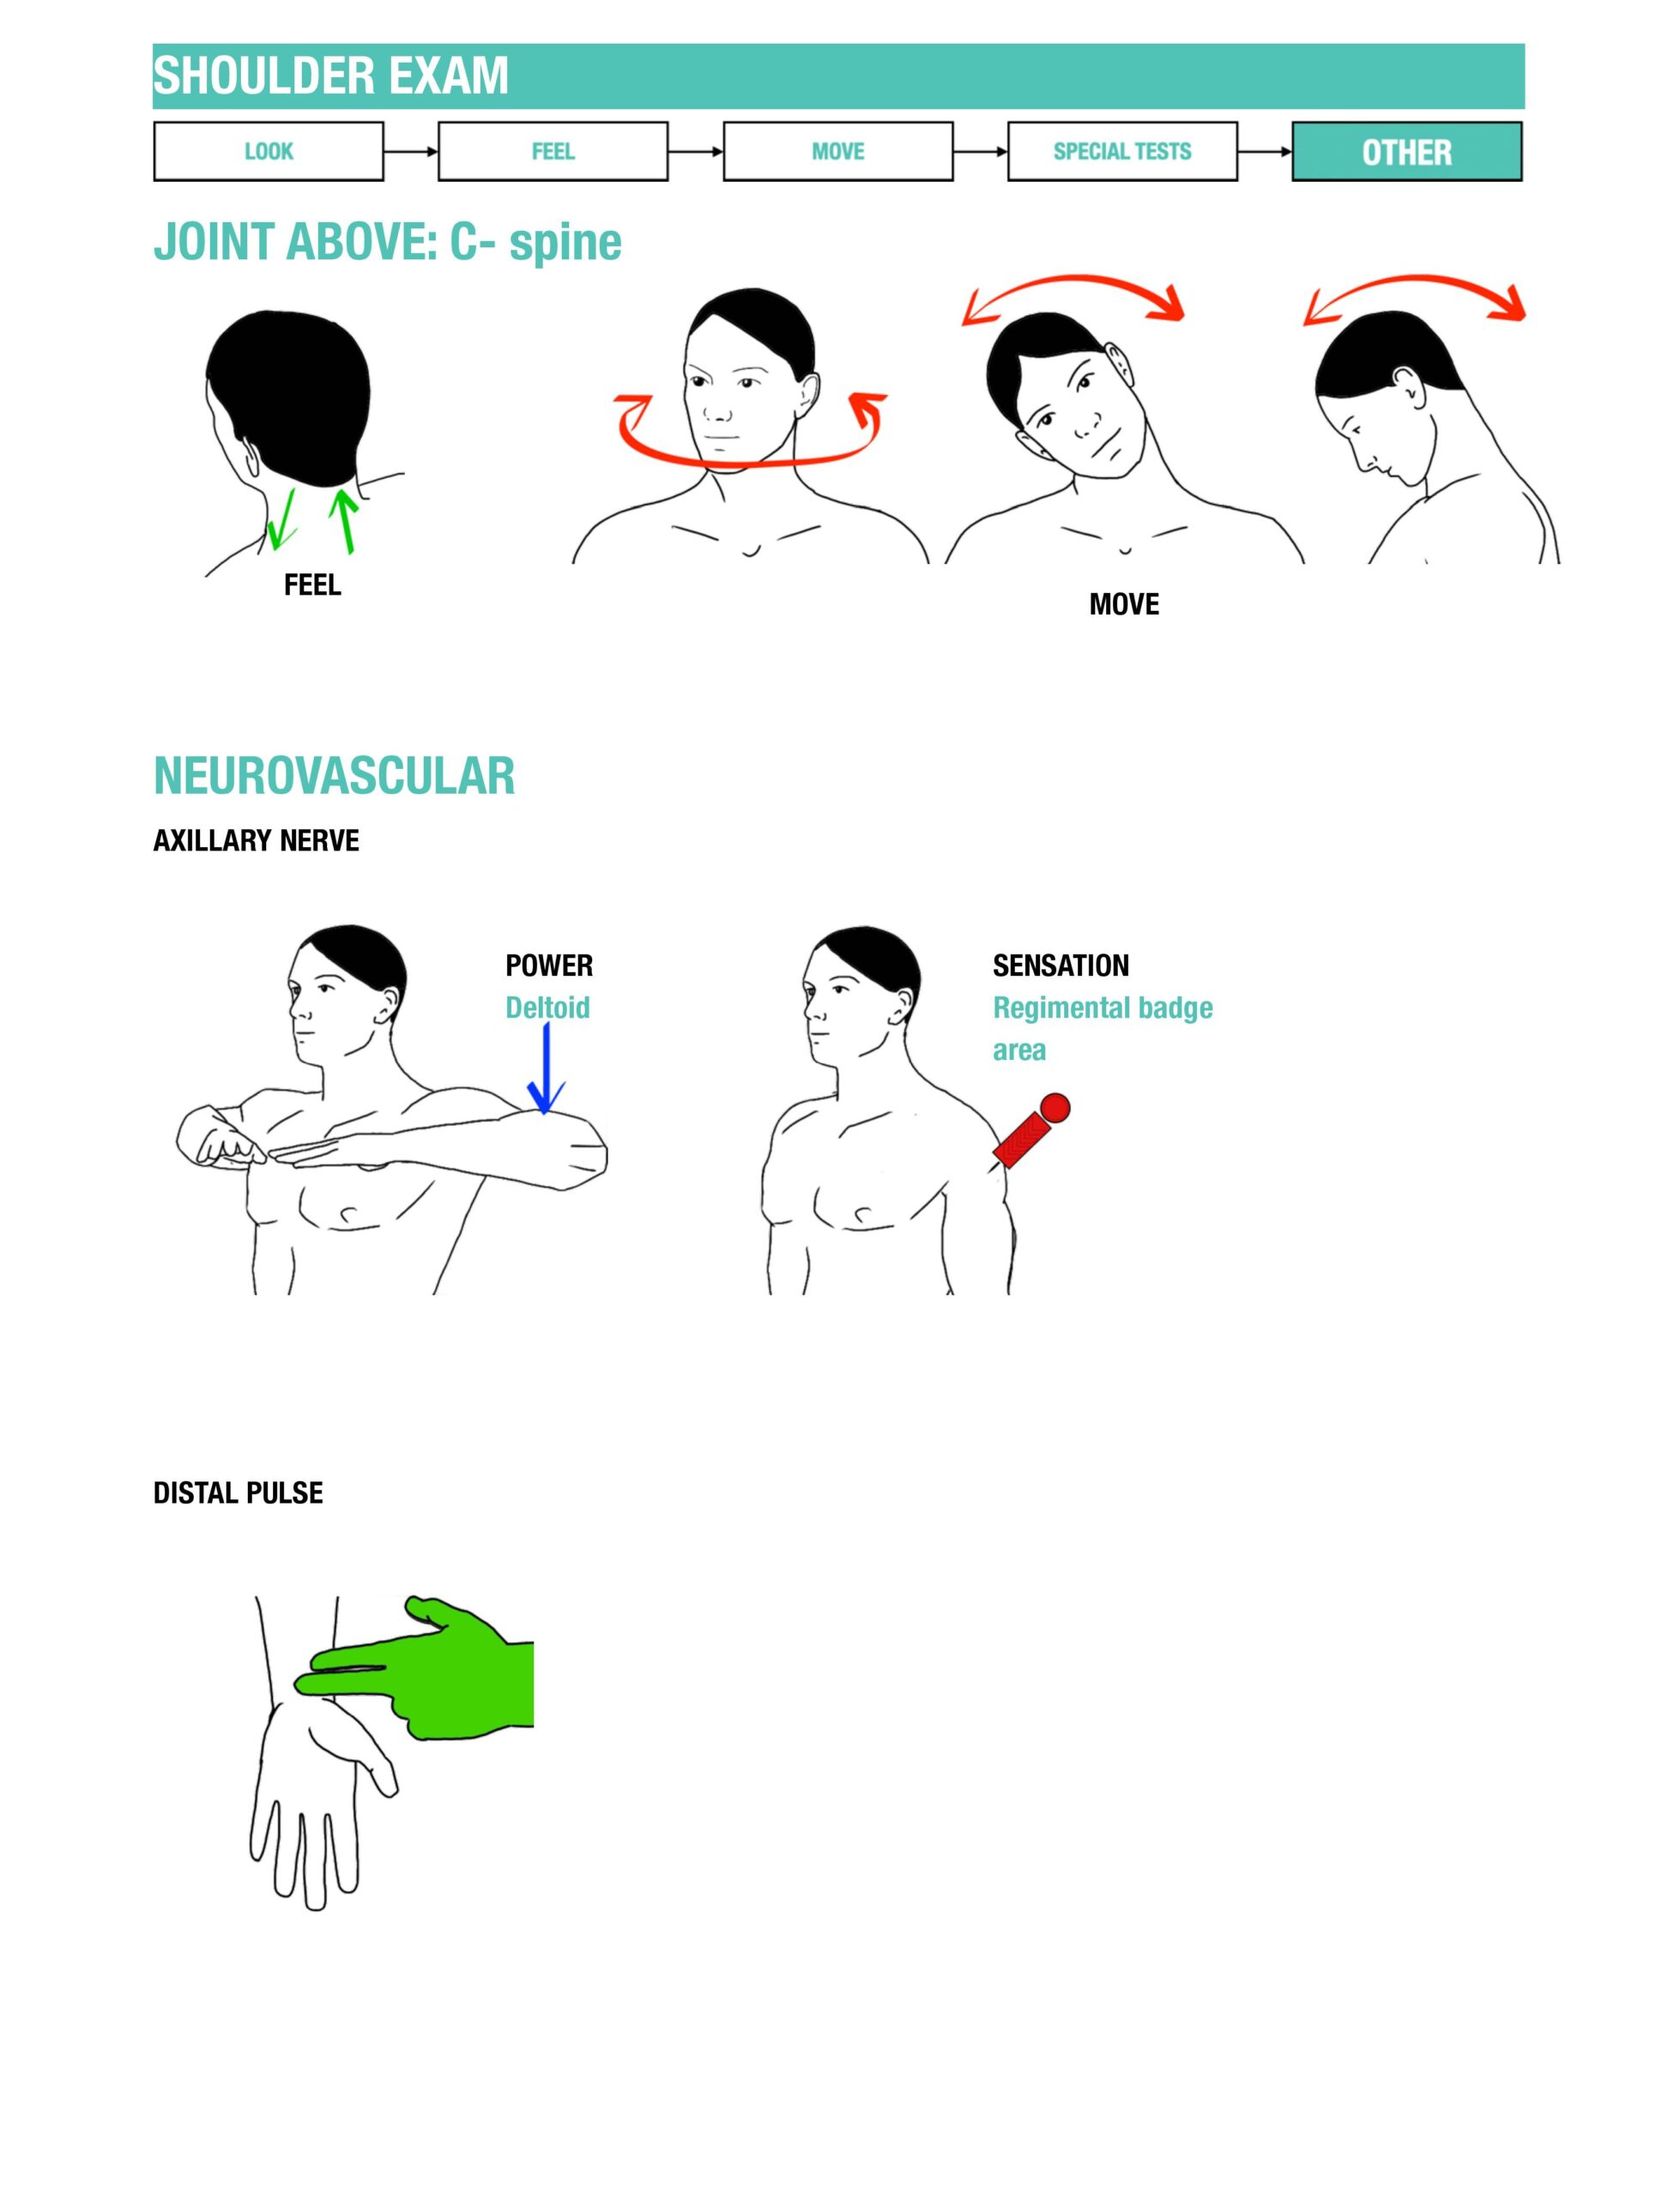
Original shoulder infographics · Nick Smith
Original teaching artwork, retained with its credit. Use the written sequence on this page for the corrected technique and safety qualifications.
05 / CHAPTER 7
Neck
First decide whether it is safe to move the neck. Establish trauma, pain distribution, weakness, altered sensation and functional changes such as clumsy hands or difficulty walking. These questions help distinguish local musculoskeletal symptoms from nerve-root or spinal-cord involvement.
Check for trauma and neurological concerns before testing movement.
Neck: sequence and example phrases
Introduction
Use the introduction, consent and preparation described above, explaining the particular area and movements involved. Protect privacy and adapt the examination to pain, mobility and the clinical question.
Brief history
“Can you tell me about the pain, any injury and whether you have noticed weakness, numbness, clumsy hands or difficulty walking?”
Ask about onset, radiation, function, occupation, fever, cancer history and bladder/bowel symptoms when relevant. After trauma, maintain appropriate spinal precautions and use the NICE cervical-spine assessment pathway. Do not start a routine movement or provocative-test sequence before injury has been assessed.
NICE NG41 — spinal injury · NICE NG232 — head injury and cervical imaging
Inspection
Inspect posture, alignment, scars, swelling, bruising and muscle wasting from the front, sides and back, maintaining any necessary spinal precautions. Look for relevant neurological signs, including ptosis and miosis when clinically indicated.
Palpation
“I will gently feel along your neck and the muscles on either side. Please tell me if anything is tender.”
Assess temperature, swelling and tenderness over the cervical midline and paraspinal muscles. Examine the supraclavicular region when relevant. Avoid unnecessary movement in suspected injury; carotid palpation is not part of a routine musculoskeletal neck examination.
Move
When safe, ask for comfortable active flexion, extension, lateral flexion and rotation. Do not force movement. In trauma, the Canadian C-spine rule permits active rotation assessment only in appropriately selected low-risk patients; follow the complete NICE pathway rather than testing movement in everyone.
Special tests
Possible cord involvement
- Hoffmann’s sign: a brisk flick of the distal middle finger may produce thumb/index flexion. Interpret with tone, reflexes, power, sensation and gait; it is not a diagnosis on its own.
- Lhermitte’s phenomenon: ask about an electric-shock sensation into the trunk or limbs with neck flexion. Avoid repeatedly provoking symptoms or forcing neck movement.
Thoracic outlet symptoms
Adson’s manoeuvre has false-positive results in healthy people. Loss of the radial pulse alone does not diagnose thoracic outlet syndrome. Assess the symptom pattern, neurological findings and perfusion, and arrange appropriate further assessment.
Primary study — false-positive provocative tests
Meningism
Kernig’s and Brudzinski’s signs belong to a clinically indicated assessment for meningitis, not every musculoskeletal station. Kernig’s involves painful/resisted knee extension with the hip flexed; Brudzinski’s is involuntary hip/knee flexion with neck flexion. Their absence does not exclude meningitis. Do not force the neck or delay urgent assessment and treatment when meningitis is suspected.
Upper limb neurology
Tone
“I am going to hold each of your hands and do some movements with them to assess your tone…” (Flexion; extension; supination and pronation at the elbow)
“I am assessing whether tone is increased, reduced or normal.”
Power
“I need to assess your strength by asking you to make some movements against resistance.”
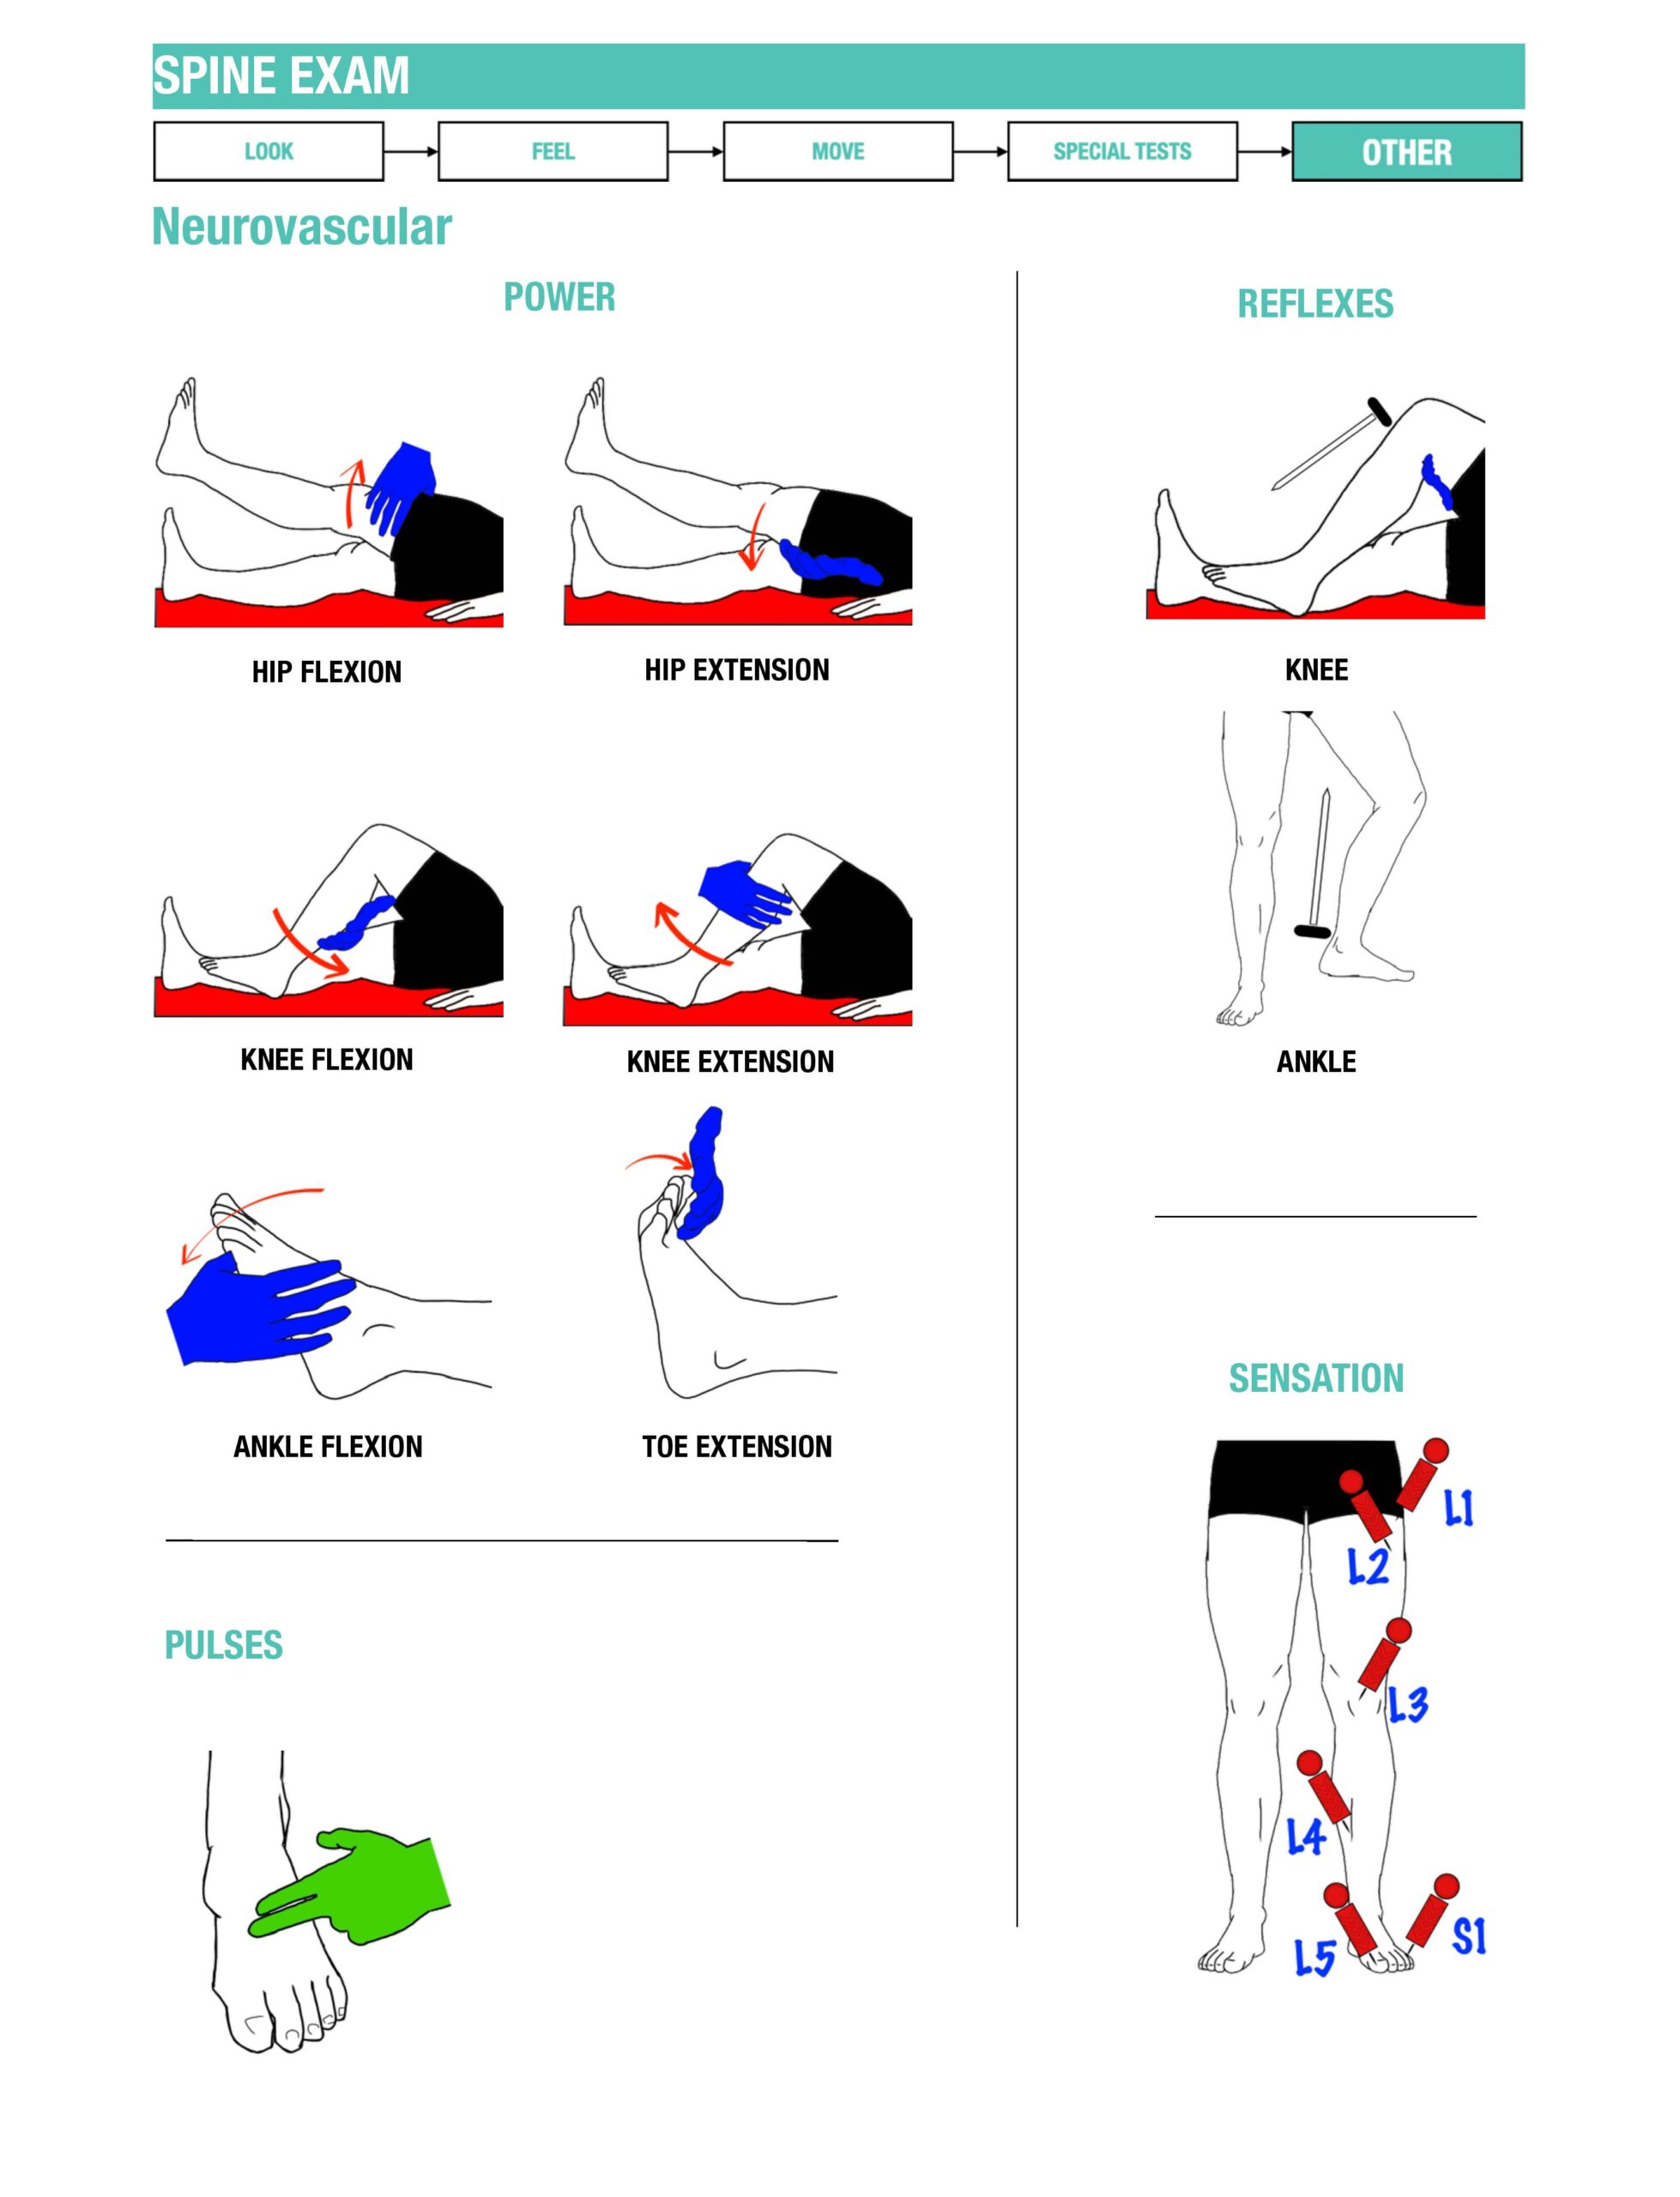
Compare sides, test proximal and distal groups, and document power on the MRC 0–5 scale, including pain or other limitations. Muscles have overlapping root supplies; these are useful key movements, not a complete map of each muscle’s innervation.
| Key movement | Clinical root anchor |
|---|---|
| Elbow flexion | C5 |
| Wrist extension | C6 |
| Elbow extension | C7 |
| Finger flexion (distal phalanx of middle finger) | C8 |
| Little-finger abduction | T1 |
Also assess shoulder abduction, wrist flexion, finger extension and relevant thumb movements. Specify the movement and peripheral nerve being assessed; thumb extension, opposition and finger abduction are not all simply “T1”.
ASIA: key muscles and neurological assessment
Sensation
“I need to test how well you can feel areas on your skin…”
- Can you feel here? (on upper chest)
- Bring your arms straight by your side with your palms facing forward (‘anatomical’ position).
- Please can you close your eyes and tell me when you feel something.
“I will compare sensation on both sides, test relevant dermatomes and peripheral nerve territories, and map any abnormality using:”
- Light touch (cotton wool)
- Sharp/dull (neurotip)
- Vibration sense (128Hz tuning fork): start on a distal bony prominence and move proximally
- Proprioception (joint position sense)
- Temperature
Reflexes
“Let your arm relax while I check the reflexes with this tendon hammer.”
- Support the limb and compare sides: biceps C5–C6, brachioradialis C5–C6 and triceps mainly C7.
- Describe whether reflexes are absent, reduced, normal or brisk, and use reinforcement if needed without contracting the muscle being tested.
Stanford Medicine 25 — tendon reflexes
Coordination
“Please touch your nose and then my finger, and repeat on the other side.”
- Assess finger–nose testing with eyes open for dysmetria and intention tremor.
- Test rapid alternating hand movements for dysdiadochokinesia.
- Assess pronator drift with the arms extended forwards, palms upwards and eyes closed; look for pronation and downward drift.
University of Utah — motor examination
If myelopathy is suspected, assess the lower limbs and gait as well. Use Chapter 6’s neurological examination for the full sequence.
Close
Help the patient return to a comfortable position, offer privacy for dressing and thank them. Present the findings and your proposed next steps to the responsible clinician, then explain the agreed plan to the patient.
Further reading
- Geeky Medics — Spine examination
- Canadian C spine rules
- Nexus decision rule
- NICE NG232 — head injury and cervical imaging
- NICE Spinal injury: assessment and initial management
- Oxford Medical Education — C-spine injury: Immobilisation (initial assessment of the trauma patient)
- Oxford Medical Education — C-spine injury: Collar application (initial assessment of the trauma patient)
- TeachMeAnatomy — Neck anatomy
- NICE NG41 — spinal injury assessment
- ASIA — neurological assessment resources
Interpret and present your findings
Report the pattern across power, tone, reflexes and sensation, not a positive sign in isolation. New or progressive neurological findings need prompt assessment. In trauma, maintain appropriate precautions and discuss the complete imaging pathway with the responsible clinician; do not independently “clear” the neck after testing one movement.
Original dermatome diagram

06 / CHAPTER 7
Back
Clarify pain distribution, onset, trauma and its effect on walking, sleep and daily activities. Ask about systemic illness and neurological symptoms before proceeding. Inflammatory, mechanical and referred pain patterns overlap, so use the history and examination together rather than choosing a diagnosis from age alone.
Recognise red flags, assess neurological function and interpret nerve-tension tests.
Back: sequence and example phrases
Introduction
Use the introduction, consent and preparation described above, explaining the particular area and movements involved. Protect privacy and adapt the examination to pain, mobility and the clinical question.
Brief history
“Where is the pain, does it travel into either leg, and have you noticed weakness or changes to your bladder, bowels or sensation?”
- Ask about trauma, fever, infection risk, cancer history, unexplained weight loss and severe or progressive symptoms.
- Ask specifically about new difficulty starting urination, altered urinary flow sensation, saddle/genital sensory change, loss of rectal fullness, sexual dysfunction and progressive bilateral leg weakness.
- For possible inflammatory pain, ask about prolonged morning stiffness, night waking, improvement with movement, psoriasis, uveitis and inflammatory bowel disease.
Possible cauda equina syndrome requires urgent assessment through the local emergency MRI pathway. Negative physical findings do not rule it out. GIRFT does not require a digital rectal examination for referral; document the symptoms and neurological findings, including reported perianal sensory change. Do not use anal tone or a low post-void residual to provide false reassurance.
GIRFT — national suspected cauda equina pathway (March 2026)
Inspection
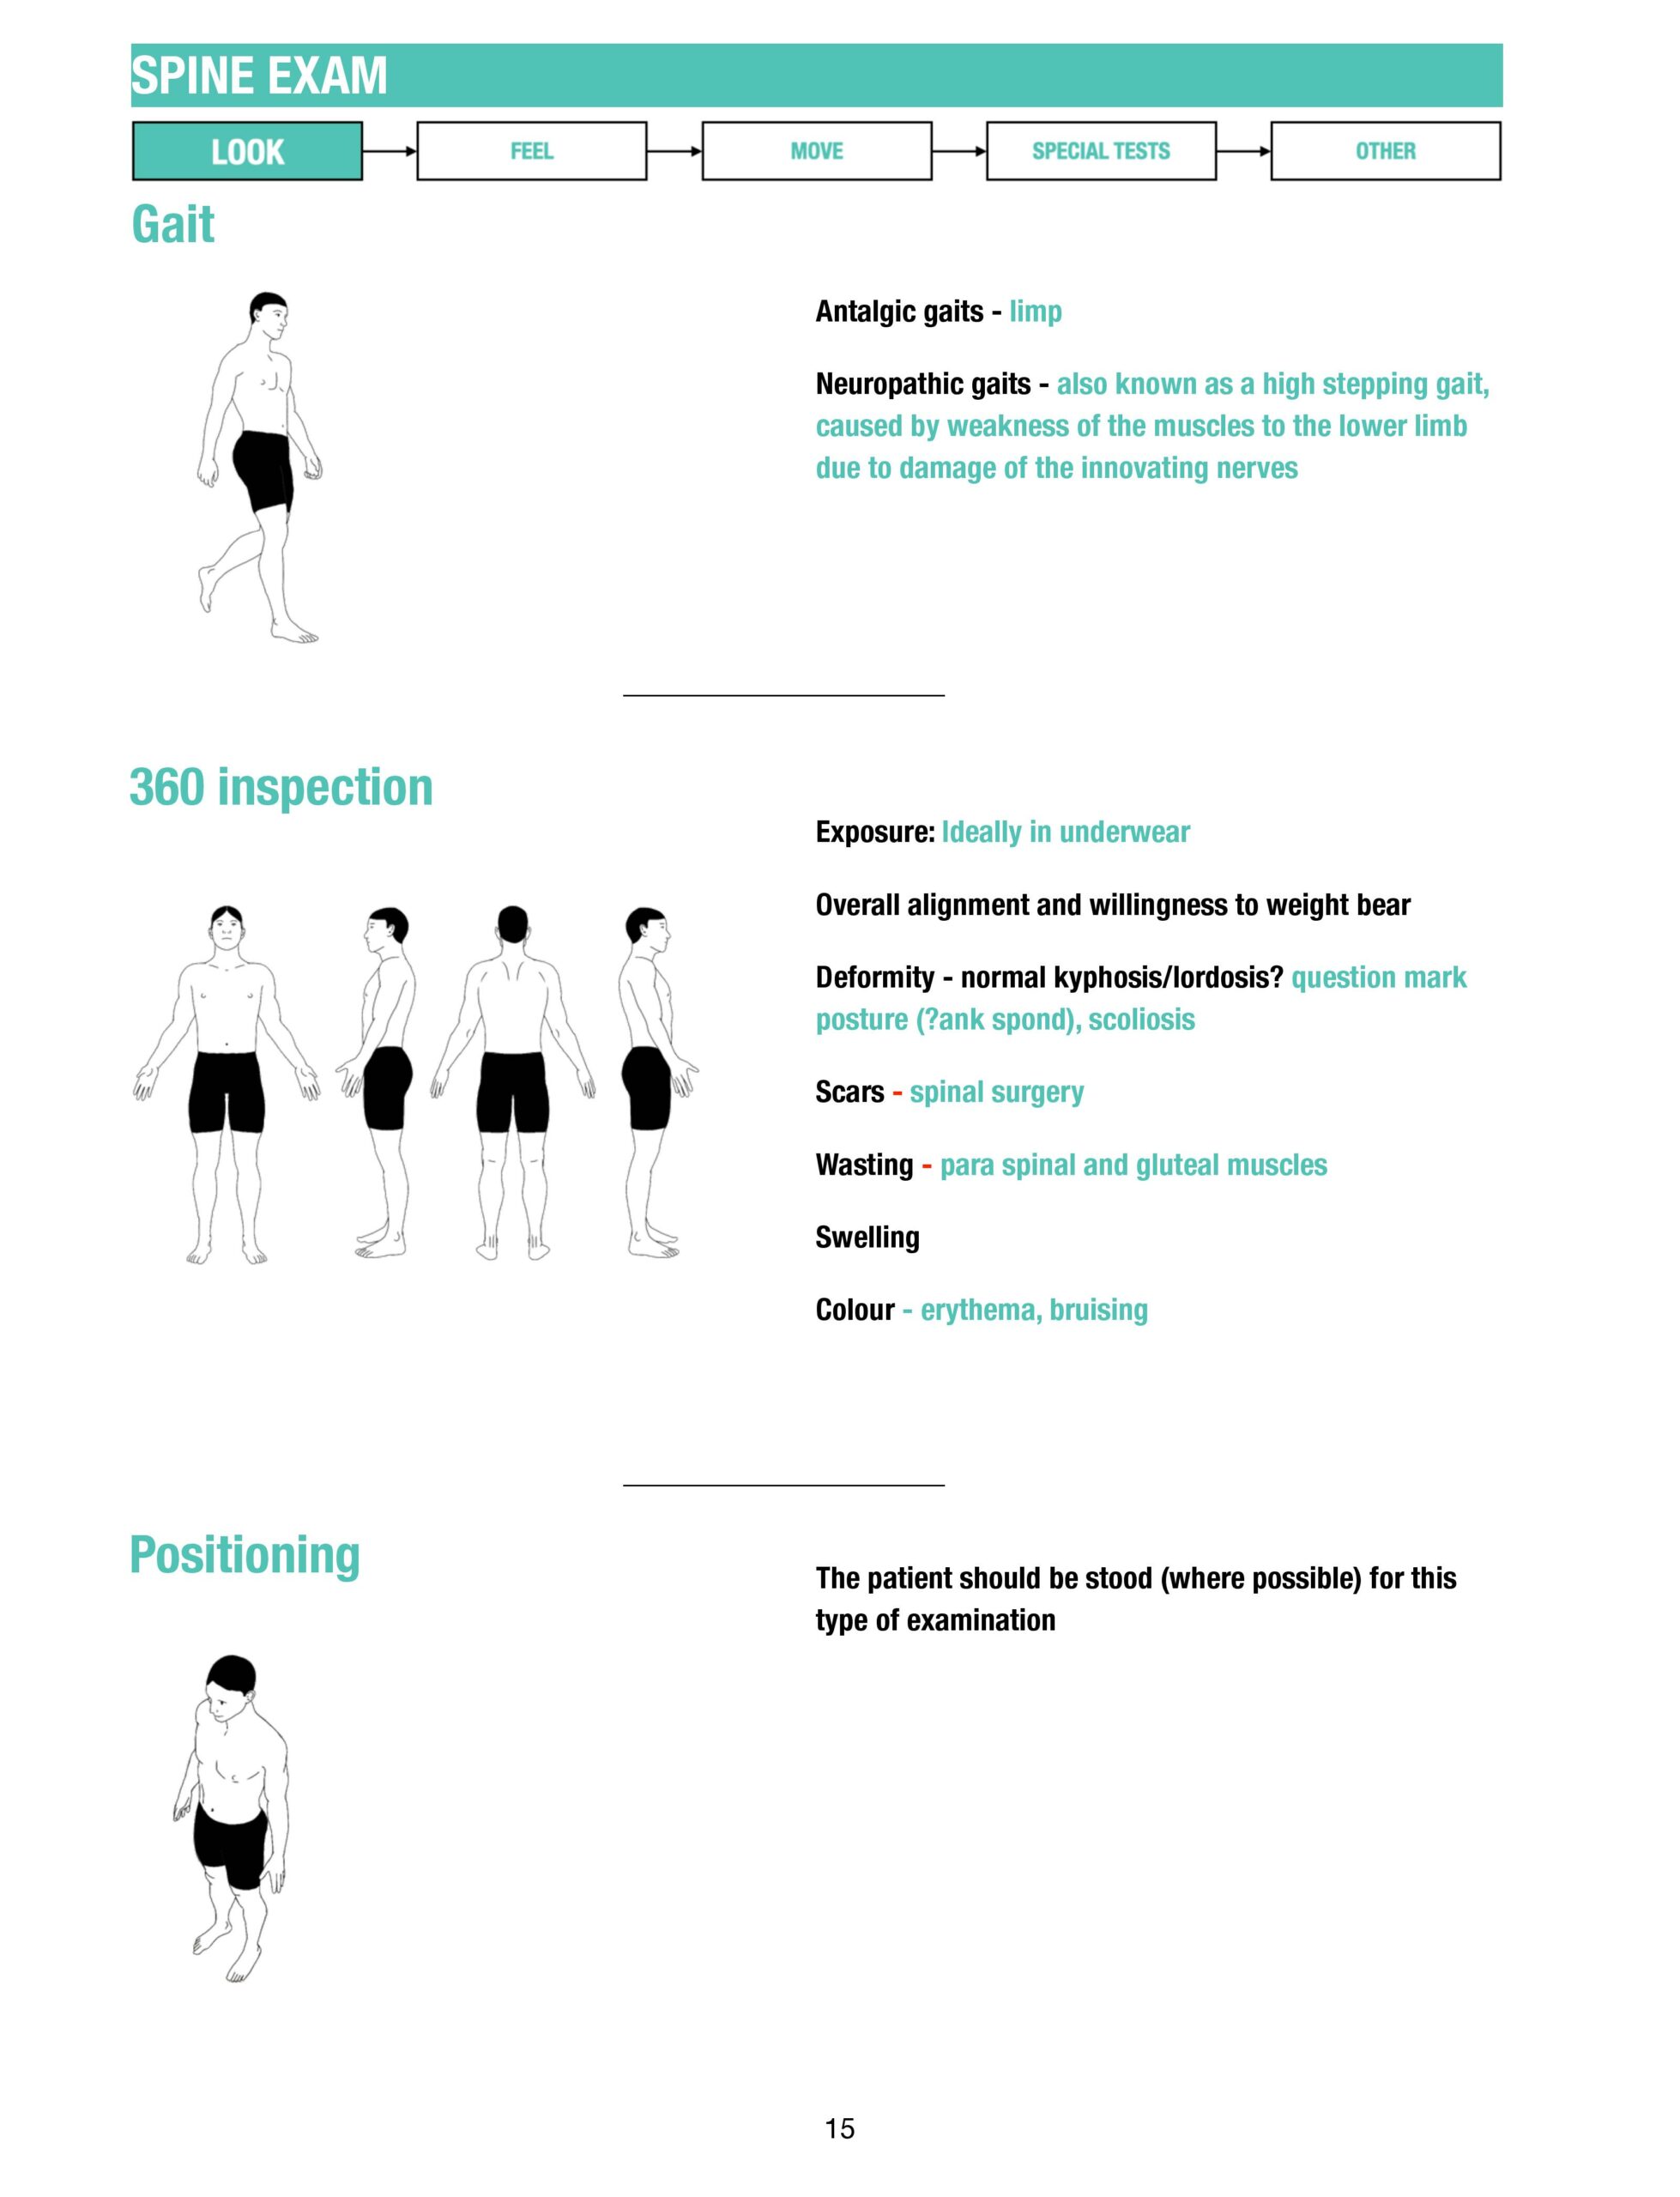
“If it is safe and comfortable, please stand so I can look at your back from the front, side and behind.”
Observe posture, gait where appropriate, lumbar/cervical lordosis, thoracic kyphosis, scoliosis, scars and skin changes. Do not require single-leg standing in someone with acute pain or an unsafe gait.
Palpation
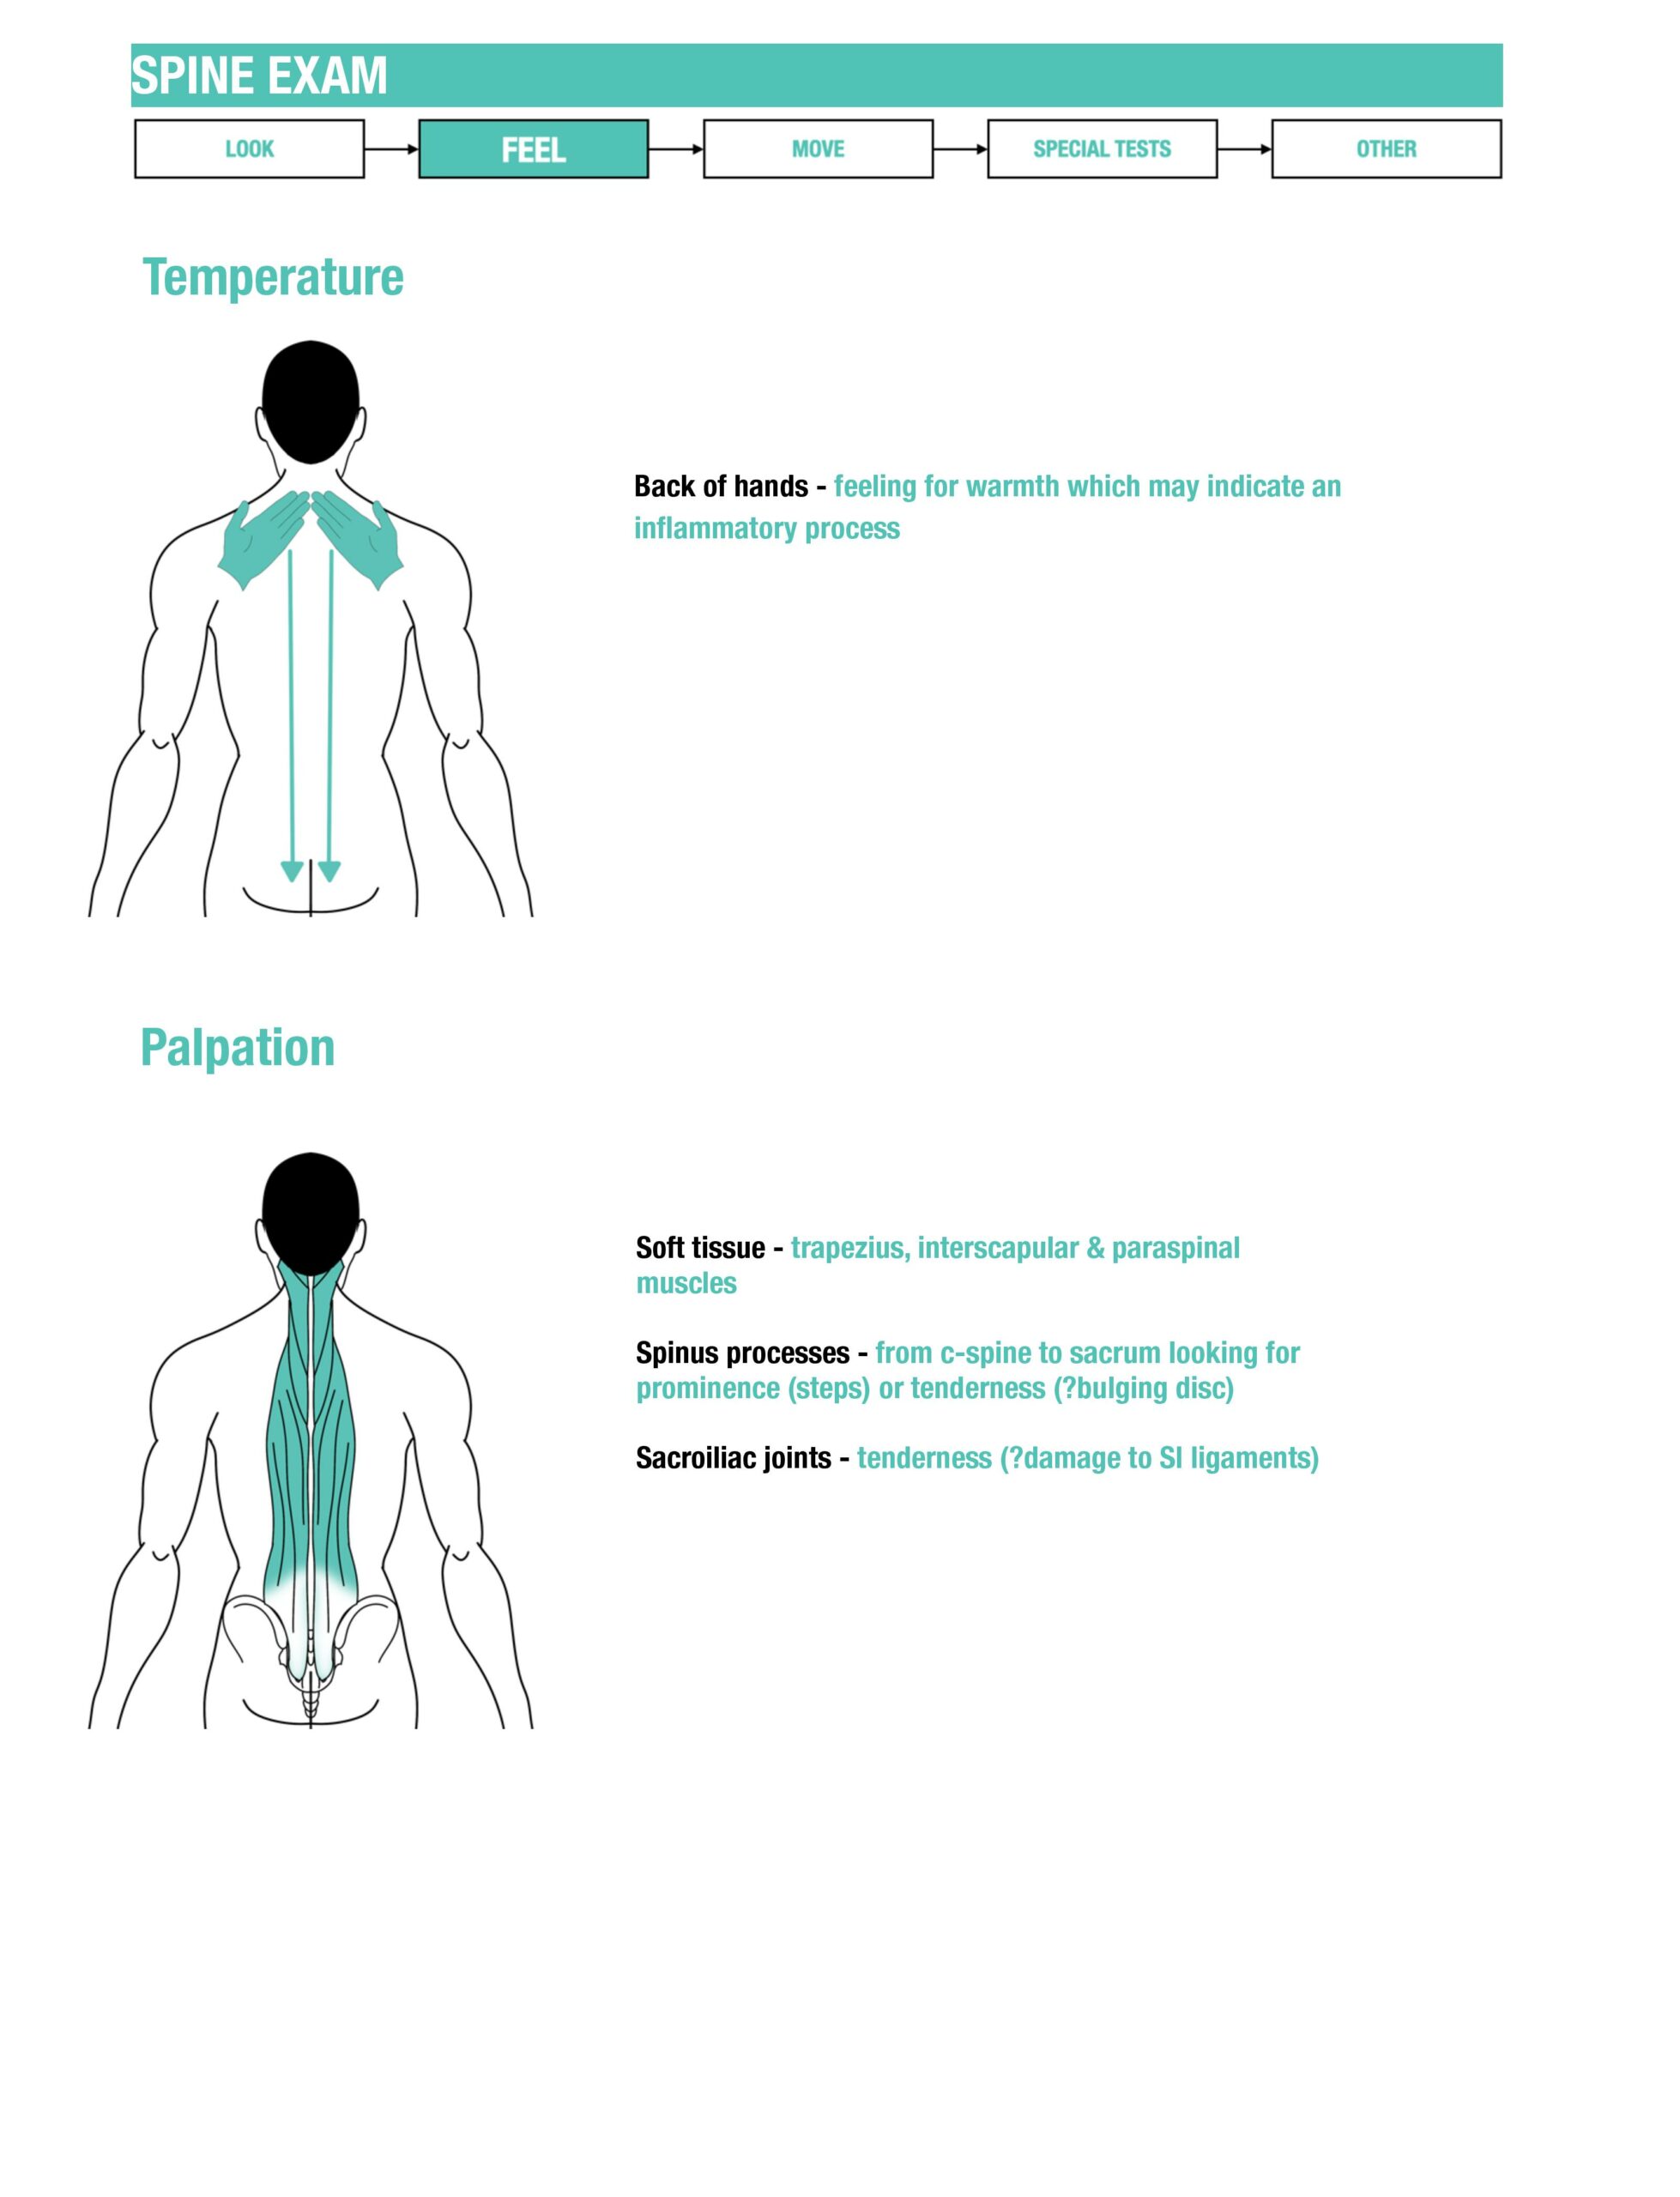
“I am going to gently feel all the bones along your spine, as well as the muscles either side.”
Comment on:
- warmth
- swelling
- bogginess
- crepitus in movement
- pain
- widened spinous processes
All vertebrae: cervical; thoracic; lumbar spine on both sides
Move
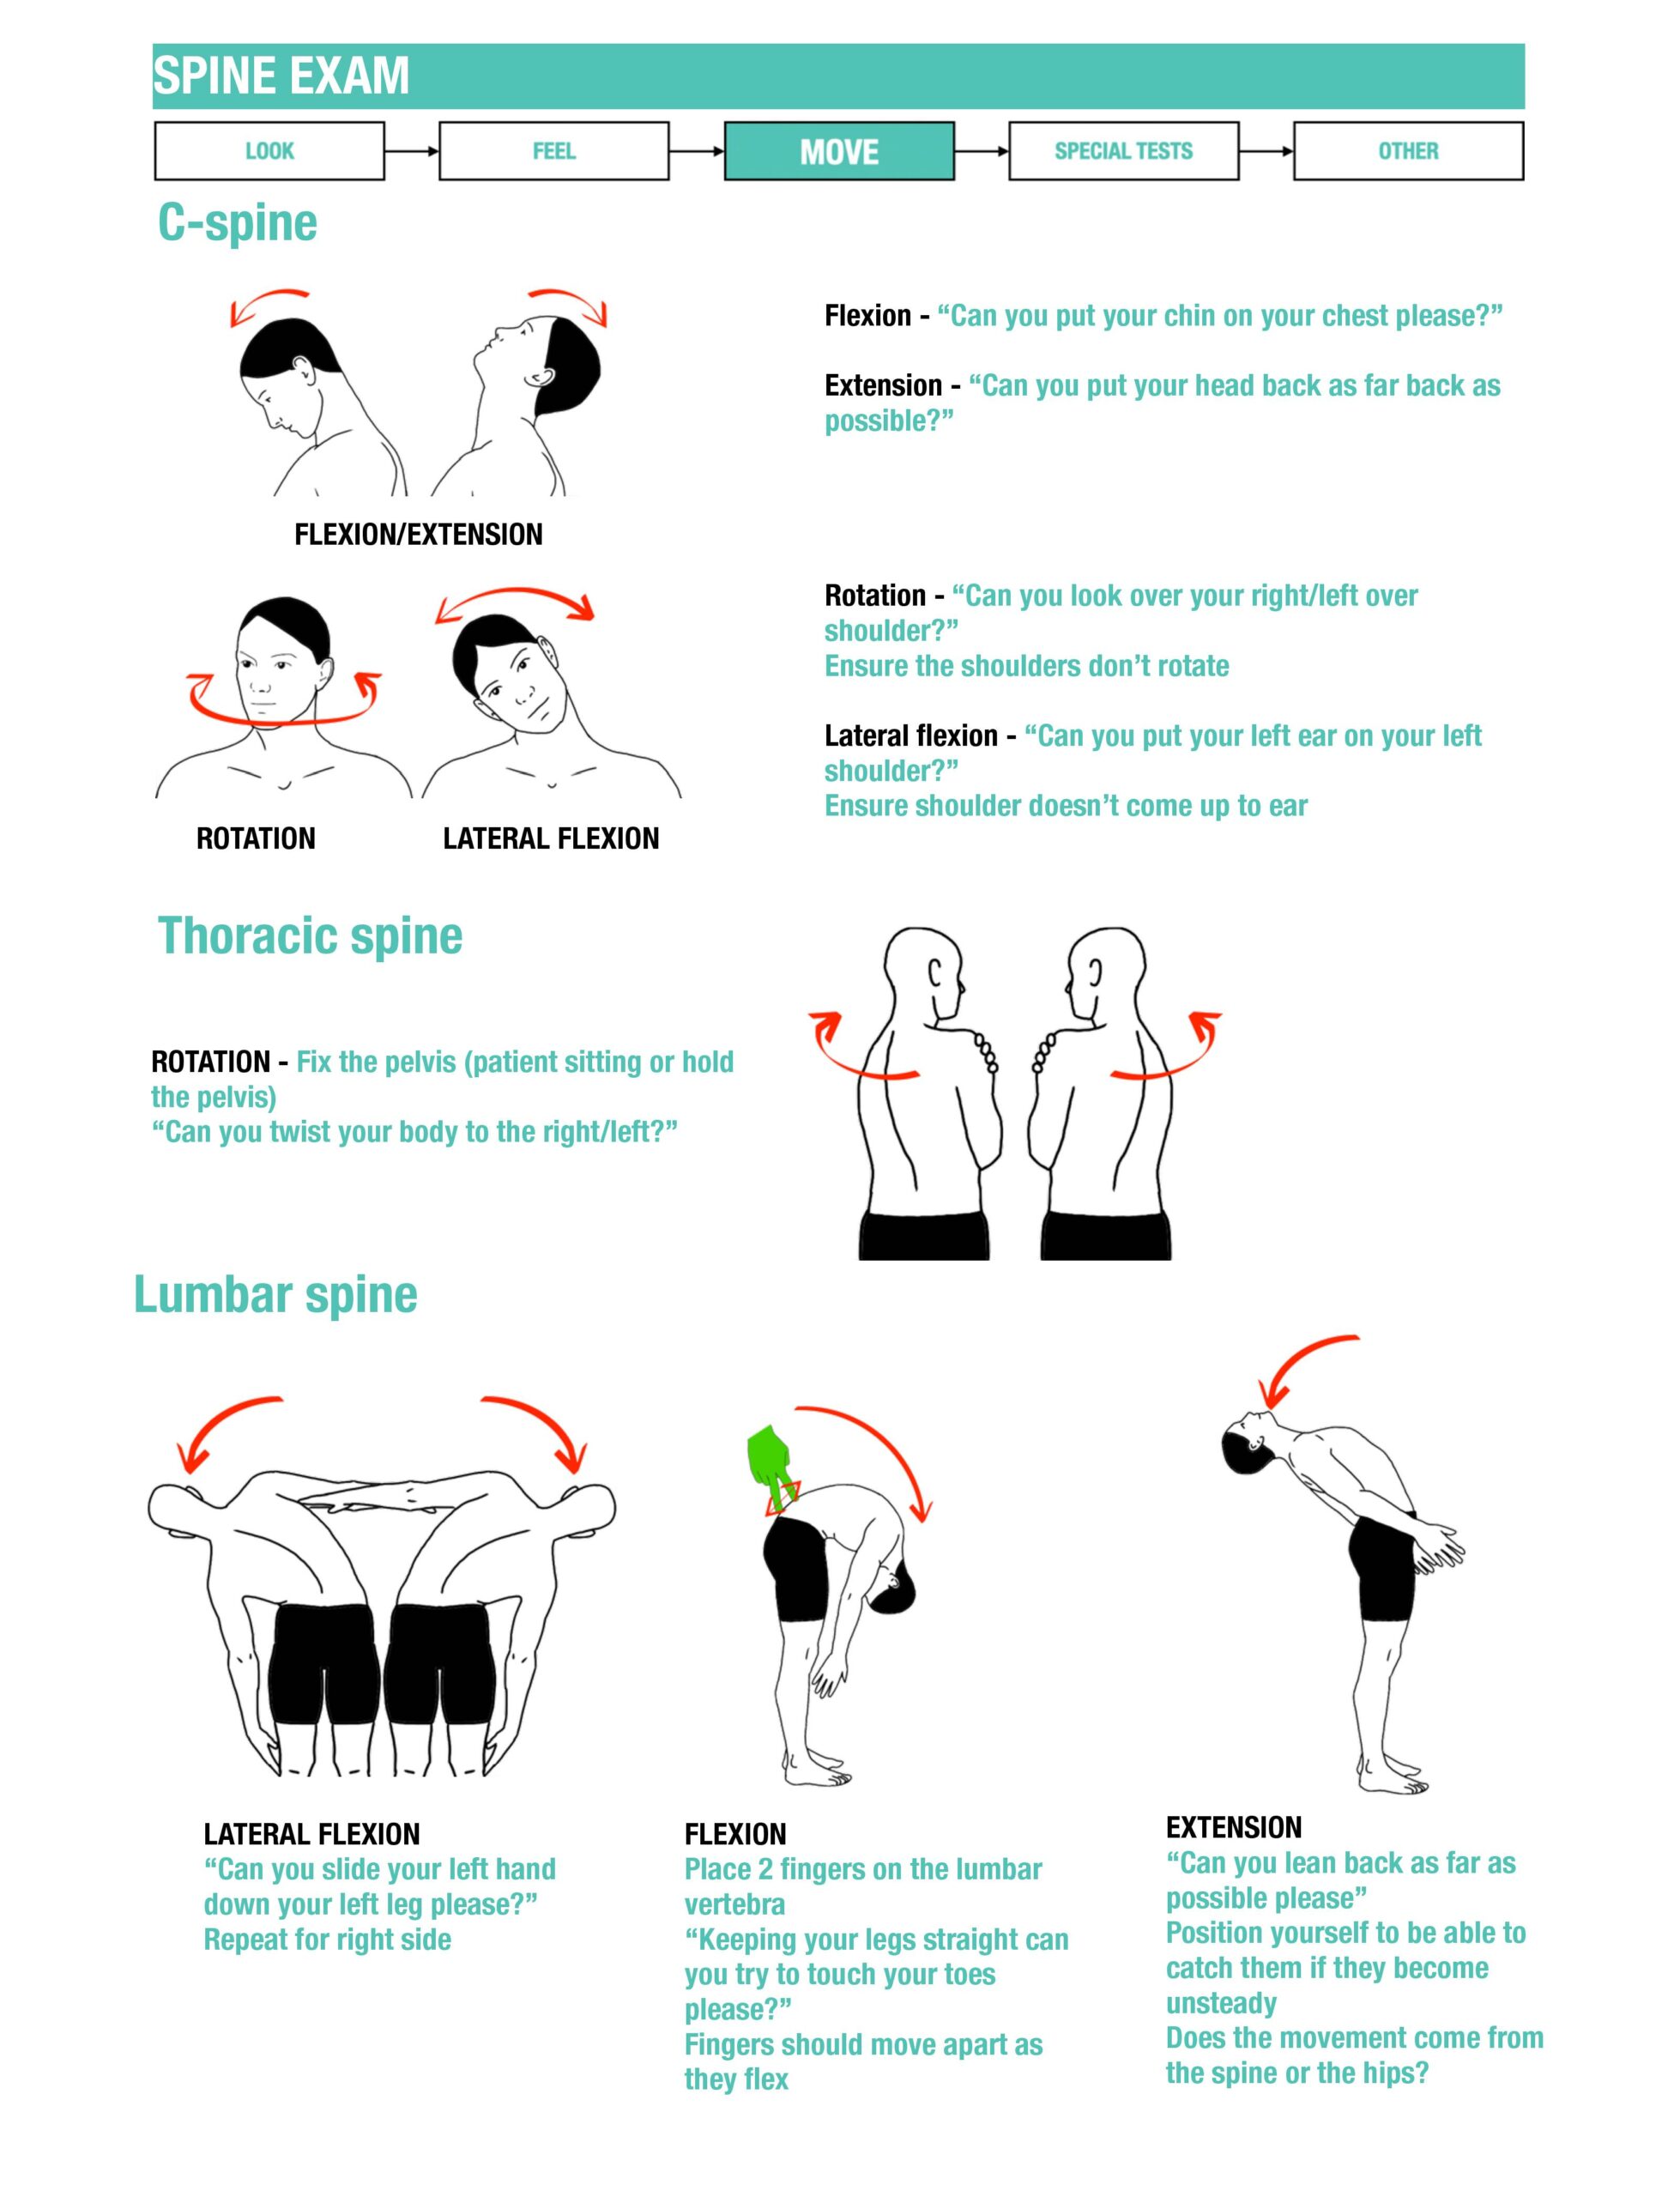
- Flexion
- Extension
- Rotation
- Lateral flexion
Special tests
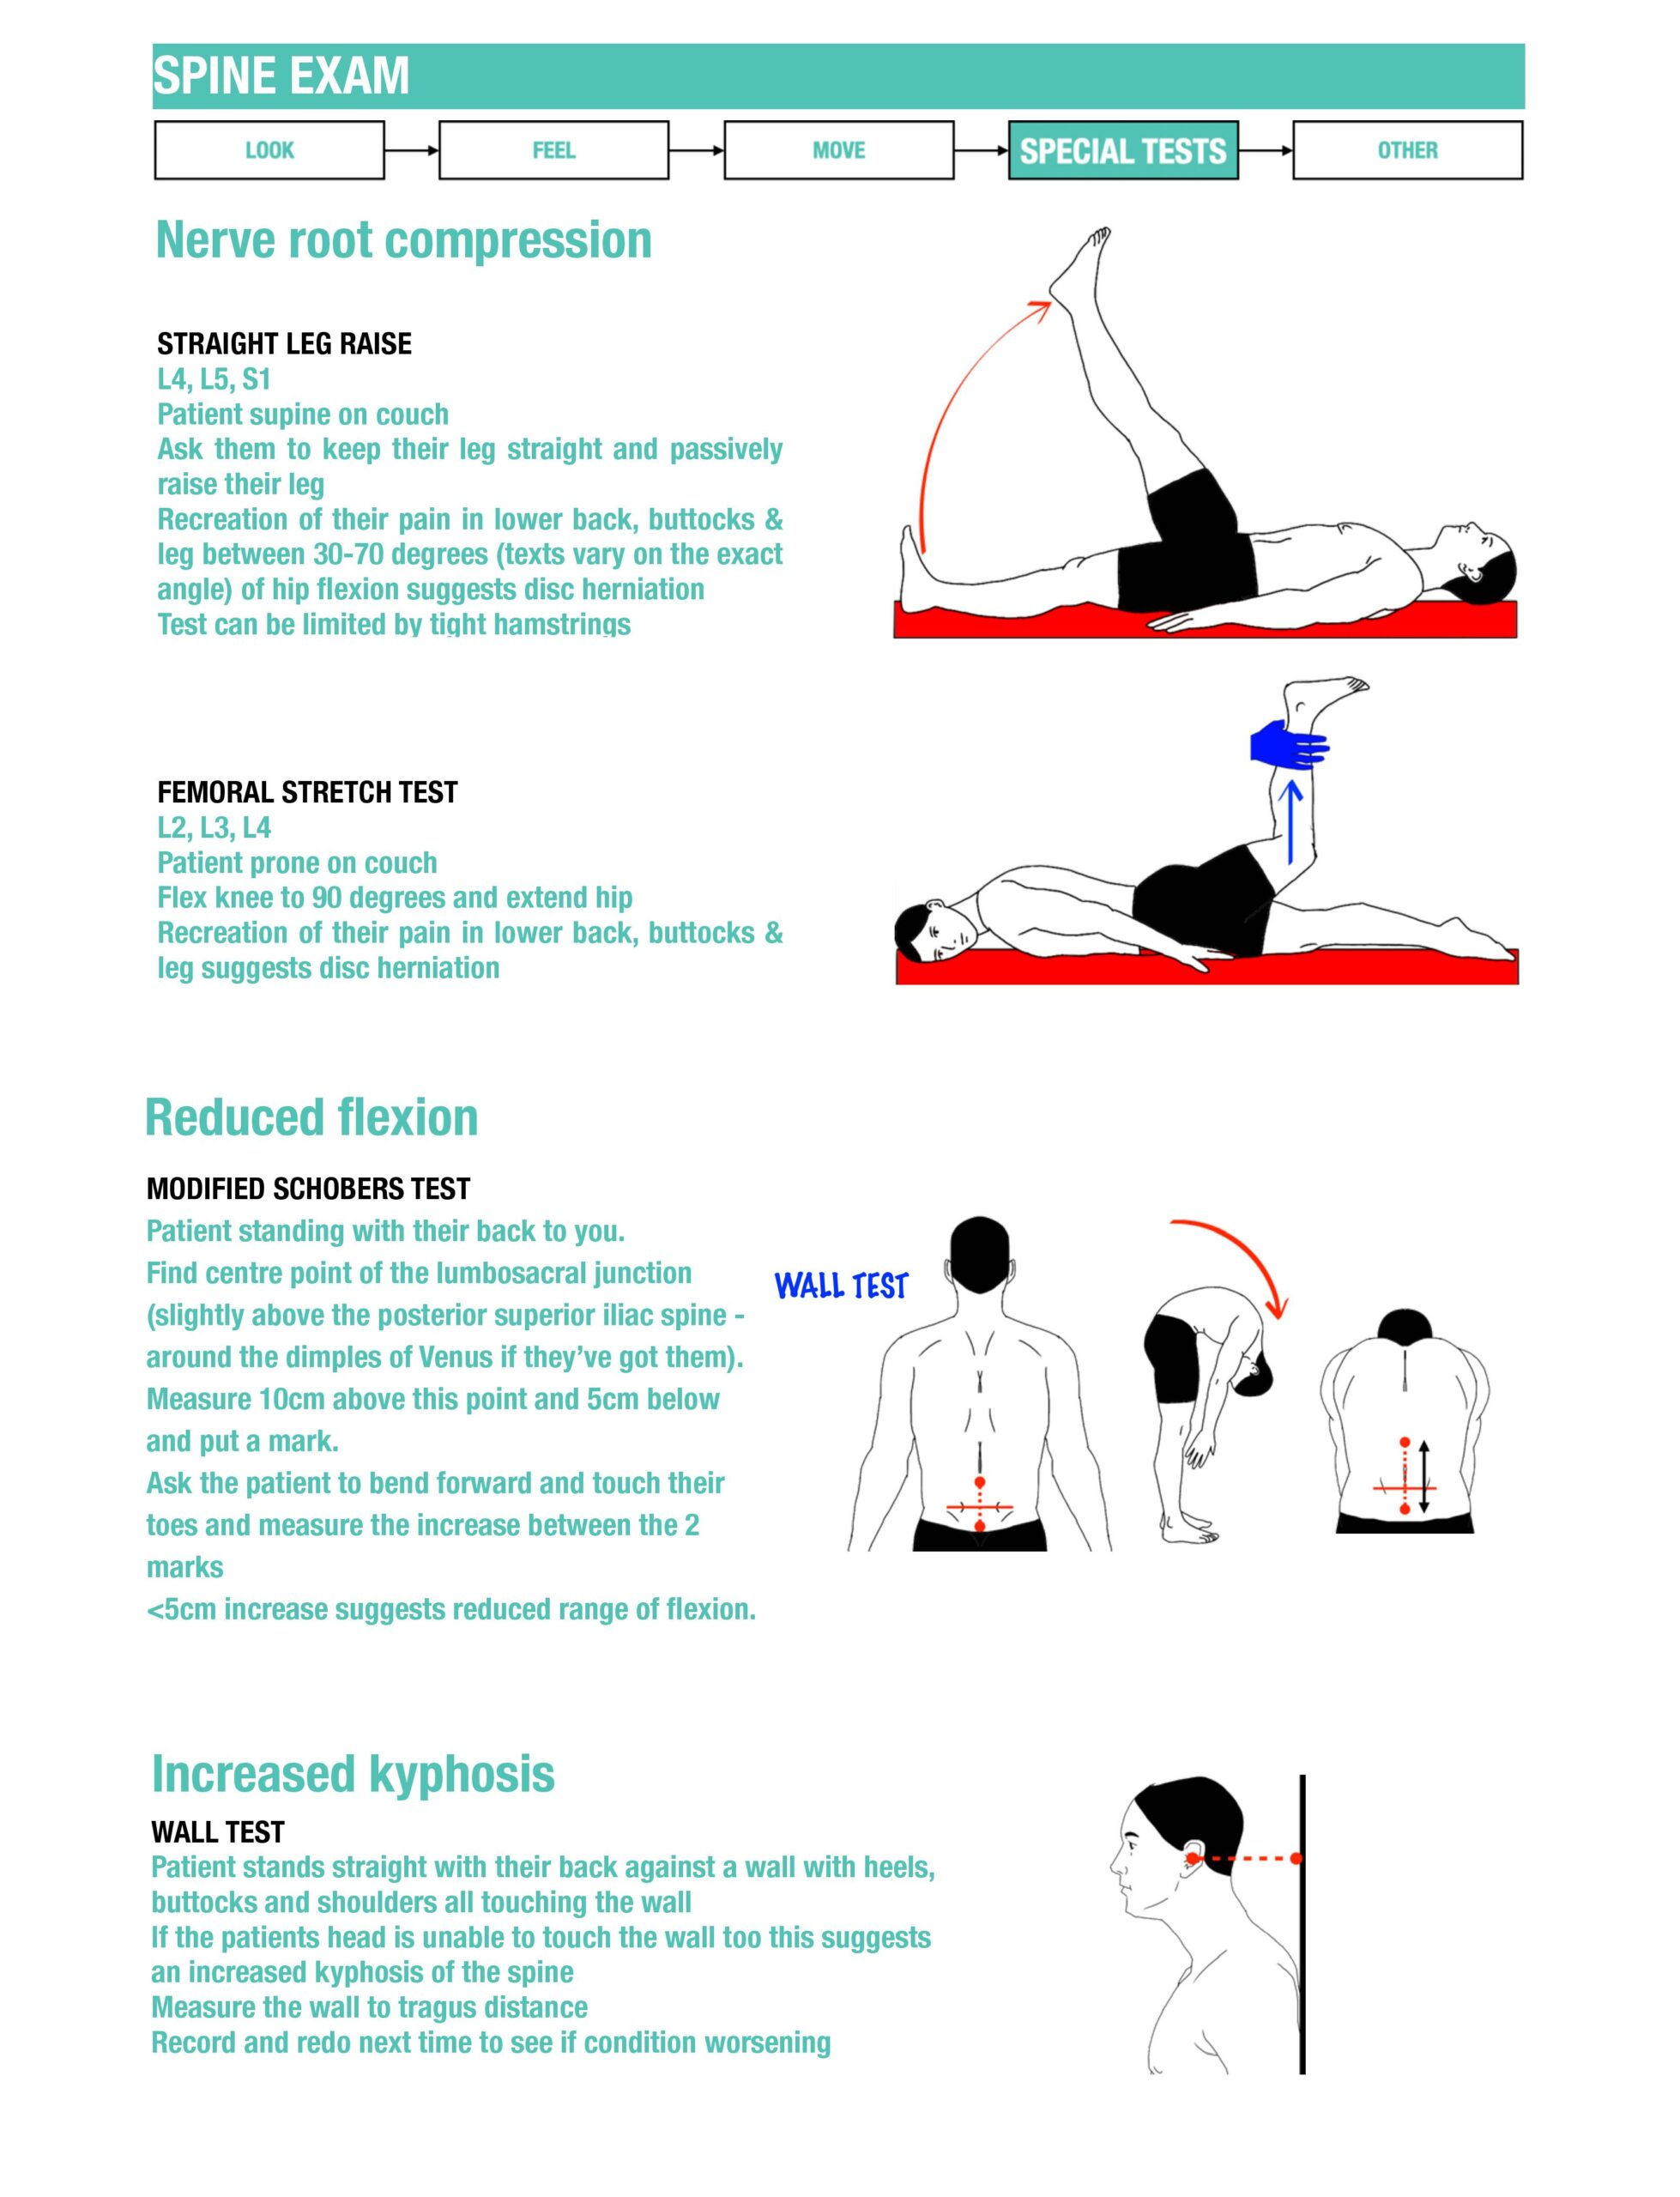
Modified Schober: mark the midline at the level of the posterior superior iliac spines, then 5 cm below and 10 cm above. Ask for forward flexion and measure the increase from the initial 15 cm. Reduced excursion (often less than about 5 cm) supports restricted lumbar flexion; record the measurement and technique.
Straight-leg raise: with the patient supine, passively elevate the straight leg. Reproduction of the familiar radiating leg pain, typically at about 30–70°, supports lumbosacral nerve-root irritation; back pain or hamstring tightness alone is not a positive radicular test.
Crossed straight-leg raise: lifting the unaffected leg reproduces radicular pain in the affected leg. This supports nerve-root irritation; it does not establish disc size or location.
Bowstring manoeuvre: an optional nerve-tension adjunct for a trained examiner. Flexing the knee after a symptomatic straight-leg raise should ease tension; gentle pressure in the popliteal region may reproduce symptoms. Avoid forceful pressure over the common peroneal nerve and do not treat this test as diagnostic in isolation.
FABER: flex, abduct and externally rotate the hip, resting the ankle above the opposite knee. Stabilise the opposite pelvis and lower the flexed knee gently. Record where pain occurs: groin pain may arise from the hip; posterior pain may implicate the sacroiliac region. The test does not establish osteoarthritis or sacroiliac disease by itself.
Femoral nerve stretch: with the patient prone when suitable, gently flex the knee and, if needed, extend the hip. Familiar anterior-thigh radicular pain supports upper lumbar nerve irritation; distinguish it from quadriceps stretch discomfort.
Complete a lower-limb neurological examination and assess other possible sources of pain as indicated.
Stanford — low-back examination
Use this demonstration for examination technique alongside the neurological levels in this guide: the ankle jerk principally tests S1, not L4. Inconsistent responses or non-anatomical findings do not establish deliberate deception; describe what you observe, explore pain and distress, and interpret the findings in their clinical context.
Close
Help the patient return to a comfortable position, offer privacy for dressing and thank them. Present the findings and your proposed next steps to the responsible clinician, then explain the agreed plan to the patient.
Further reading
An intimate examination requires a specific indication, explanation, consent, appropriate supervision and a chaperone discussion. Digital rectal examination is not a routine completion step for a joint examination or a prerequisite for referring suspected cauda equina syndrome.
Interpret and present your findings
Describe posture, movement and neurological findings alongside relevant red flags. For possible inflammatory disease, explain the significance of morning stiffness, improvement with movement and associated uveitis, psoriasis or bowel disease. Routine imaging is not necessary for every back pain; conversely, a normal limb examination does not safely dismiss symptoms of cauda equina syndrome. Discuss an urgent concern immediately and follow the appropriate local pathway.
Reading the original illustration. The illustration’s nerve-tension tests are prompts, not proof of a disc lesion. Reproduction of the patient’s radiating leg pain is more informative than back discomfort or hamstring tightness alone. Do not force spinal movement after trauma or when a serious cause is suspected.
Original back infographics · Nick Smith
Original teaching artwork, retained with its credit. Use the written sequence on this page for the corrected technique and safety qualifications.
07 / CHAPTER 7
Hip
Ask the patient to point to the pain: groin, lateral hip, buttock and referred knee symptoms suggest different possibilities. Establish trauma, ability to bear weight, systemic symptoms and previous surgery. Observe gait only when safe and offer support; an examination should not become a test of whether a person can endure pain.
Localise the pain, compare movement and remember referred symptoms.
Hip: sequence and example phrases
Introduction
Use the introduction, consent and preparation described above, explaining the particular area and movements involved. Protect privacy and adapt the examination to pain, mobility and the clinical question.
Brief history
“Can you briefly tell me what the problem is?”
“What is your occupation?”
“Have you been involved in any trauma?”
“Have you had any previous operations on your hips?”
“Have you had a fever?”
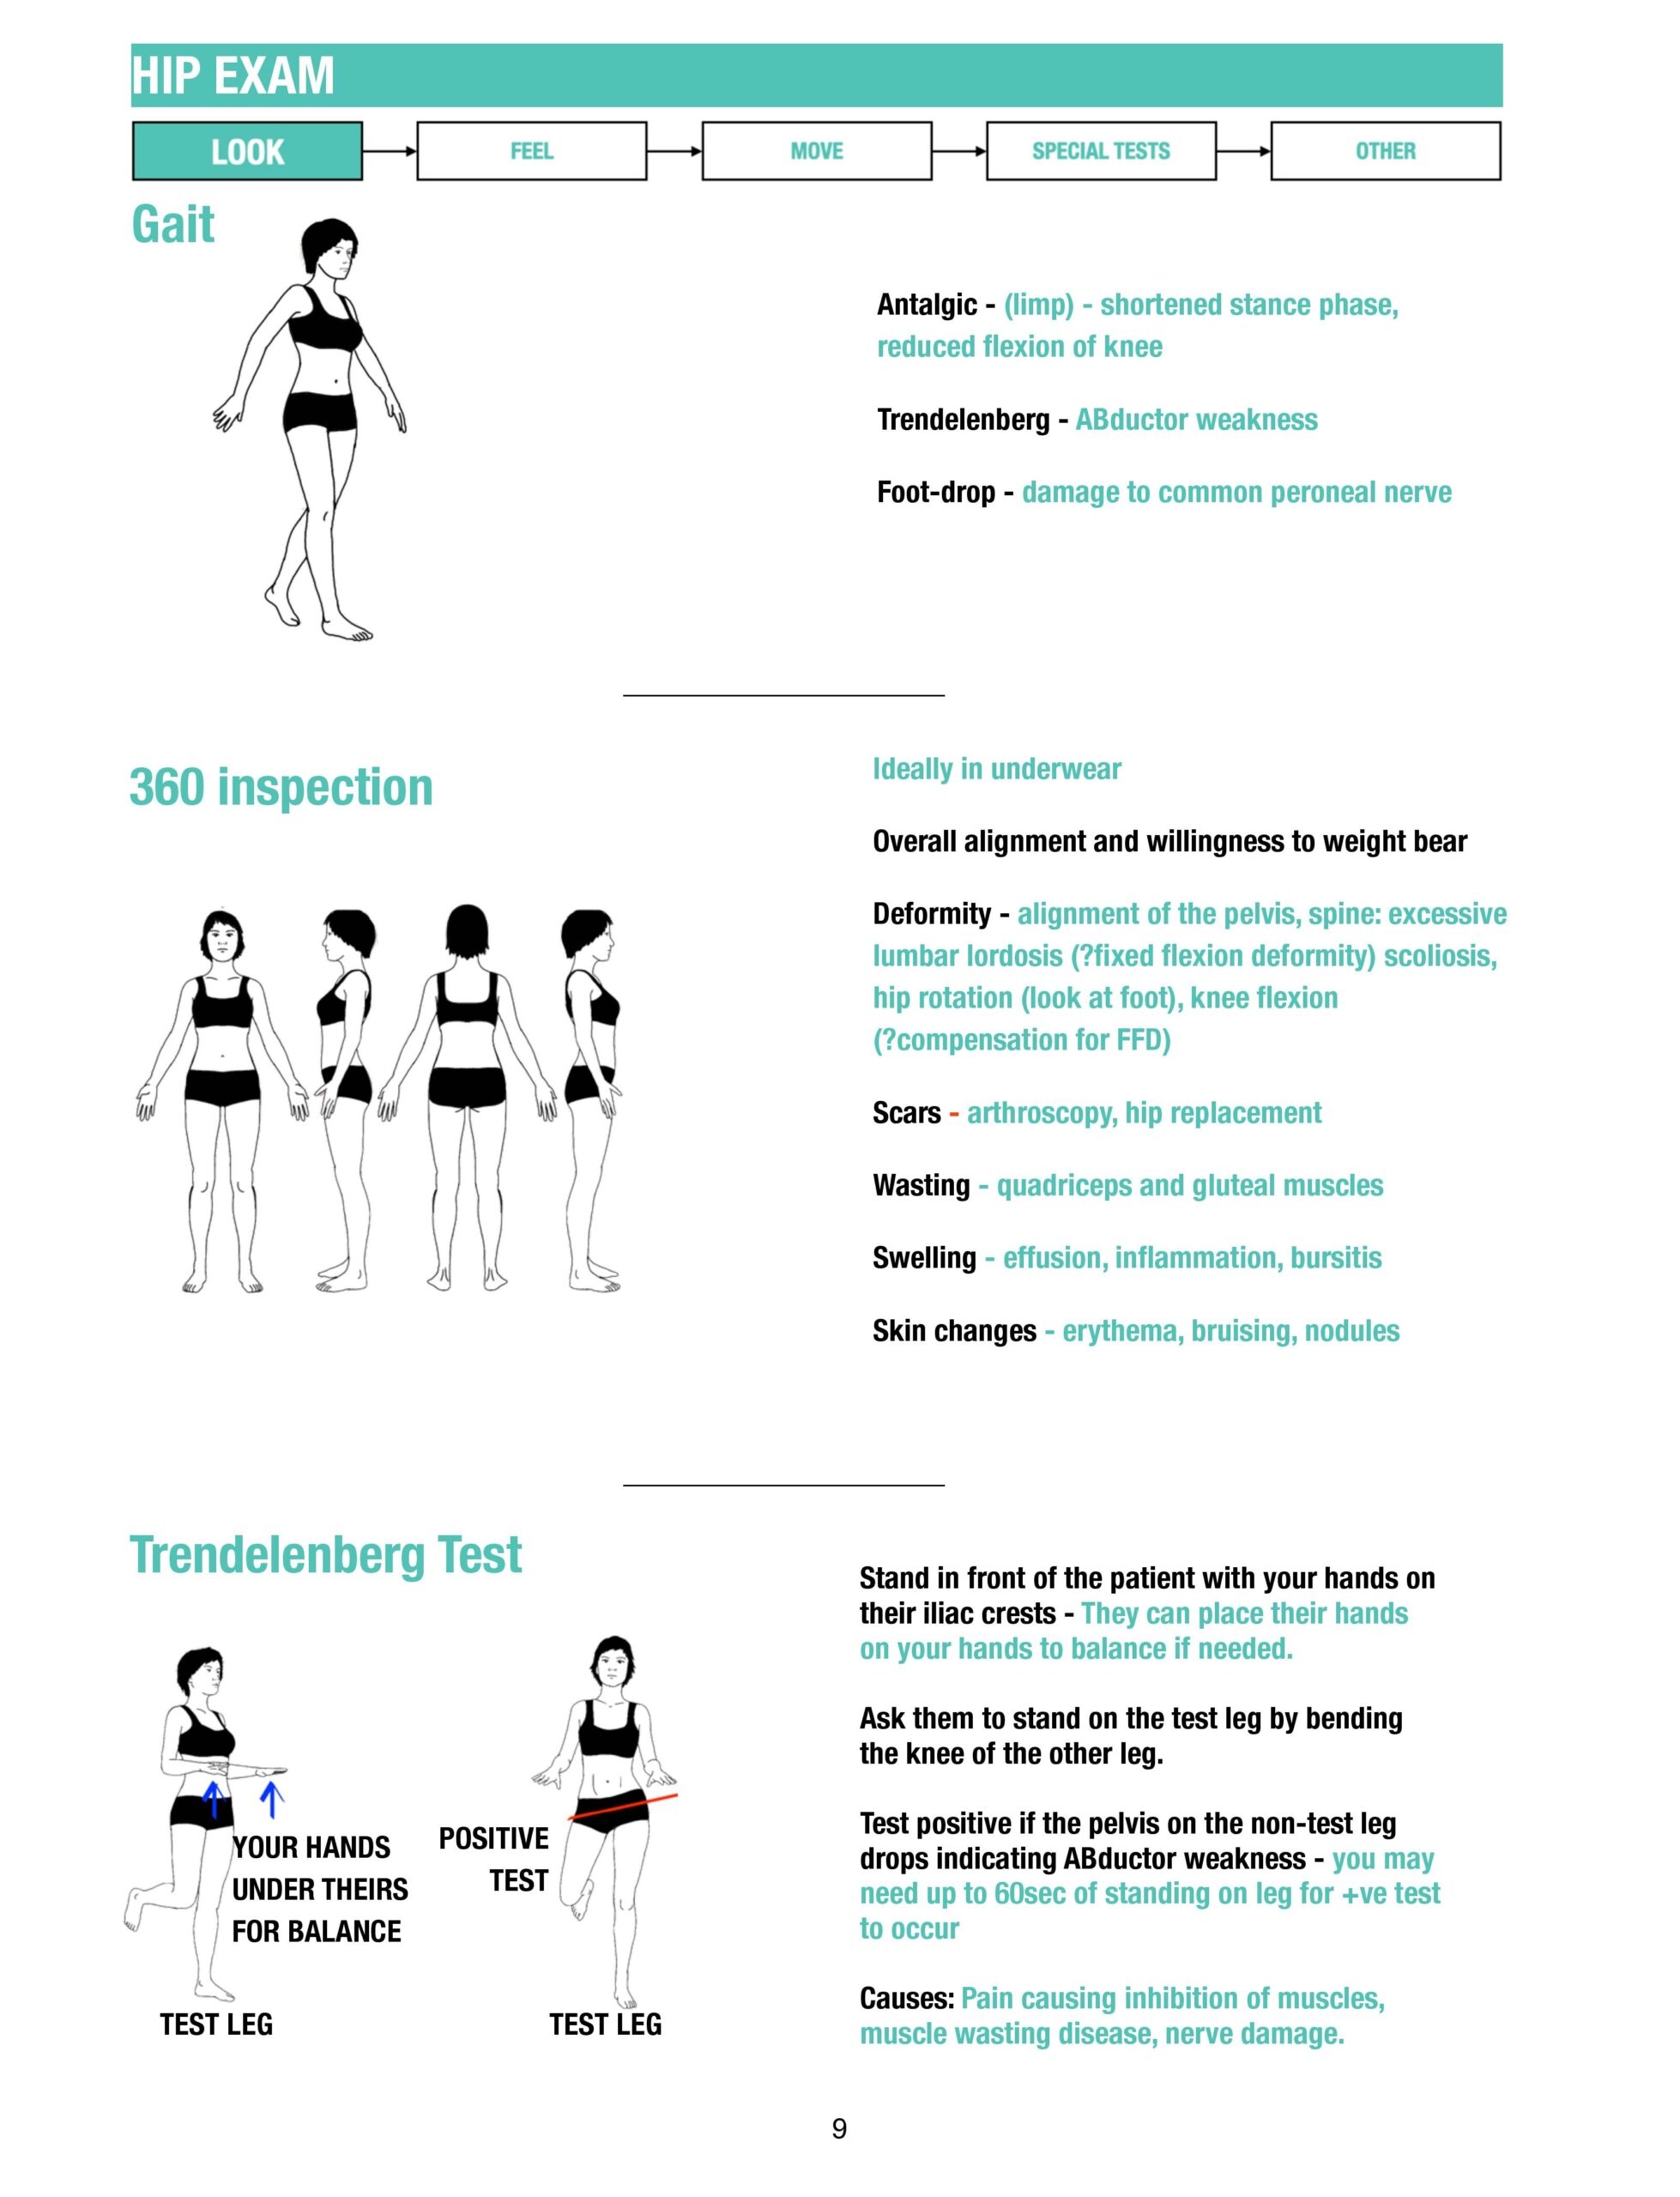
Gait
“If it is comfortable and safe, please walk a short distance, turn and walk back.”
Observe symmetry, stance, stride, an antalgic pattern, pelvic drop and foot drop. Use the person’s usual walking aid and provide support. Do not ask someone with suspected fracture or an acutely painful injury to walk for the sake of completing a checklist.
Inspection
Compare both hips and legs, assessing scars, deformity, skin changes, muscle bulk and resting posture.
Trendelenburg test: if safe, provide secure support and ask the patient to stand briefly on one leg. A drop of the pelvis on the opposite, unsupported side suggests abductor dysfunction on the stance side. Pain and balance difficulty can affect the test. Compare sides.
Palpation
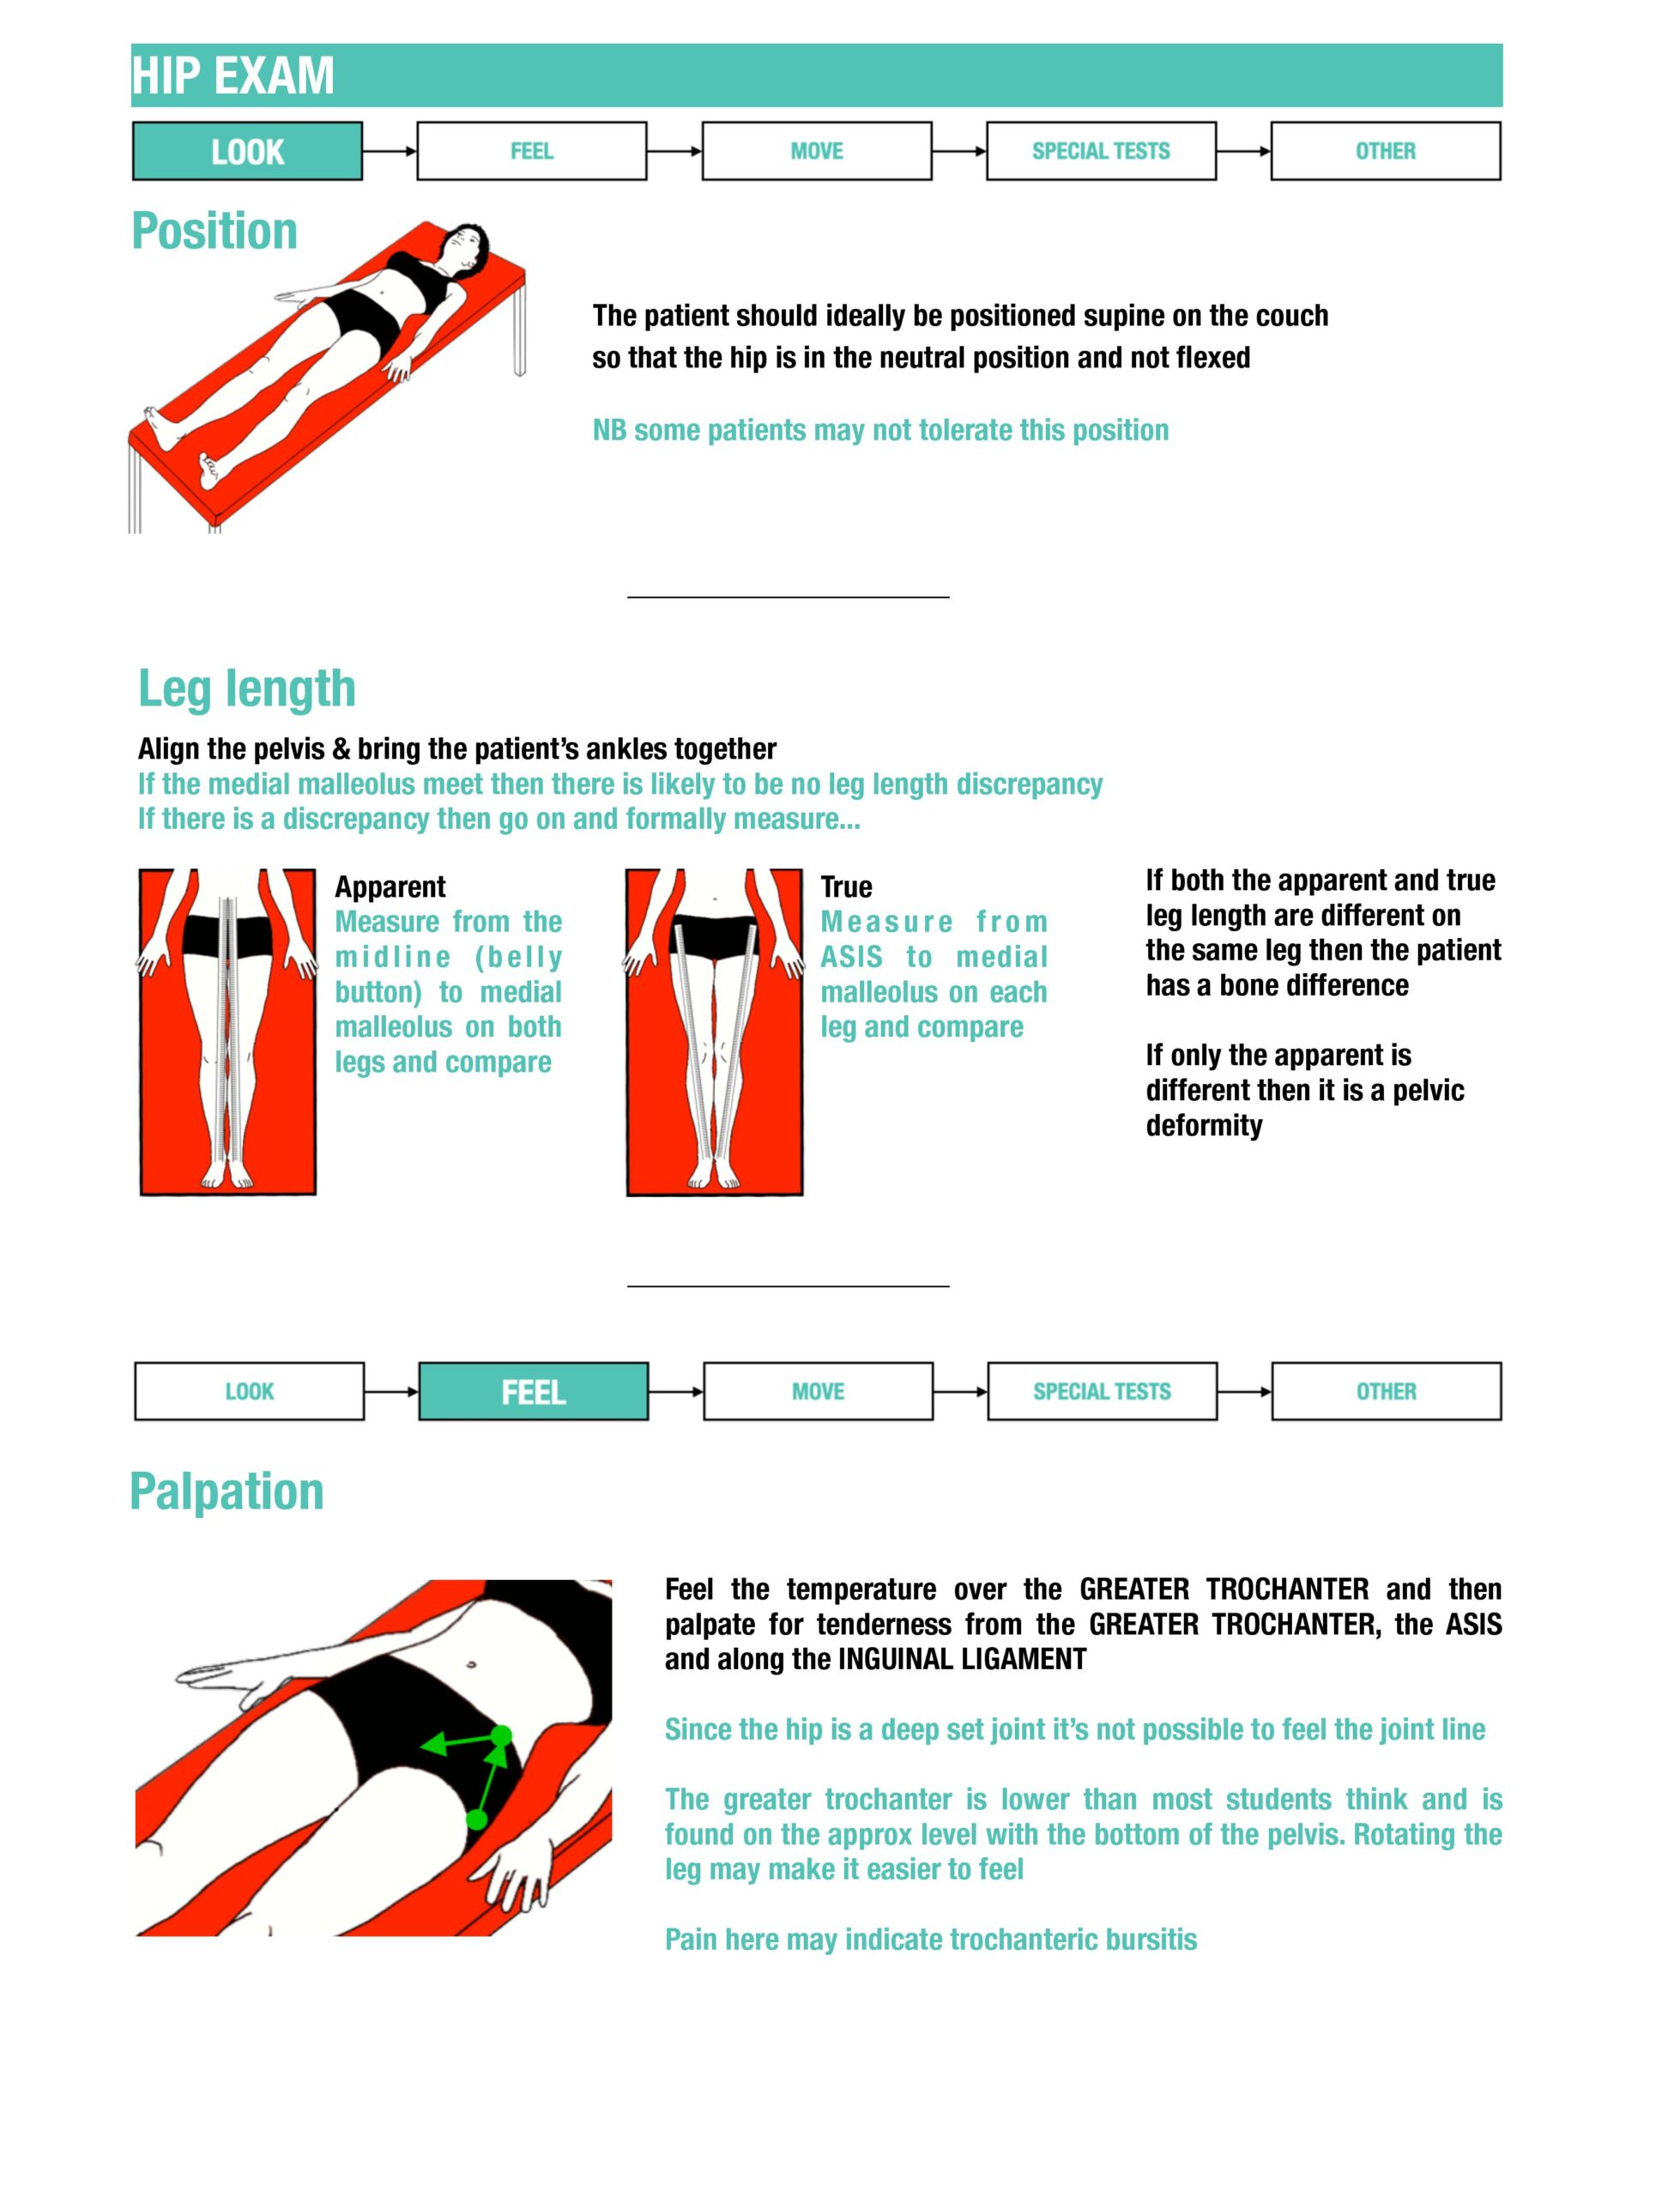
“Please lie comfortably. I will feel around the hip and compare the two sides.”
- Assess warmth, swelling and tenderness. Palpate relevant accessible landmarks, including the iliac crest, ASIS and greater trochanter; examine other areas only when indicated and with appropriate explanation.
- The lesser trochanter is not a routine externally palpable landmark; the ischial tuberosity is not the same structure as the pubic ramus.
- For leg length, align the pelvis and place the legs symmetrically. Measure true length from ASIS to medial malleolus and apparent length from umbilicus to medial malleolus, comparing sides.
Move
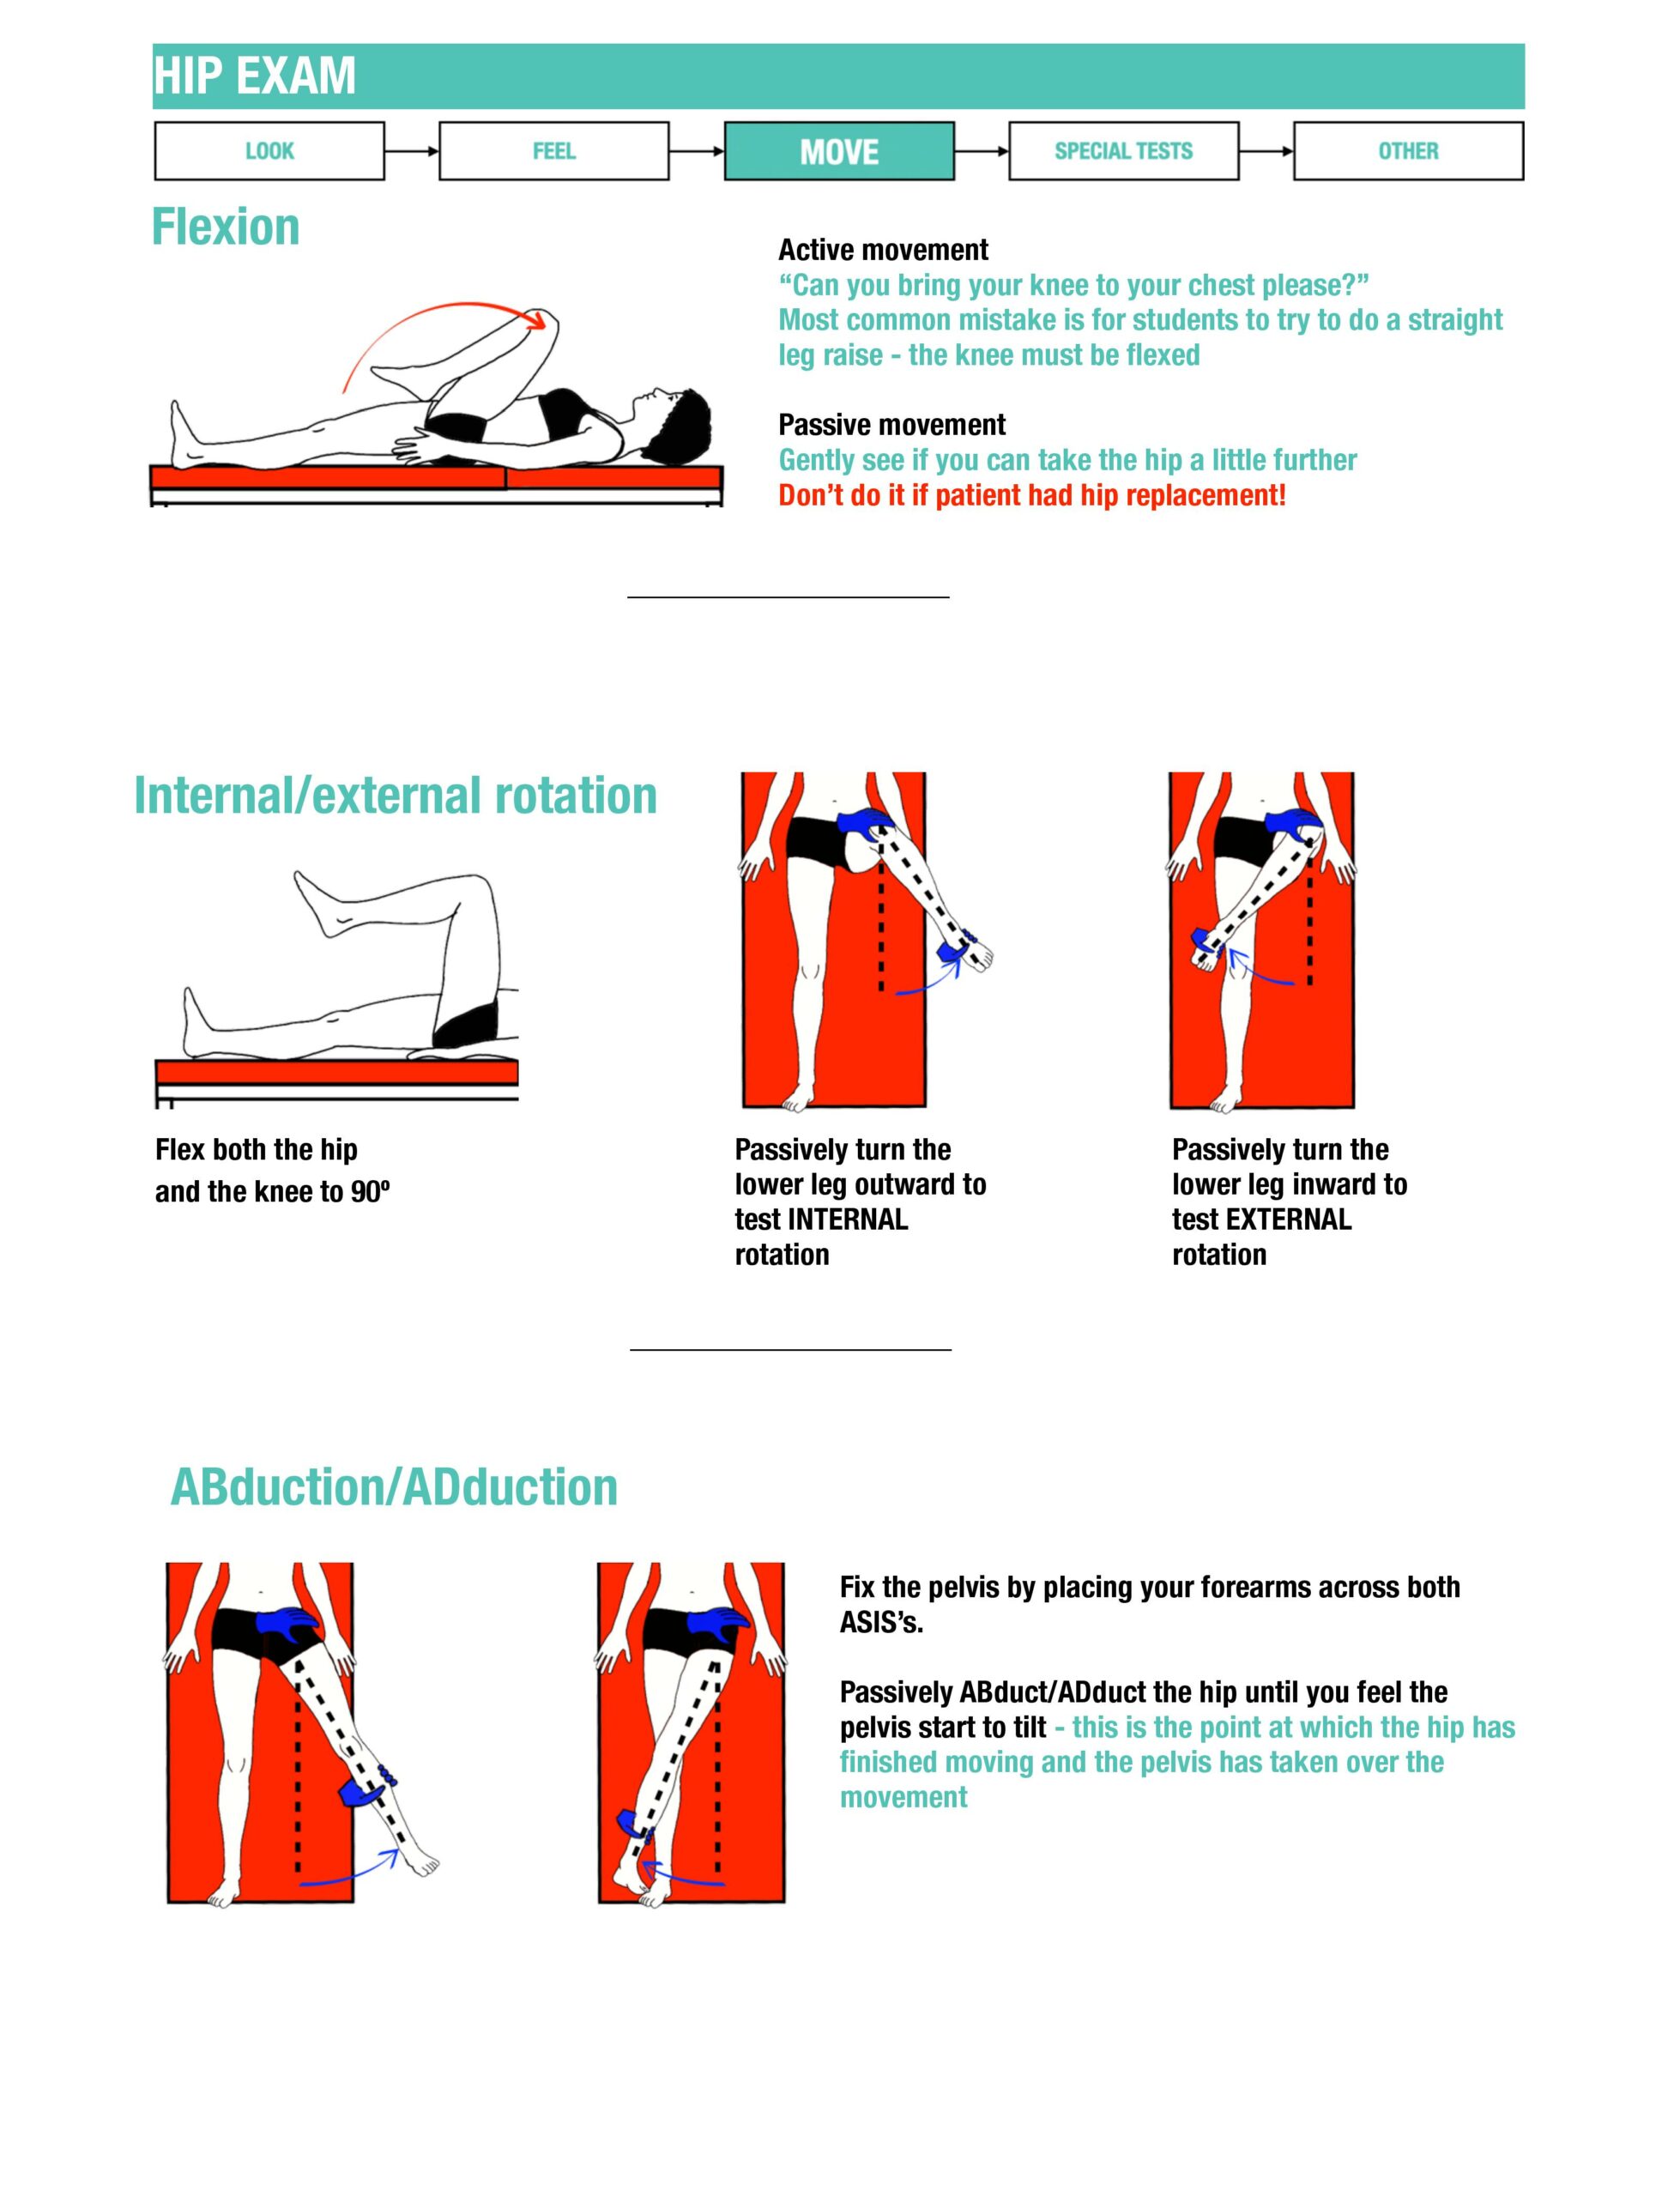
Compare active and gentle passive flexion, extension, abduction, adduction and internal/external rotation, according to comfort and suspected injury. Assess resisted strength when appropriate. Pushing the heel into the couch tests extension strength; it does not measure the range of hip extension.
Special tests
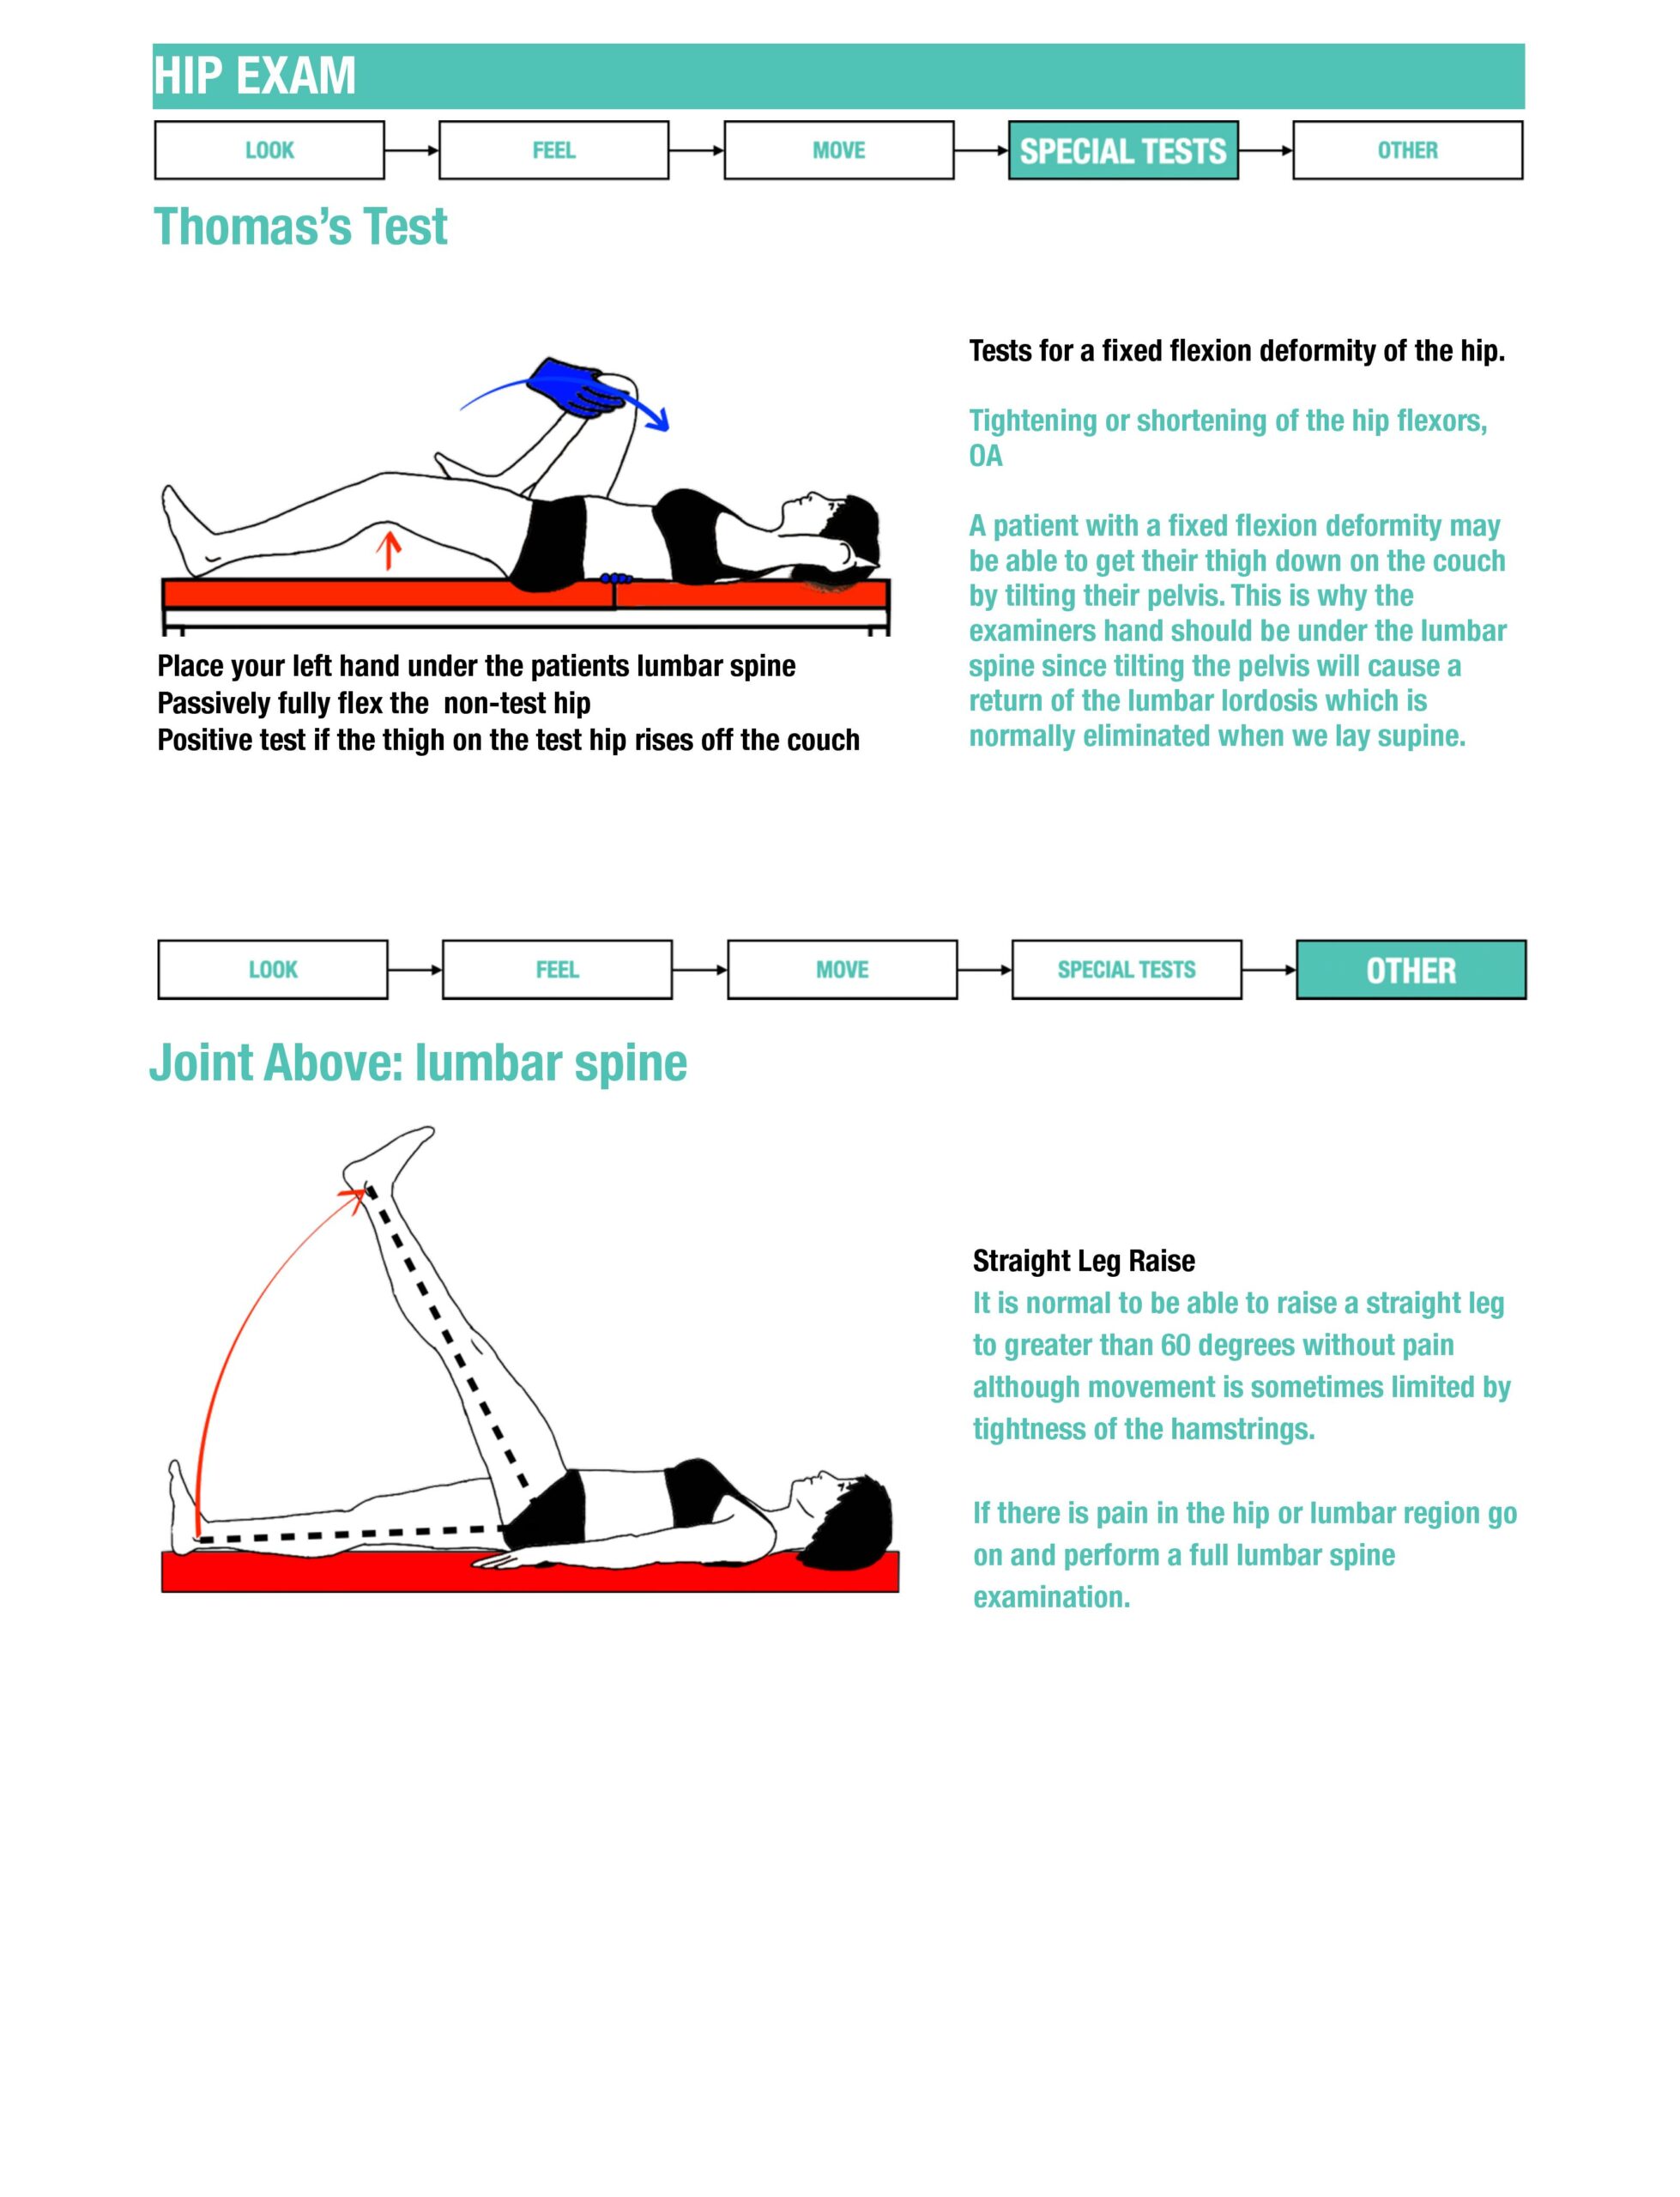
Thomas test: with the patient supine, flex one hip towards the chest to flatten lumbar lordosis, monitoring the pelvis/lower back. If the opposite thigh lifts off the couch, this suggests a flexion contracture of that hip. Do not exaggerate lumbar lordosis.
Straight-leg raise: with the patient supine, passively elevate the straight leg. Reproduction of the familiar radiating leg pain, typically at about 30–70°, supports lumbosacral nerve-root irritation; back pain or hamstring tightness alone is not a positive radicular test.
FABER: flex, abduct and externally rotate the hip, resting the ankle above the opposite knee. Stabilise the opposite pelvis and lower the flexed knee gently. Record where pain occurs: groin pain may arise from the hip; posterior pain may implicate the sacroiliac region. The test does not establish osteoarthritis or sacroiliac disease by itself.
Stanford — regional hip examination
A child with a limp: examine the joints above and below because hip disease may present as knee pain. Acute inability to bear weight is a red flag; a hot, painful, restricted joint, especially with fever, needs urgent assessment for infection. Follow local paediatric pathways.
RCH — limping or non-weight-bearing child
Close
Help the patient return to a comfortable position, offer privacy for dressing and thank them. Present the findings and your proposed next steps to the responsible clinician, then explain the agreed plan to the patient.
Further reading
NICE hip-fracture guidance: suspected occult fracture.
Interpret and present your findings
Describe the gait, site of tenderness, movement and any leg-length difference. Relate restriction to pain and function. In a child, remember that hip disease can present as knee pain; a child who is unwell or unable to bear weight needs prompt assessment. In an older person after a fall, continuing pain or inability to mobilise warrants further assessment even if the first radiographs do not show a fracture.
Reading the original illustration. The illustration simplifies leg-length interpretation and hip-replacement precautions. Interpret measurements with pelvic position and the rest of the examination. Check the operation, timing and individual precautions before testing movement; neither unrestricted movement nor a blanket lifelong prohibition is appropriate.
Original hip infographics · Nick Smith
Original teaching artwork, retained with its credit. Use the written sequence on this page for the corrected technique and safety qualifications.
08 / CHAPTER 7
Knee
Ask about the mechanism of injury, swelling, locking, giving way and weight bearing. After non-traumatic onset, ask about fever, other joints and recent illness. An acutely swollen joint may not permit reliable ligament or meniscal testing. Identify the immediate problem, provide appropriate comfort and plan reassessment rather than forcing every manoeuvre.
Assess the extensor mechanism, effusion, ligaments and menisci.
Knee: sequence and example phrases
Introduction
Use the introduction, consent and preparation described above, explaining the particular area and movements involved. Protect privacy and adapt the examination to pain, mobility and the clinical question.
Brief history
“Can you briefly tell me what the problem is?”
“What is your occupation?”
“Have you been involved in any trauma?”
“Have you had any previous operations on your knees?”
“Have you been unwell recently?”
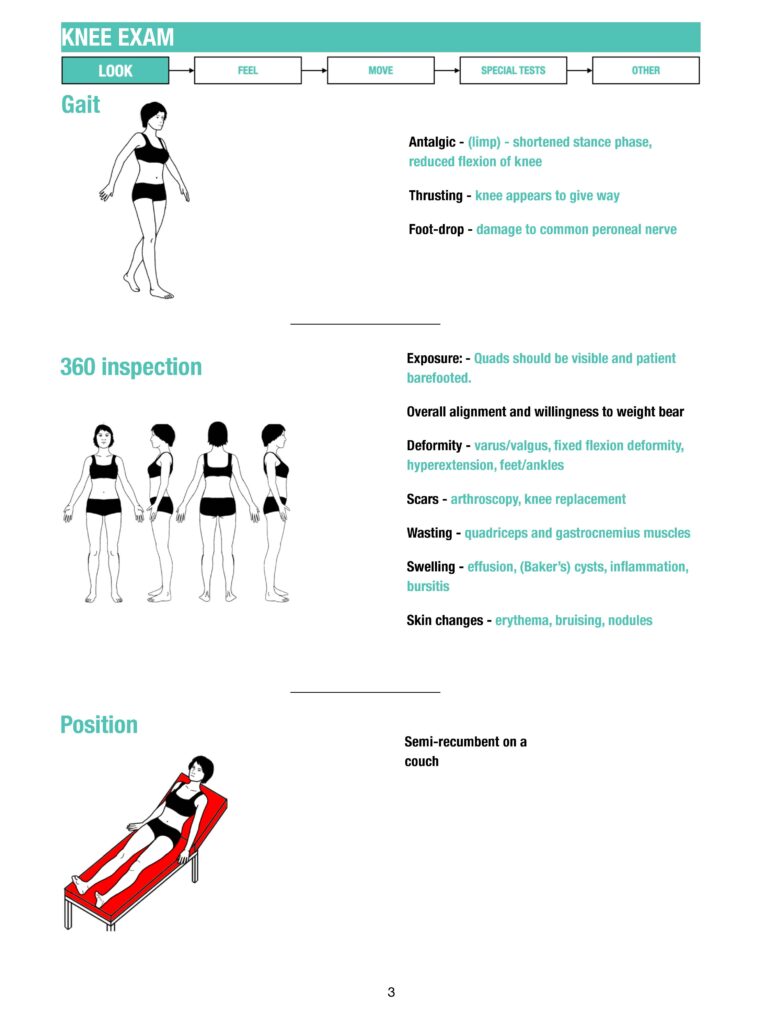
Gait
“If it is comfortable and safe, please walk a short distance, turn and walk back.”
Observe symmetry, stance, stride, an antalgic pattern, pelvic drop and foot drop. Use the person’s usual walking aid and provide support. Do not ask someone with suspected fracture or an acutely painful injury to walk for the sake of completing a checklist.
Inspection
“Please can you stand up straight. I am inspecting the knees from the front; back, and sides. I am looking for…”
- scars
- skin changes
- wasting
- muscle bulk of quadriceps
- deformity: varus (bow-legged); valgus (knock-kneed)
- popliteal mass or swelling
Palpation
“Please can you lie down on the couch. I need to feel the knees for…”
Comment on:
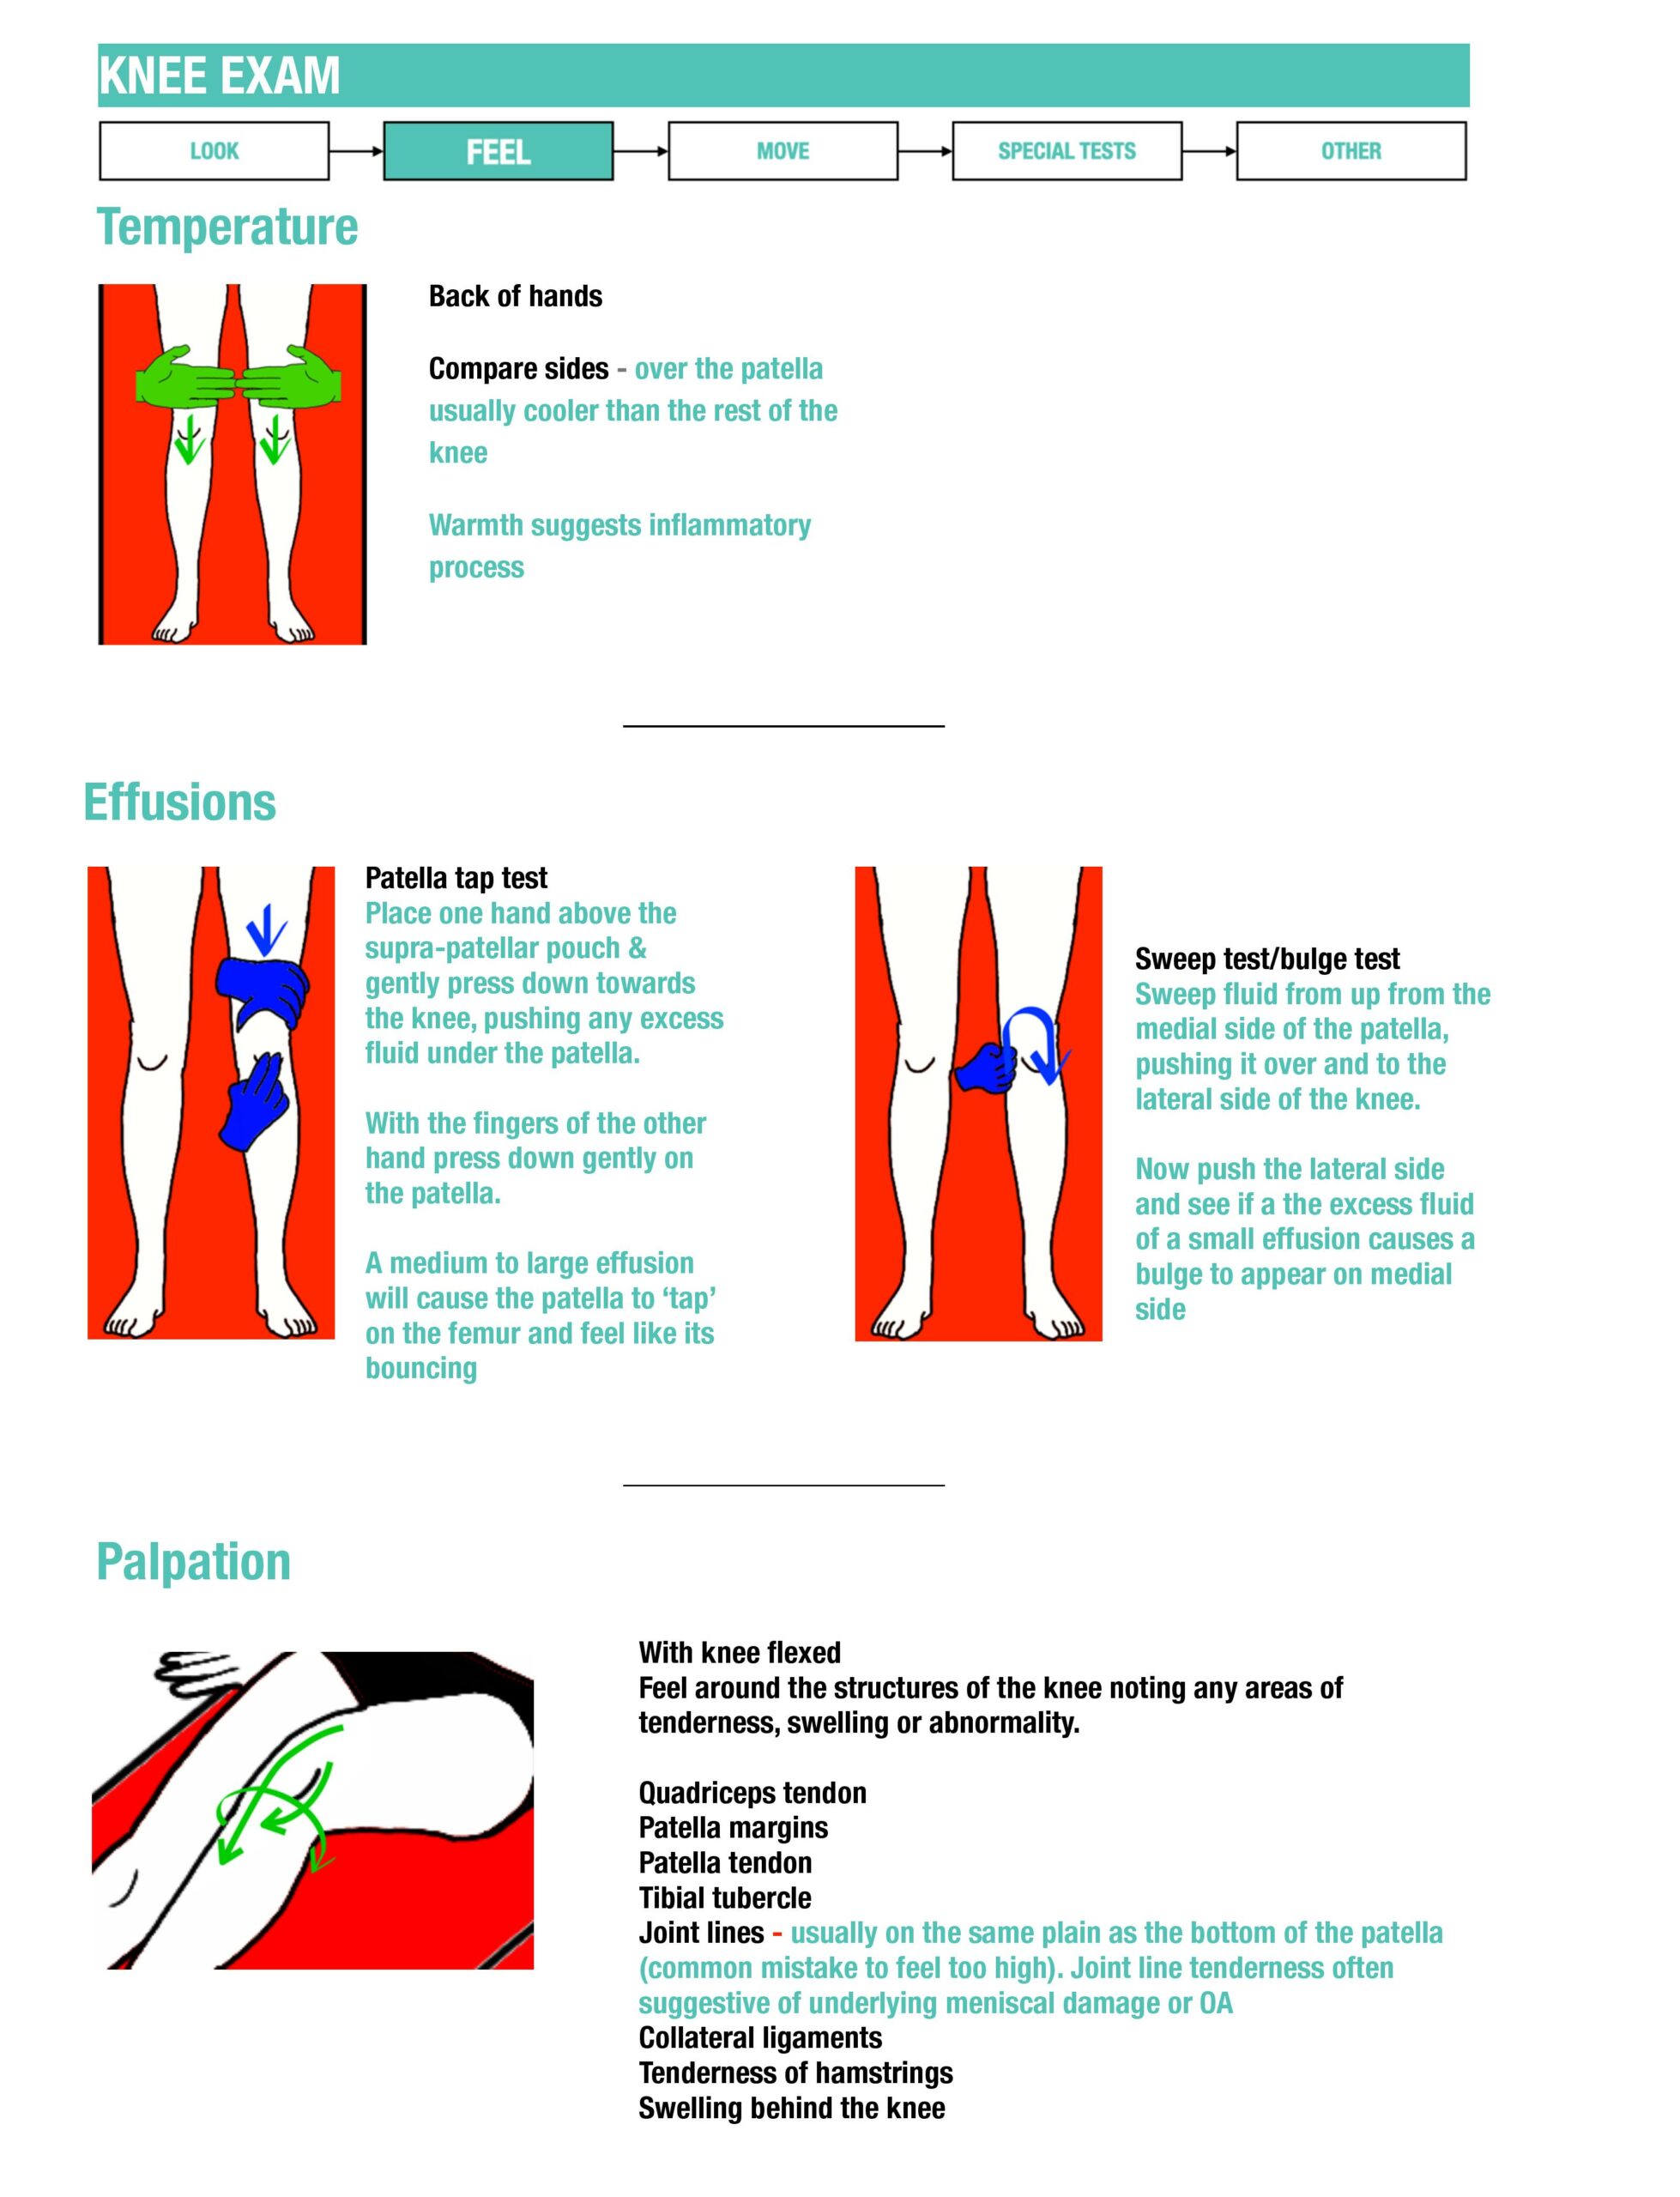
- warmth – use the back of your hand to compare to the other side and rest of the leg
- swelling
- bogginess
- crepitus in movement
- pain
“I now need to palpate the joint line or any tenderness, and also assess for effusion”
- Knee flexed at 90o
- Start in the hollow next to medial part of patellar tendon
- Medial joint line → medial tibial plateau (inferiorly) → medial femoral condyle (superiorly) → quads tendon and muscles → lateral femoral condyle → lateral joint line → lateral tibial plateau → patella tendon → fibular head → patella
Effusion
- milk the knee → squeeze thigh and push towards feet
- maintain hold → apply pressure to medial, then lateral side → looking for a bulge
- Patella tap – larger effusion.
- Empty supra-patellar pouch → press gently on the patella with thumb and index finger → tap + bounce back if effusion)
Move
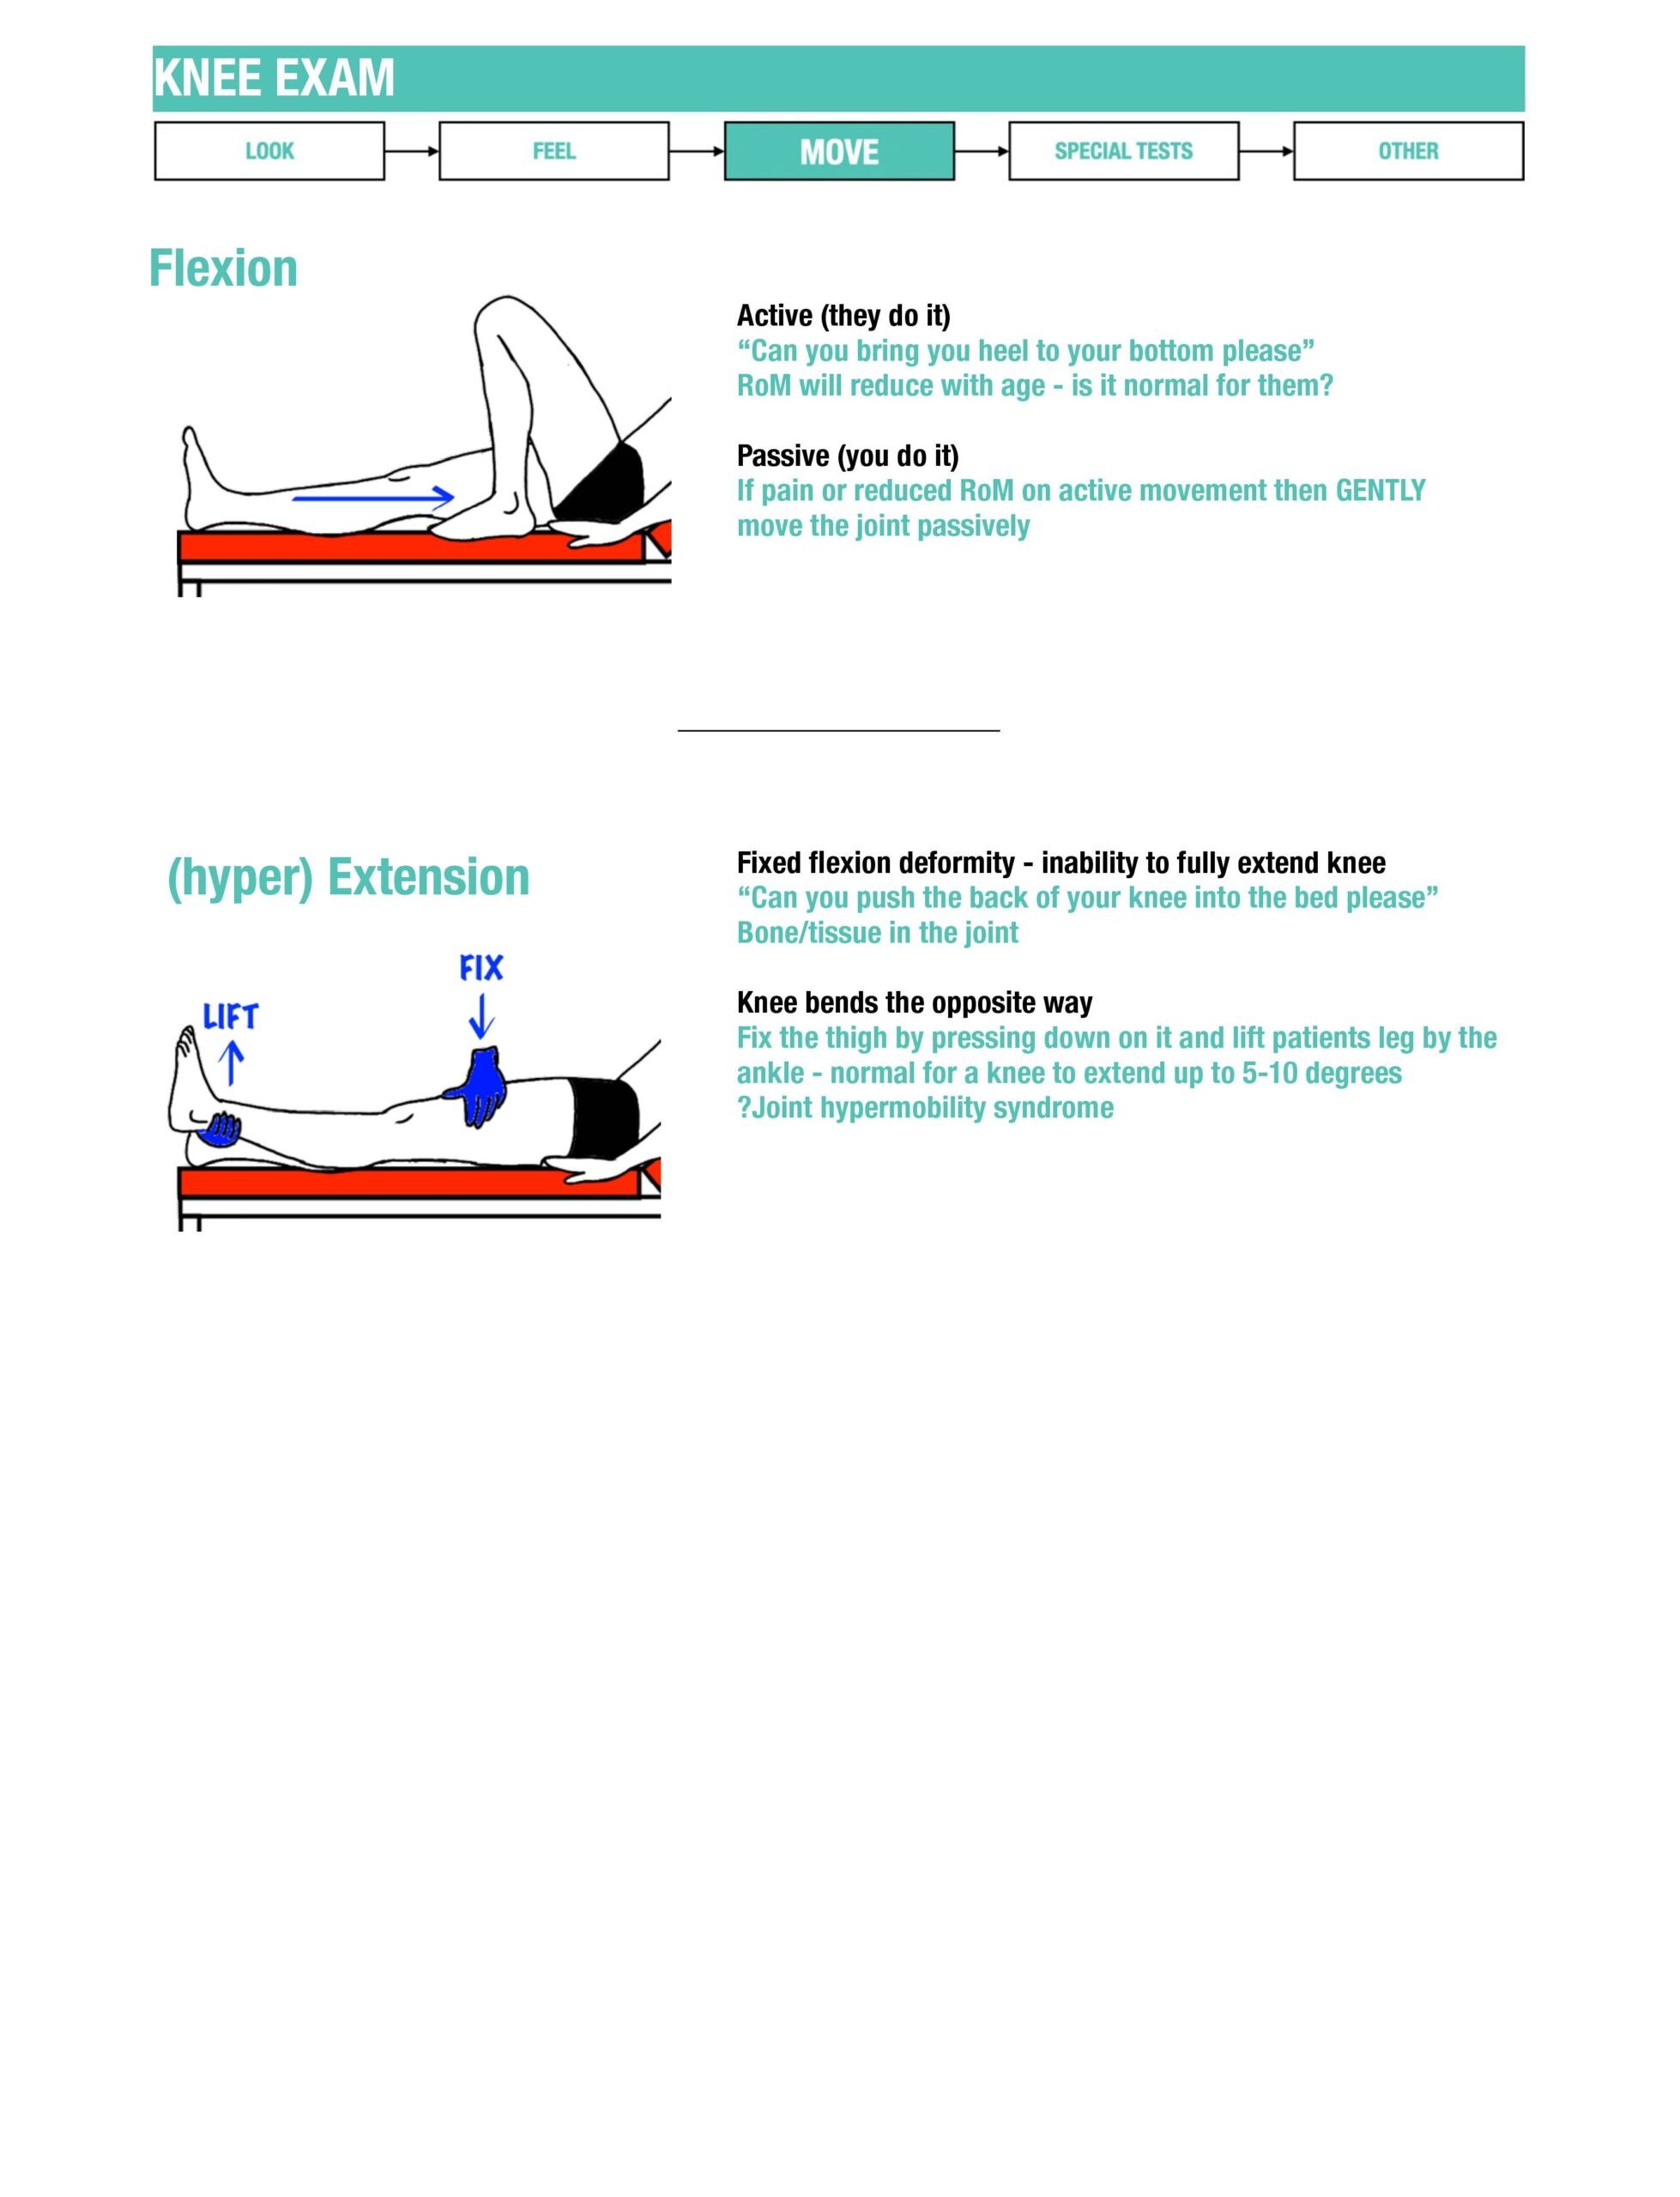
Active; passive, resisted (with hand over patella to feel for crepitus)
- flexion
- extension
Special tests
- Extensor mechanism: ask for an active straight-leg raise and look for an extension lag; this is different from passive nerve-tension testing.
- Patellar apprehension: with slight knee flexion, gently translate the patella laterally. Stop if apprehension occurs; do not push through pain.
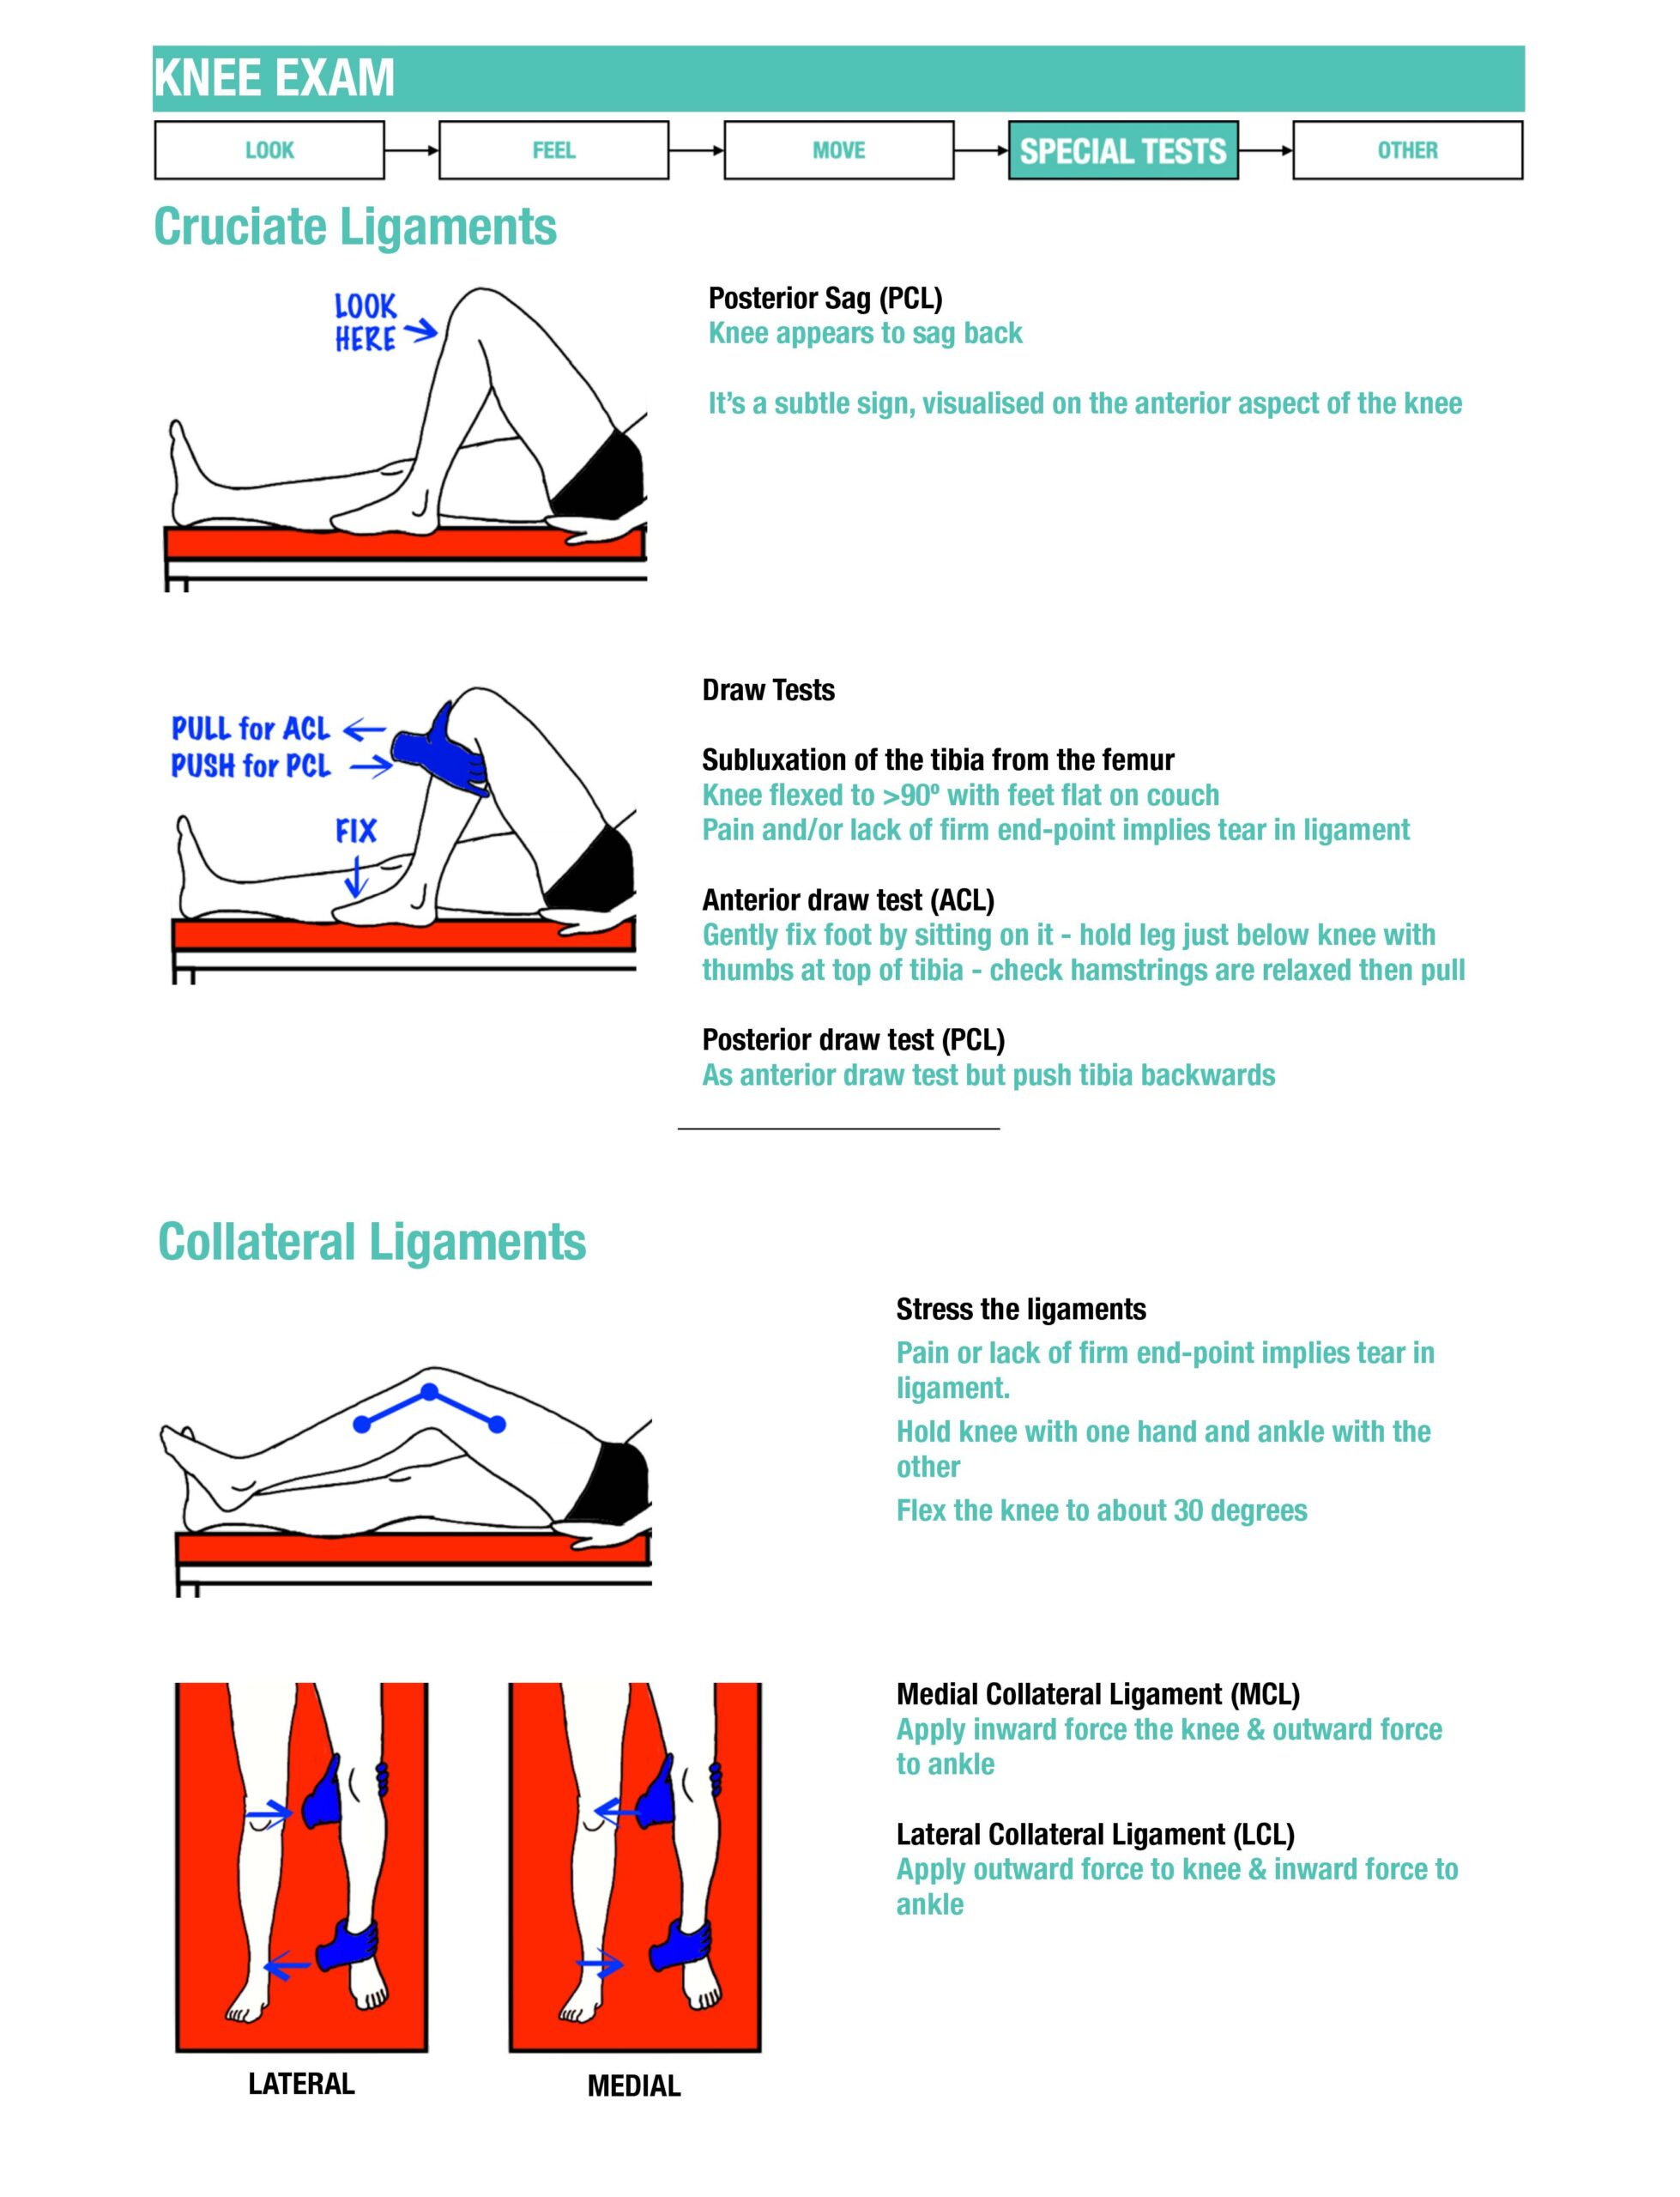
- ACL: use Lachman testing at about 20–30° flexion. For anterior drawer, flex the knee to 90°, support the foot, relax the hamstrings, hold the proximal tibia with fingers behind and thumbs in front, and apply controlled anterior translation. Compare excursion and end point; avoid a sharp jerk.
- PCL: inspect posterior sag with the knee at 90°, then assess controlled posterior translation if appropriate.
- Collateral ligaments: at about 20–30° knee flexion, valgus stress tests the MCL and varus stress tests the LCL. Compare opening and end point, distinguishing pain from laxity.
- McMurray: from flexion, guide the knee towards extension using external tibial rotation with valgus for the medial meniscus, and internal rotation with varus for the lateral meniscus. A painful joint-line click or locking supports meniscal injury; painless cracking alone is not diagnostic.
An acutely painful or swollen knee may prevent reliable testing. Provide analgesia, consider fracture and arrange appropriate reassessment or imaging rather than forcing special tests.
Merck Manual — knee ligament and meniscal assessment · NICE NG38 — fracture assessment and Ottawa rules
Close
Help the patient return to a comfortable position, offer privacy for dressing and thank them. Present the findings and your proposed next steps to the responsible clinician, then explain the agreed plan to the patient.
Further reading
Interpret and present your findings
Present the effusion, extensor mechanism, movement and selected stability findings. Distinguish pain from laxity and explain any limitation from guarding. Consider hip disease when the knee findings do not explain the complaint, particularly in a child. A hot, markedly painful joint needs urgent assessment for infection; a negative special test does not remove that concern.
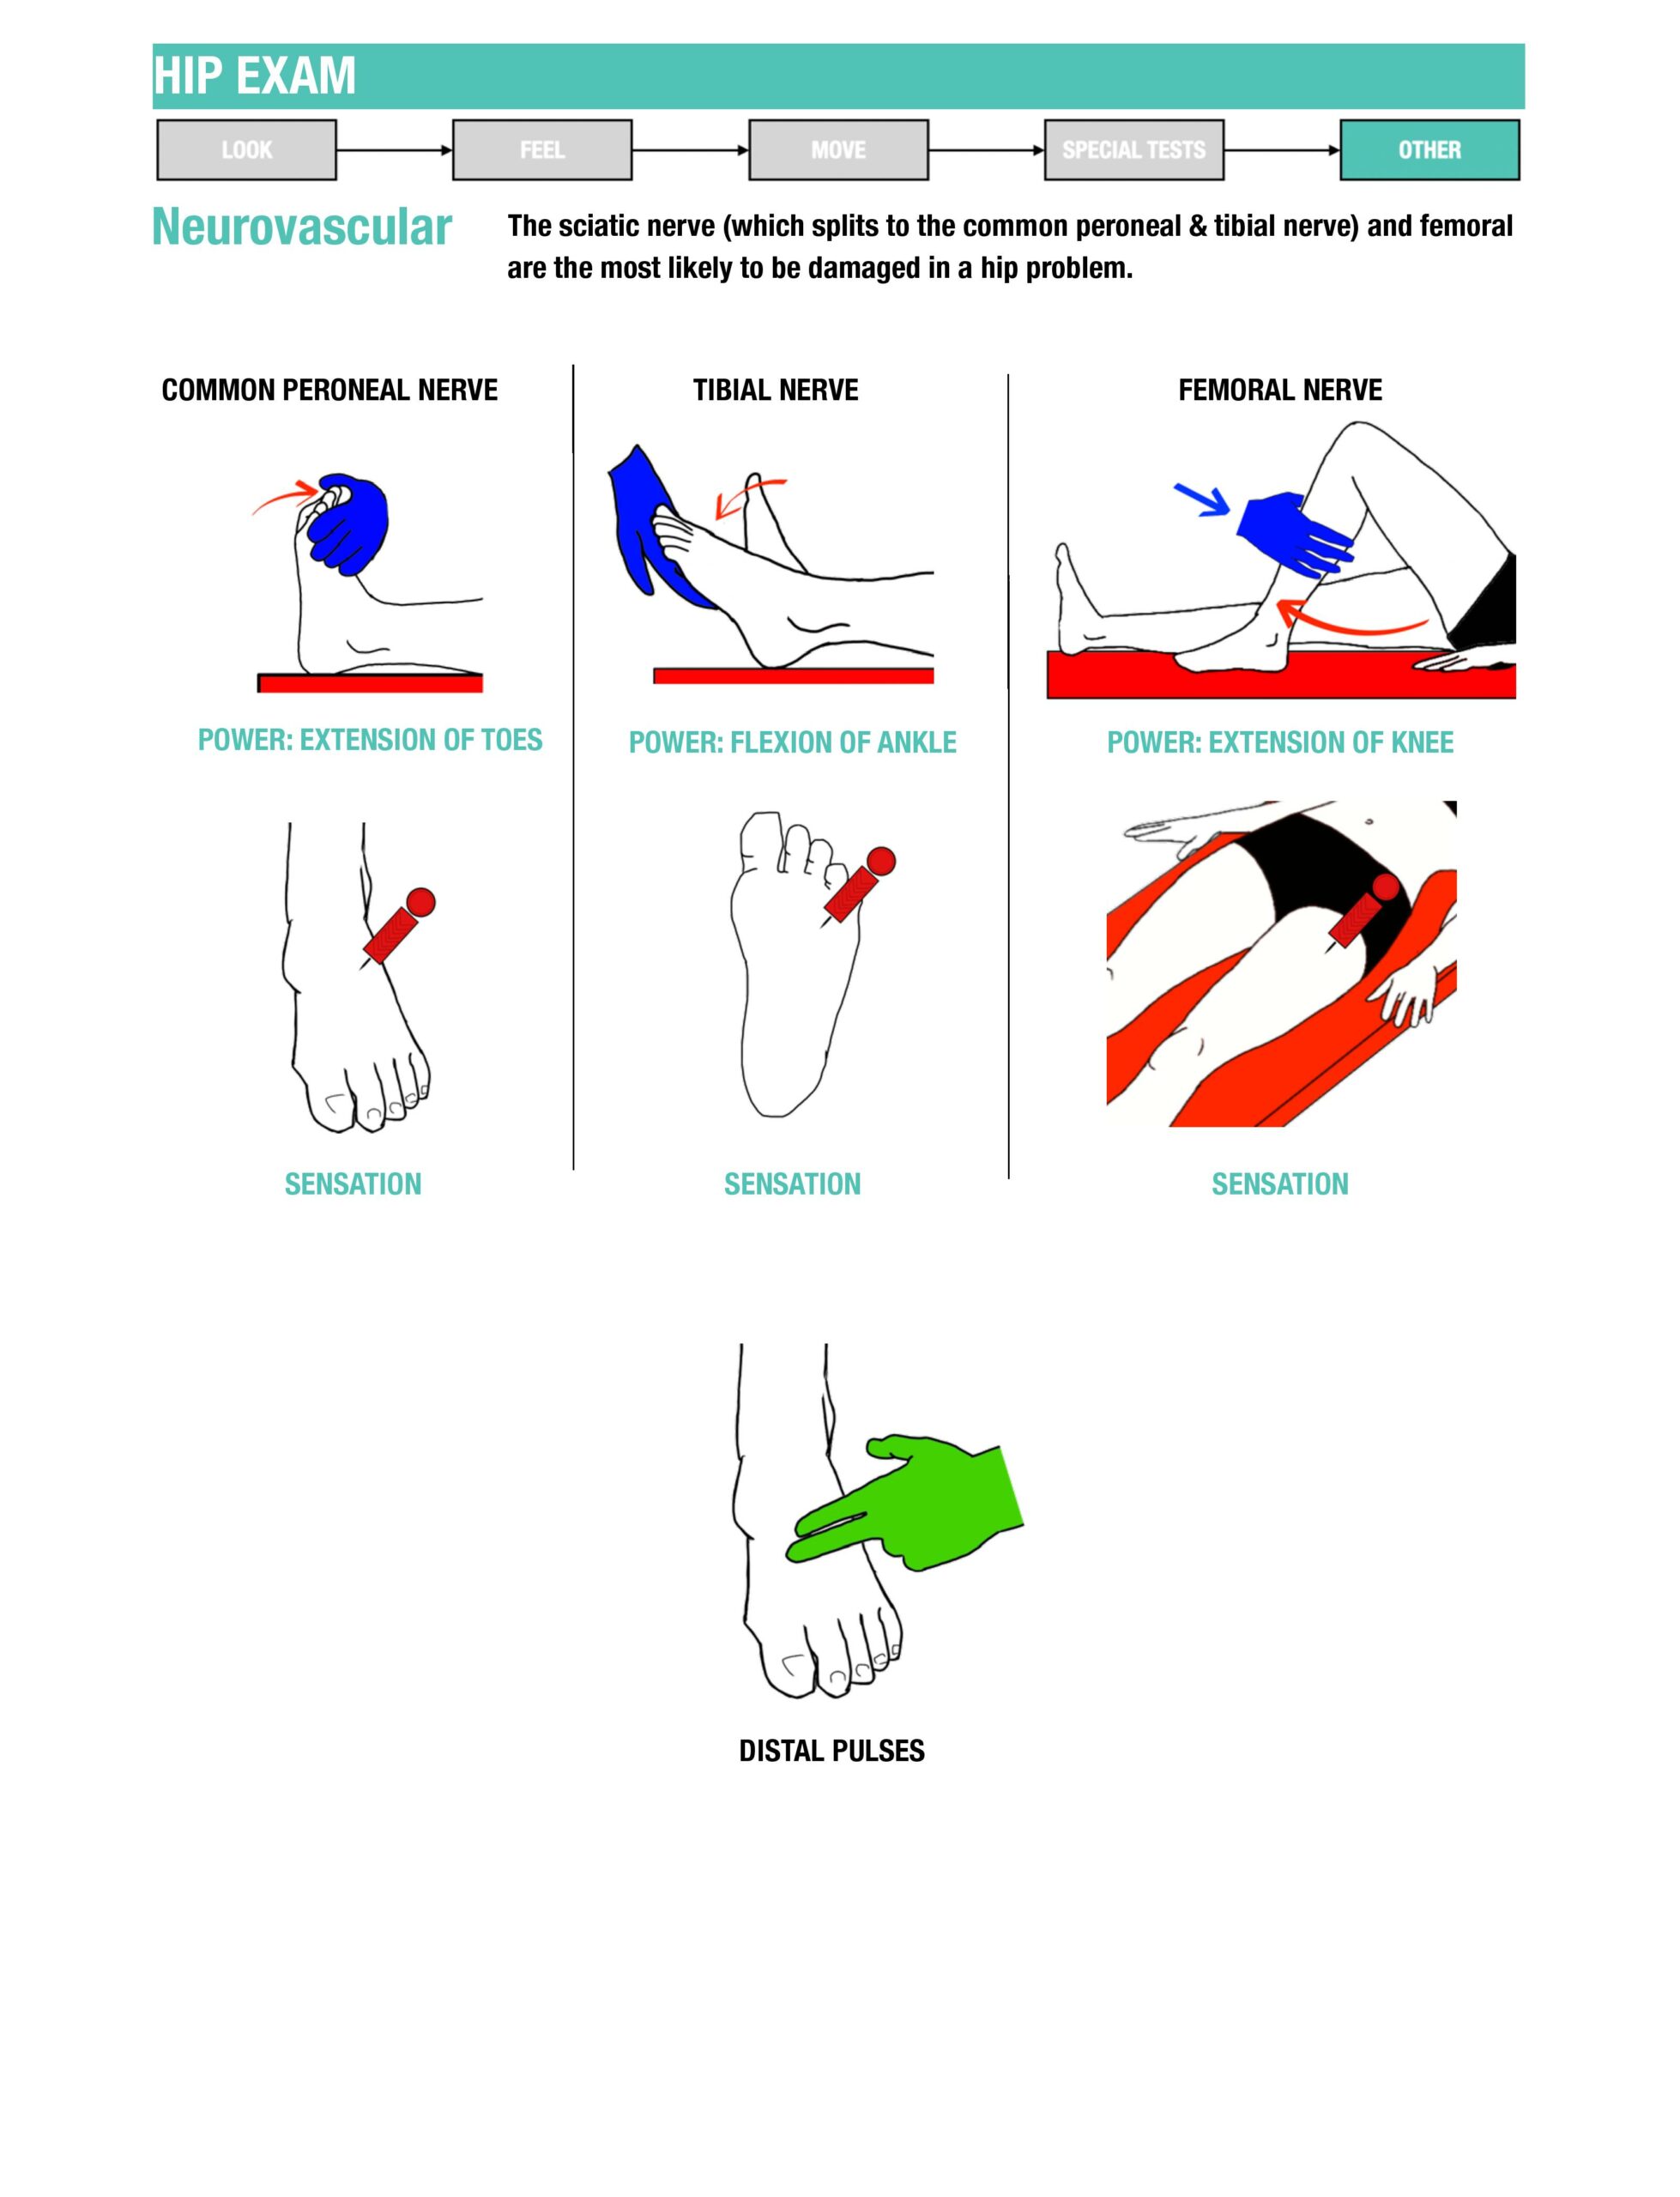
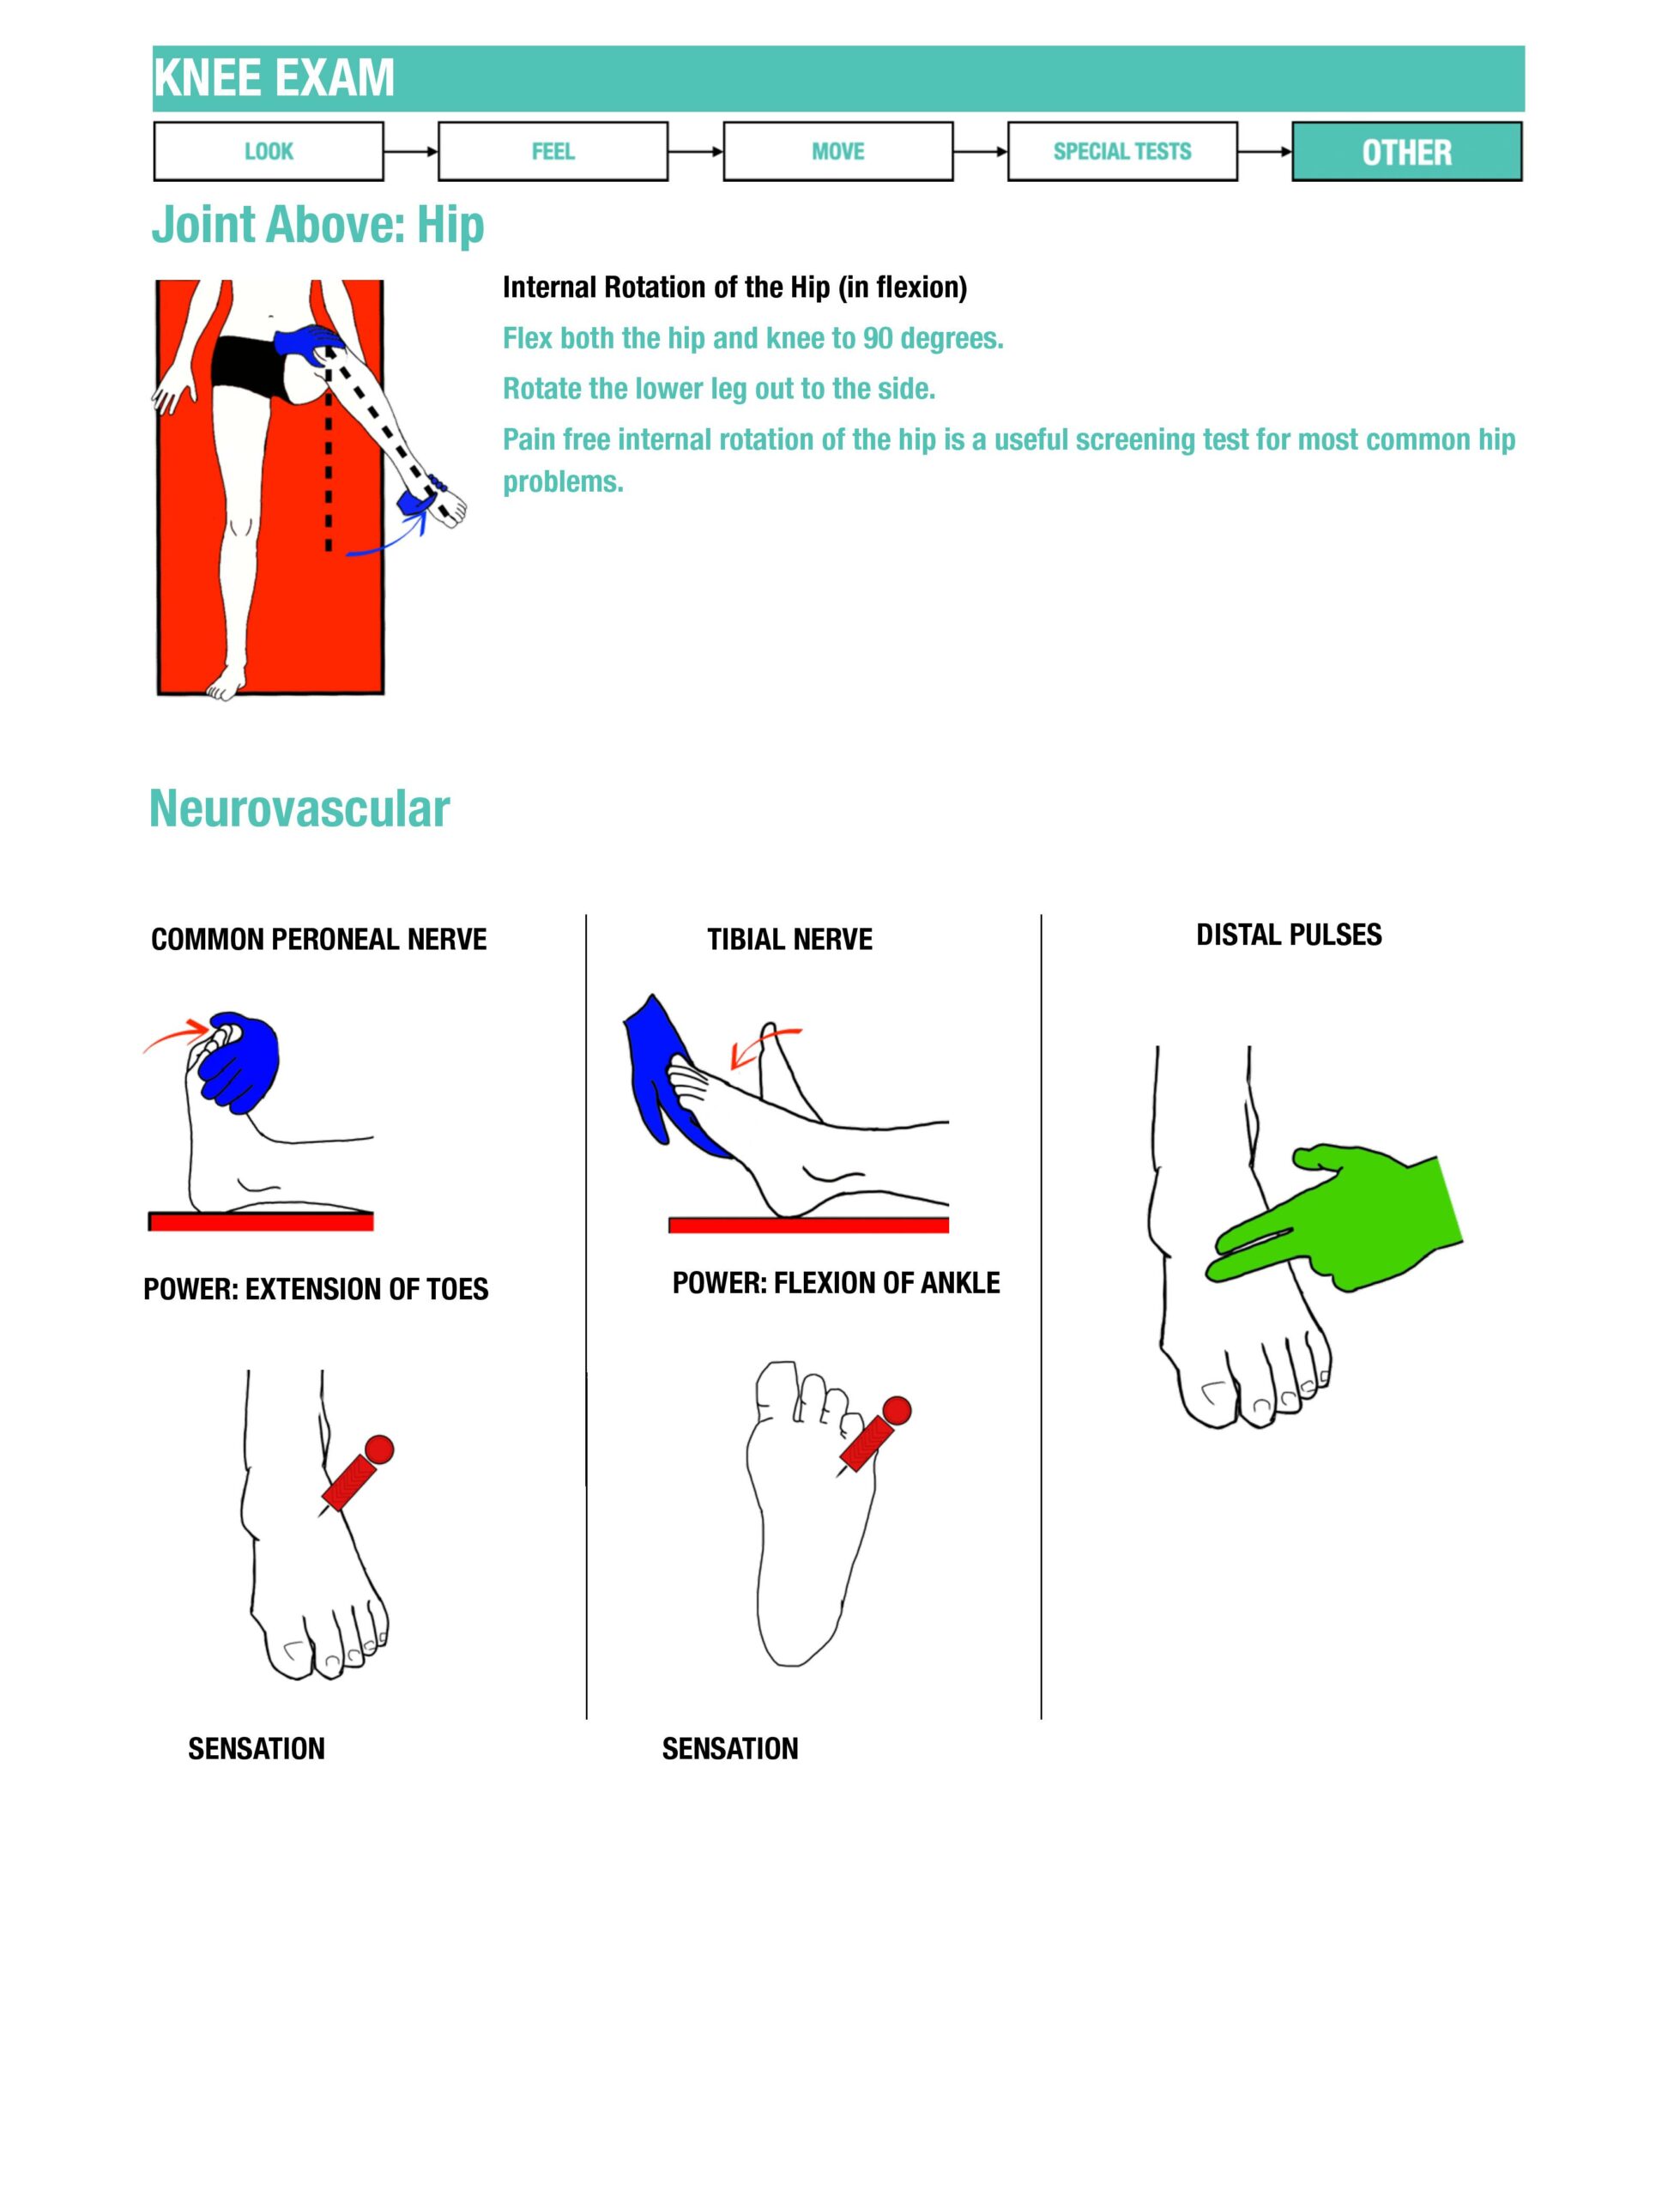
Reading the original illustration. The illustration uses the broad label “ankle flexion”. Specify dorsiflexion or plantarflexion and the nerve being tested. Pain during a ligament test does not by itself prove a tear; interpret laxity, endpoint, history and the rest of the examination.
Original knee infographics · Nick Smith
Original teaching artwork, retained with its credit. Use the written sequence on this page for the corrected technique and safety qualifications.
09 / CHAPTER 7
Ankle and foot
Ask about the injury mechanism, exact location of pain, ability to bear weight and previous mobility. Inspect footwear where useful and examine the sole and between the toes. In diabetes, neuropathy can alter the presentation, so skin integrity, perfusion and sensation are particularly important.
Examine the whole region, including the Achilles tendon and midfoot.
Ankle and foot: sequence and example phrases
Introduction
Use the introduction, consent and preparation described above, explaining the particular area and movements involved. Protect privacy and adapt the examination to pain, mobility and the clinical question.
Brief history
“Can you briefly tell me what the problem is?”
“What is your occupation?”
“Have you been involved in any trauma?”
“Have you been unwell recently?”
Gait
“If it is comfortable and safe, please walk a short distance, turn and walk back.”
Observe symmetry, stance, stride, an antalgic pattern, pelvic drop and foot drop. Use the person’s usual walking aid and provide support. Do not ask someone with suspected fracture or an acutely painful injury to walk for the sake of completing a checklist.
Inspection
“Please can you stand up. I am inspecting the feet and ankles from the front; back, and sides. I am looking for…”
- scars
- skin changes
- wasting
- Deformity:
- toes: claw toes (MTP hyperextension with PIP/DIP flexion); hammer toe (predominantly PIP flexion)
- arches: high arch; flat foot
"Please can you sit down on the chair so I can examine…”
- sole of foot – plantar bruising (Lisfranc)
- between toes
Palpation
"I am feeling the ankle and feet for…”
- warmth – use the back of your hand to compare to the other side and rest of the leg
- swelling
- bogginess
- crepitus in movement
- pain
Bones
- foot
- ankle
- fibula head
Ligaments
- anterior talofibular
- deltoid
- syndesmotic squeeze (high ankle sprain)
Move
Compare active, gentle passive and resisted dorsiflexion (foot upwards), plantarflexion (foot downwards), inversion and eversion, where safe. Support the heel and assess toe movements as indicated. Stop when pain or suspected injury limits the examination.
Special tests
Simmonds–Thompson calf-squeeze test: with the patient prone and feet free over the edge of the couch, squeeze the calf and compare sides. Absent or reduced plantarflexion supports Achilles rupture. Preserved voluntary plantarflexion does not exclude rupture.
CUH — Achilles rupture · Thompson test — clinical report
Morton’s neuroma: compress the forefoot while applying gentle pressure to the relevant plantar web space. Reproduction of the usual web-space pain/paraesthesia into adjacent toes, sometimes with a click (Mulder’s sign), supports the diagnosis.
After trauma, assess the malleoli, navicular, base of the fifth metatarsal, midfoot and proximal fibula as appropriate. Plantar bruising raises concern for Lisfranc injury. The Ottawa rules address the need for radiographs in their intended population; they do not exclude every important ligament, tendon or midfoot injury.
NICE NG38 — Ottawa ankle and foot rules
Close
Help the patient return to a comfortable position, offer privacy for dressing and thank them. Present the findings and your proposed next steps to the responsible clinician, then explain the agreed plan to the patient.
Further reading
Interpret and present your findings
Describe the bones or soft tissues involved, movement, tendon function and neurovascular findings. Explain why radiography or another assessment is indicated rather than simply naming the Ottawa rules. These rules address particular fractures in their intended population; they do not exclude an Achilles rupture or a significant midfoot ligament injury.
10 / CHAPTER 7
GALS screening examination
GALS stands for gait, arms, legs and spine. It is a brief screen to identify a region that needs closer examination, rather than a substitute for a regional assessment in someone with a specific complaint. Explain the movements, ask about pain and adapt the sequence to comfort and mobility.
Use a brief screen to identify which region needs closer examination.
GALS screening examination: sequence and example phrases
Introduction
Use the introduction, consent and preparation described above, explaining the particular area and movements involved. Protect privacy and adapt the examination to pain, mobility and the clinical question.
Three questions
- Do you have pain, stiffness or swelling in your joints, muscles or back?
- Can you dress yourself completely without difficulty?
- Can you walk up and down stairs without difficulty?
GALS examination
GALS = Gait, Arms, Legs and Spine. This is a screen; an abnormal finding prompts a focused regional examination.
Gait
Observe walking, turning, posture and limb alignment, with support if needed.
Arms
Ask for hands behind the head and elbows back; then arms forward, palms down and up. Inspect hands, make a fist, assess grip and finger–thumb pinch, and gently squeeze the MCP joints.
Legs
With the patient supine, inspect alignment, assess knee flexion/extension and hip internal rotation, check the knees for swelling, and inspect the feet with a gentle MTP squeeze.
Spine
Inspect spinal alignment and curves. Assess lateral neck flexion and forward lumbar flexion when safe.
Arthritis UK — full GALS demonstration
Close
Help the patient return to a comfortable position, offer privacy for dressing and thank them. Present the findings and your proposed next steps to the responsible clinician, then explain the agreed plan to the patient.
Further reading
Interpret and present your findings
Record abnormalities in appearance, movement and function by region. A positive screen should lead to a focused history and examination. In children, use age-appropriate communication and the paediatric approach taught by your school; development and normal variation affect interpretation. A screen does not establish a diagnosis.