
St Emlyn’s Lesson Plans
Interpreting chest X-rays
Review five chest X-rays and discuss how the findings change the next clinical decision.
Early-career Emergency Medicine · 45-minute session
For learners
Before: Allow about 18 minutes in total.
When we meet: We will describe the films, compare possible explanations and discuss when the findings need urgent action or further review.
For facilitators
Send: the learner preparation link before teaching.
Bring: Good screen or printed films, this numbered image set with facilitator notes, and current BTS/NICE links. Check that displayed images contain no new patient identifiers.
Before the session
If you are attending this session, complete the core preparation below before you come. Allow about 18 minutes in total.
Core preparation
NICE NG250: Pneumonia · About 5 minutes
Read NG250's follow-up chest X-ray recommendations, including why follow-up is selective.
https://www.nice.org.uk/guidance/ng250/chapter/recommendations
BTS Guideline for Pleural Disease · About 10 minutes
Read the BTS spontaneous-pneumothorax pathway. Focus on how symptoms, physiology and underlying disease affect the options.
https://www.brit-thoracic.org.uk/clinical-resources/guidelines/pleural-disease/
Think about (allow 3 minutes): Which part of a chest X-ray are you most likely to overlook once you have spotted an abnormality?
Picture the scene
A breathless older patient has a portable chest X-ray. The room is noisy, the screen is poor and the history offers several possible explanations. Where would you start?
By the end of the session
- Check image identity, projection and quality before applying a consistent review sequence.
- Separate observed signs, interpretation and clinical action in a concise presentation.
- Recognise important limitations and seek comparison or radiology advice when the image and clinical picture disagree.
After the session
- Choose one recent image you interpreted and compare your documented description with the formal report; identify one specific review habit to change.
Facilitator guide
Send learners the preparation link several days before teaching. Allow about 18 minutes in total.
Before learners arrive
- Open and enlarge the five numbered images above; use images 1, then 3 and 5, then 4 and 2. Read the matching facilitator notes in advance. A radiology colleague can help resolve uncertainty.
- Test the screen, lighting and image enlargement. If images cannot be provided, use the text cases to discuss clinical decisions; image-recognition practice will need to wait until suitable films are available.
Equipment: Good screen or printed films, this numbered image set with facilitator notes, and current BTS/NICE links. Check that displayed images contain no new patient identifiers.
Setup: Pairs first write three observations independently. Take descriptions from several learners before inviting a diagnosis; this makes quieter participants’ observations available before anchoring takes hold.
If the preparation has not been completed
Use the five-minute opening for shared preparation. Ask each learner to sketch a chest outline and mark their usual review sequence, then compare with a partner and include the apices, behind the heart, diaphragms, soft tissues and devices. Use the NICE and BTS pathways beside the later cases. In the 30-minute plan, use five minutes here and reduce the opacity case from nine to eight minutes.
Suggested session plan
- 0–5 min — Human factors and a review sequence. Ask how the noise and poor screen could affect the review, and what the group could change.
- 5–17 min — Opacity and follow-up. Separate description, interpretation and action on the board.
- 17–32 min — Pneumothorax versus bullae. Spend time on uncertainty and consequences of the proposed intervention.
- 32–40 min — Review areas and second findings. Use the final cases to practise completing the search.
- 40–45 min — Close. Each learner gives a concise finding-to-action handover.
Start the discussion
Read the opening scenario together. Give everyone a moment to think, then ask what concerns them and what they need to know next.
Cases and discussion
Use these cases, or invite an anonymised case from the group that addresses the same questions.
Teaching image set
Useful during the session: teaching images
Fever and a retrocardiac opacity
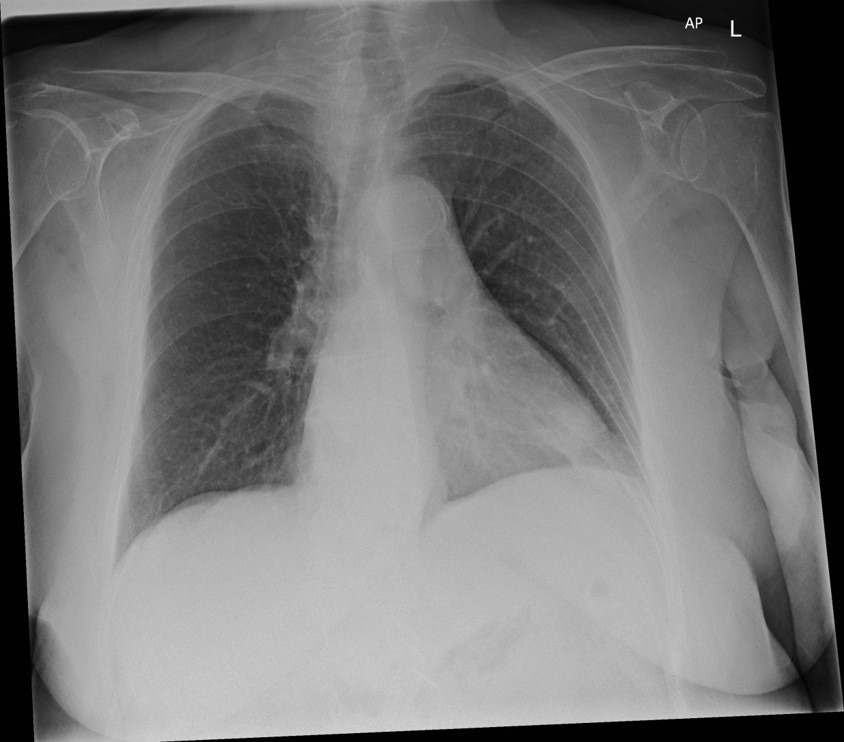
A 65-year-old has cough, fever and breathlessness. Review the portable AP chest X-ray in image 1 before opening the discussion notes.
Add this information as the discussion develops:
- Before naming a diagnosis, ask one learner to state projection, quality and visible findings.
- Ask a second learner to explain how the clinical information alters the interpretation.
- At discharge planning, a colleague suggests every pneumonia needs a repeat film in six weeks.
Ask the group:
- What can AP projection do to apparent heart size?
- What other possibilities should remain if the patient fails to improve?
- Who needs follow-up imaging, and who will own the result?
Discussion notes
Points to draw out:
- Describe the location and pattern before calling pneumonia. Projection and quality constrain interpretation; compare earlier imaging where available.
- NICE NG250 recommends selective rather than routine follow-up imaging after inpatient pneumonia, considering cancer risk, persistent/worsening symptoms and unexplained weight loss, with a shared decision. Discuss the indication and agree who will arrange and review the follow-up.
- A useful report ends with an action and responsibility, not just a disease label.
Common misconceptions:
- Stopping the search after finding one opacity.
- Giving a follow-up instruction without a responsible service.
For a more experienced group: Change the history to persistent haemoptysis and weight loss. Ask how urgency and follow-up differ.
The lucent hemithorax
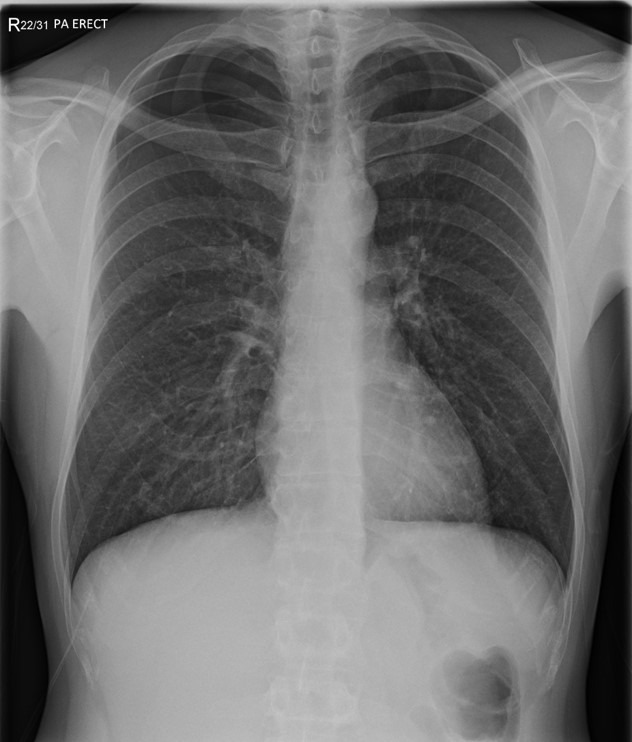
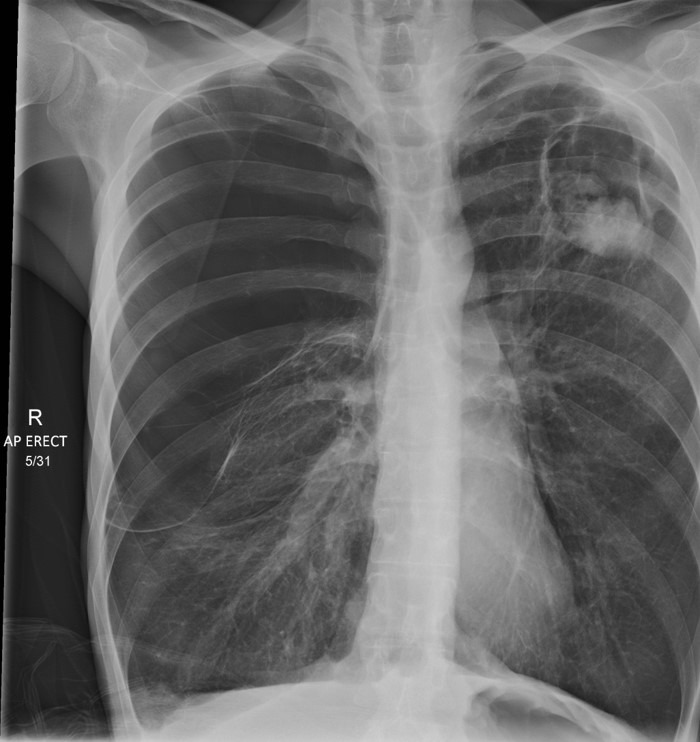
Compare images 3 and 5. Check the side markers and describe the findings before considering the history.
Add this information as the discussion develops:
- Ask pairs to describe the feature they believe is decisive, and one uncertainty.
- Reveal acute right pleuritic pain in the image 3 case. For image 5, reveal cough and fever with a history of heavy inhaled cannabis use; do not let that history explain away a second abnormality.
- A colleague proposes a drain because one lucency appears large.
Ask the group:
- Where is the pleural line, and can you identify lung markings beyond it?
- What could make an intervention on this image harmful?
- Which clinical findings determine immediate urgency?
- When should expert review or further imaging be sought?
Discussion notes
Points to draw out:
- Distinguish a descriptive sign from a management decision. When stable, uncertainty between bullae and pneumothorax warrants appropriate expert review rather than a speculative pleural procedure.
- For confirmed spontaneous pneumothorax, use the current BTS pathway and clinical context, including symptoms, underlying disease and available follow-up. An apical measurement alone is not the whole treatment algorithm.
- An unstable patient requires immediate clinical assessment and resuscitation; do not use this reading exercise to delay emergency treatment of a strongly suspected tension pneumothorax.
- Image 3 shows a right pneumothorax. Image 5 shows severe right-sided bullous change, together with a left upper-zone cavity containing a rounded opacity. The latter finding requires radiology and clinical assessment: an intracavitary fungal ball and other causes of cavitation are possibilities, but neither tuberculosis nor fungal infection is established by this film alone. Consider appropriate infection precautions when clinically indicated.
Common misconceptions:
- Equating every dark area with pleural air.
- Applying a remembered size threshold without examining the patient.
For a more experienced group: Ask a senior learner to explain the trade-off between further imaging and treatment delay.
Finish the search
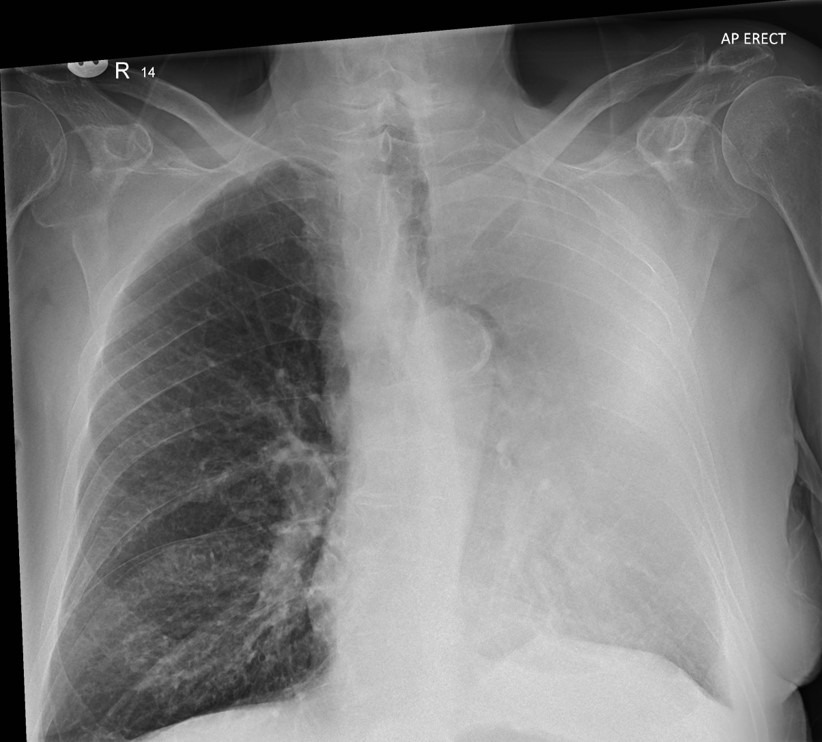
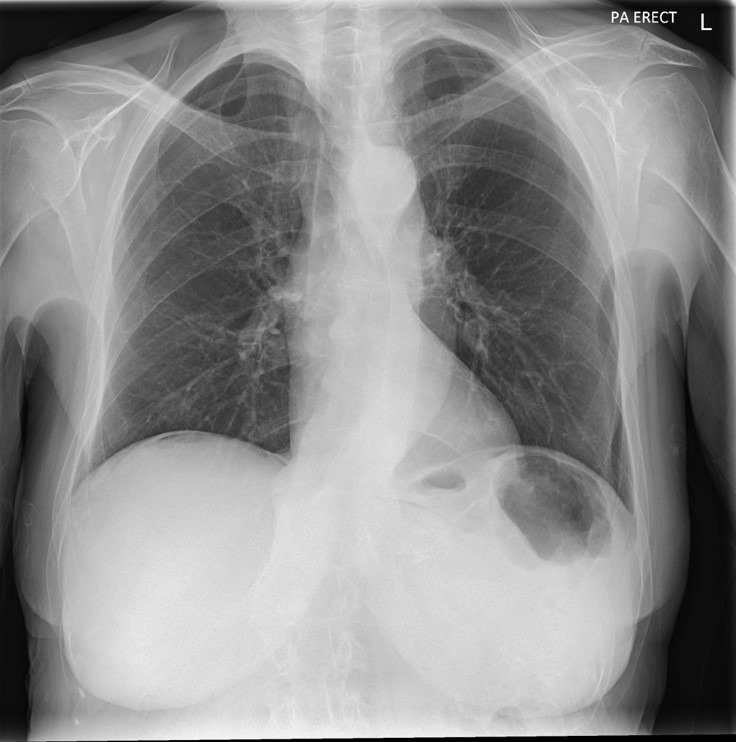
Image 4 is from a patient with severe abdominal pain and fever. Image 2 is from a patient with breathlessness and haemoptysis. Review each film before opening the discussion notes.
Add this information as the discussion develops:
- Use the last two minutes of image review to check areas outside the lungs.
Ask the group:
- Which finding requires urgent action beyond the respiratory team?
- What does suspected collapse suggest, and what does it not prove?
Discussion notes
Points to draw out:
- Image 4 shows subdiaphragmatic free gas. With acute abdominal pain, this requires urgent senior/surgical assessment for a perforated viscus, while considering the full clinical context.
- Image 2 shows left upper-lobe collapse with veil-like opacity, volume loss and the crescent of lucency beside the aortic arch shown on the film. Investigate the cause, including an obstructing lesion. The film does not itself diagnose malignancy or pulmonary embolism; assess those possibilities separately.
Common misconceptions:
- Inferring pulmonary embolism from lobar collapse alone.
For a more experienced group: Write a radiology request that explains the clinical question and the finding you want reviewed.
Important clinical points
- Keep image rights and creator credit visible; do not copy third-party radiology banks.
- Follow current local emergency and pleural pathways when physiology demands treatment.
Closing the session
Use these questions to check what the group will take away. Go back over any clinical points that remain unclear.
- Which areas do you most often skip?
- What makes a finding uncertain?
- Who owns an unexpected later report?
Key teaching points:
- Use a consistent sequence and finish reviewing the image after finding an abnormality.
- Check image quality and projection, and interpret the findings with the clinical history.
- State what needs to happen next and who will arrange it.
Before leaving, ask each person to choose one action from After the session and say when they will try it. They complete that follow-up in practice, with supervision where needed.
Adapting the discussion
Uncertainty and local practice
Plain films can be non-diagnostic. Practise describing uncertainty and seeking review when the findings and clinical picture do not fit.
If the discussion drifts
What can you actually see, what are you inferring, and what will you do next?
For a more experienced group
Introduce disagreement between the bedside interpretation and later formal report; work through a safe discrepancy and patient-contact process.
A 30-minute version
30-minute option: sequence 4, opacity 9, lucency comparison 12, closing 5. Omit the final two films.
Evidence and guidance
- NICE NG250: Pneumonia — 2025 recommendations include selective follow-up chest radiography after inpatient pneumonia.https://www.nice.org.uk/guidance/ng250/chapter/recommendations
- BTS Guideline for Pleural Disease — 2023 guideline and clinical pathways; symptoms and context matter in pneumothorax decisions.https://www.brit-thoracic.org.uk/clinical-resources/guidelines/pleural-disease/
Suggested curriculum links
RCEM 2021 curriculum (2025 update): SLO1 Adult acute assessment
Learners connect imaging interpretation with diagnosis and management decisions.
Check these links against the learner’s stage and programme. Attendance at a teaching session does not establish competence.
Contributors: Dr Lisa Shannon, Consultant Radiologist, Barnsley Hospital (@docshannon).
Clinical review: awaiting clinician sign-off
The references have been checked during editing. A named clinician has not yet signed off the revised lesson collection. Use current local guidance when preparing to teach; editorial updates do not constitute clinical approval.
First published 2020-08-28 · Simon Carley.